A Tutorial: Lighting for Product and Still Life Photography- metallic objects and more. Lesson#1
Oct 1, 2017 20:15:21 #

Product and still life photography. Tutorial #1 LIGHTING
There are many lighting methods that can be applied to product and still life photography. There is no singular or cure-all formula, however, there are a number of basic methods that can be used for a wide range of subjects and can serve as starting points for more specific or complex lighting scenarios.
The study of photographic lighting principles can involve a great deal of physics, mathematics and geometry. There are many formulas, equations and diagrams that can be studied in a classroom environment and presented in academic conceptualizations. In my own learning and teaching experience, I prefer, and find more effective, a hands on and more demonstrative visual plan of attack. Theoretically understanding how light behaves in terms of reflectance, refraction, transmittance and diffusion is a good starting point, however, visually observing the play of light on various surfaces is a more powerful cognitive experience. One of the most important attributes a photographer can posses is the ability to SEE and and apply light. This is a skill well worth ascertaining and a talent deserving of development.
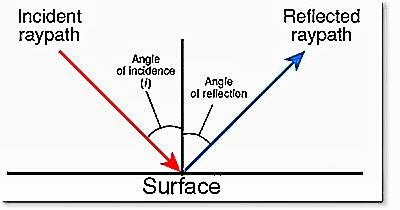
One of the most important concepts to study and visually grasp is that of the ANGLE OF INCIDENCE theory which states that the angle of incidence is equal to the angle of reflection. In other words, the angle at which a beam of light leaved or reflects away from the subject is the same as the angle at which it strikes the subject- as illustrated in the accompanying diagrams. Fully mastering this concept is the key to so many techniques and solutions in photography such as the authentic rendition of both polished, dull and textured surfaces, capturing fine detail in relief and engraving, eliminating troublesome and distracting glare and hot spots and loss of highlight detail on highly reflective surfaces. Imparting dimensionality in your photographic imagery is yet another function of angle of incidence control. This theory is also fundamental to the correct and savvy application of all manner of indirect or bounce lighting, light modification and finite reflector, umbrella and soft box usage.
It all boils down to controlling where every beam of light, from whatever source you are utilizing, as to where it is going, what is it doing and how it's gonna land on your sensor or film. Once you understand what the lighting is doing, you will know exactly where to place your camera, in the optimum possible relationship to the subject in order to achieve the best rendition.
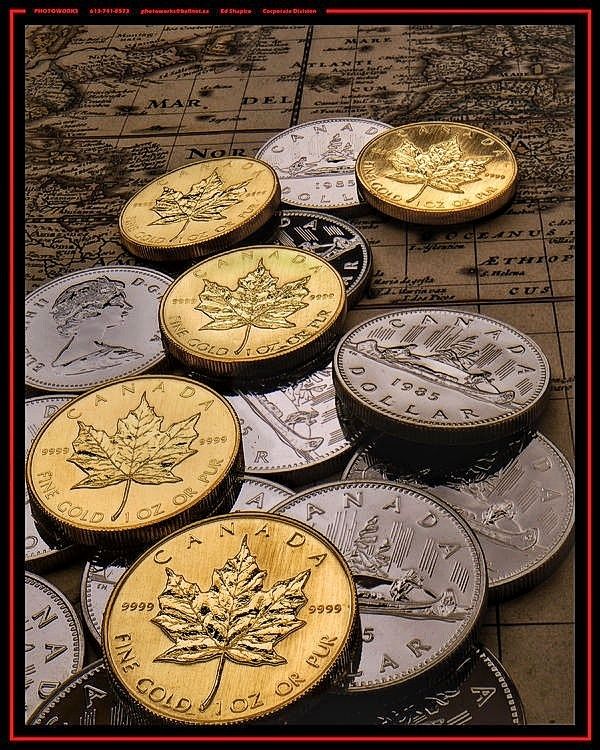
In keeping with the idea of a visually demonstrative experience, I would like y'all to engage in my "coin trick" fast learning process. Check out the shot of the gold and silver coins I have posted. Spread out some pocket change on a table top on a suitable background and setup a simple overhead lighting. A medium or larger soft box on a boom stand or somehow suspended over the table is ideal. If you don't have that type of gear, a simple overhead flood light in some kind of parabolic reflector with a sheet of diffusion material (like a cheap frosted kinda shower curtain fabric) will do. Placing a scrim over a beauty light is another viable improvisation. Make sure that the light source is appreciably larger that the subject area and it is close enough to provide a soft effect. If it is too far away the softness will diminish. Place and tilt the light or move the table forward so that the light source is overhead and slightly behind the subject area.
Here's the important methods and observations: Place the camera where it should be to emulate the shot I have posted. Now- carefully examine my shot- you will notice that most of the coins appear naturally shiny, as they would in person. One of the coins, however, looks BLACK with its engraving in highlight. The normal looking coins are examples of LIGHT FILED photography and the seemingly black one is in DARK FIELD. Oh- all the coins are the same metallic reflective properties except for their gold or silver content. If you the proceed to tilt the coins on the table slightly, by elevating one side of some of them, you will see the variations of light and dark fields take place. The camera is an an oblique angle to the reflective surfaces so there is no direct flashback or unwanted glare although the subjects are somewhat highly polished. Even a mirror or a chrome plated object can be successfully photographed in this method.
Some conclusions: When you tilt the coins in various incremental degrees you are altering each of their angles of reflectance while the angle of incidence remains constant. Since the camera is at an angle of reflection that does not entertain direct glare, you are able to photograph a highly reflective object without extreme tenting. If you allow the edge of the light beam to skim across the surface of the coins (that's called feathering) you will achieve excellent detail in their engraved or relief details.
In actual practice, you can use white or silver reflector cards to add fill light to better control your contrast/lighting ratio. When you feather the light upward, as I have suggested, enough light will be projected forward toward the reflectors to provide sufficient fill illumination. Besides metallic objects, this basic lighting can be used for a wide variety of table top and still life work.
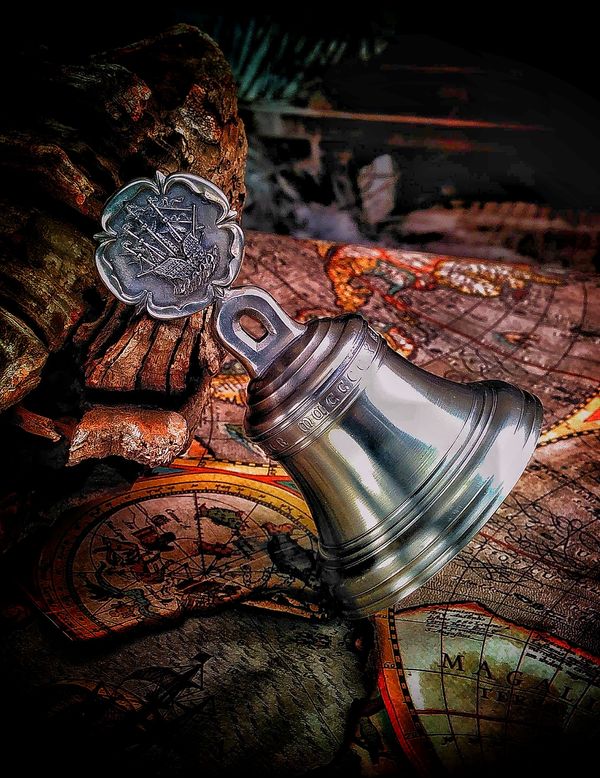
The shot of the pewter bell was made with the exact same lighting setup. It is a combination of light and dark field photography. The overhead light and reflectors provide a light field at each side of the bell. A dark field was provided by subtracting light by means of a gobo (short term for go-between) that is, a black card to shade the front of the bell. Graphite powder was rubbed into the engraving at the top of the bell to enhance the detail.
I could draw diagrams and quote geometric angles 'till the cows come home but if you do the coin trick and observe and grasp the play of light on the subjects you will quickly comprehend the angle of incidence theory all the better.
In the next tutorial, I will show y'all how this theory will give you total control over your light modifiers and you will know which ones to select for the effect you wish to achieve. You will also know which ones are advertising hype and which ones really work! Did you know that so many portrait and commercial photographer use their umbrellas the "wrong way"! Stay tuned!
I'm gonna lock this one up for the time being- until I figure out how to store tutorials so they can be easily accessed by new folks coming on here. Please feel free to comment, ask questions or yell at me in a thread that I will set up for discussion of this topic.
Is this fun, or what?
There are many lighting methods that can be applied to product and still life photography. There is no singular or cure-all formula, however, there are a number of basic methods that can be used for a wide range of subjects and can serve as starting points for more specific or complex lighting scenarios.
The study of photographic lighting principles can involve a great deal of physics, mathematics and geometry. There are many formulas, equations and diagrams that can be studied in a classroom environment and presented in academic conceptualizations. In my own learning and teaching experience, I prefer, and find more effective, a hands on and more demonstrative visual plan of attack. Theoretically understanding how light behaves in terms of reflectance, refraction, transmittance and diffusion is a good starting point, however, visually observing the play of light on various surfaces is a more powerful cognitive experience. One of the most important attributes a photographer can posses is the ability to SEE and and apply light. This is a skill well worth ascertaining and a talent deserving of development.
One of the most important concepts to study and visually grasp is that of the ANGLE OF INCIDENCE theory which states that the angle of incidence is equal to the angle of reflection. In other words, the angle at which a beam of light leaved or reflects away from the subject is the same as the angle at which it strikes the subject- as illustrated in the accompanying diagrams. Fully mastering this concept is the key to so many techniques and solutions in photography such as the authentic rendition of both polished, dull and textured surfaces, capturing fine detail in relief and engraving, eliminating troublesome and distracting glare and hot spots and loss of highlight detail on highly reflective surfaces. Imparting dimensionality in your photographic imagery is yet another function of angle of incidence control. This theory is also fundamental to the correct and savvy application of all manner of indirect or bounce lighting, light modification and finite reflector, umbrella and soft box usage.
It all boils down to controlling where every beam of light, from whatever source you are utilizing, as to where it is going, what is it doing and how it's gonna land on your sensor or film. Once you understand what the lighting is doing, you will know exactly where to place your camera, in the optimum possible relationship to the subject in order to achieve the best rendition.
In keeping with the idea of a visually demonstrative experience, I would like y'all to engage in my "coin trick" fast learning process. Check out the shot of the gold and silver coins I have posted. Spread out some pocket change on a table top on a suitable background and setup a simple overhead lighting. A medium or larger soft box on a boom stand or somehow suspended over the table is ideal. If you don't have that type of gear, a simple overhead flood light in some kind of parabolic reflector with a sheet of diffusion material (like a cheap frosted kinda shower curtain fabric) will do. Placing a scrim over a beauty light is another viable improvisation. Make sure that the light source is appreciably larger that the subject area and it is close enough to provide a soft effect. If it is too far away the softness will diminish. Place and tilt the light or move the table forward so that the light source is overhead and slightly behind the subject area.
Here's the important methods and observations: Place the camera where it should be to emulate the shot I have posted. Now- carefully examine my shot- you will notice that most of the coins appear naturally shiny, as they would in person. One of the coins, however, looks BLACK with its engraving in highlight. The normal looking coins are examples of LIGHT FILED photography and the seemingly black one is in DARK FIELD. Oh- all the coins are the same metallic reflective properties except for their gold or silver content. If you the proceed to tilt the coins on the table slightly, by elevating one side of some of them, you will see the variations of light and dark fields take place. The camera is an an oblique angle to the reflective surfaces so there is no direct flashback or unwanted glare although the subjects are somewhat highly polished. Even a mirror or a chrome plated object can be successfully photographed in this method.
Some conclusions: When you tilt the coins in various incremental degrees you are altering each of their angles of reflectance while the angle of incidence remains constant. Since the camera is at an angle of reflection that does not entertain direct glare, you are able to photograph a highly reflective object without extreme tenting. If you allow the edge of the light beam to skim across the surface of the coins (that's called feathering) you will achieve excellent detail in their engraved or relief details.
In actual practice, you can use white or silver reflector cards to add fill light to better control your contrast/lighting ratio. When you feather the light upward, as I have suggested, enough light will be projected forward toward the reflectors to provide sufficient fill illumination. Besides metallic objects, this basic lighting can be used for a wide variety of table top and still life work.
The shot of the pewter bell was made with the exact same lighting setup. It is a combination of light and dark field photography. The overhead light and reflectors provide a light field at each side of the bell. A dark field was provided by subtracting light by means of a gobo (short term for go-between) that is, a black card to shade the front of the bell. Graphite powder was rubbed into the engraving at the top of the bell to enhance the detail.
I could draw diagrams and quote geometric angles 'till the cows come home but if you do the coin trick and observe and grasp the play of light on the subjects you will quickly comprehend the angle of incidence theory all the better.
In the next tutorial, I will show y'all how this theory will give you total control over your light modifiers and you will know which ones to select for the effect you wish to achieve. You will also know which ones are advertising hype and which ones really work! Did you know that so many portrait and commercial photographer use their umbrellas the "wrong way"! Stay tuned!
I'm gonna lock this one up for the time being- until I figure out how to store tutorials so they can be easily accessed by new folks coming on here. Please feel free to comment, ask questions or yell at me in a thread that I will set up for discussion of this topic.
Is this fun, or what?
May 24, 2021 16:14:03 #

If you want to reply, then register here. Registration is free and your account is created instantly, so you can post right away.