Comparing film to digital - part IV
Mar 15, 2021 08:10:58 #

In the earlier Part I of this series, I mentioned inheriting a 1970s aged Canon AE-1 that prompted me to investigate both film and film lenses & bodies. Finding manual focus FD lenses was easy. They work on Canon's pre-EOS film bodies from 1986 back to the late 1960s and most are "cheap" at $200 or less for anything except the fastest / widest aperture models at a given focal length. I found my program-mode automatic T50 was still fully operational. I learned the Canon F-1 was the Canon professional body of the mid 70s to mid 80s and the Canon T90 was the top model of the more automated and electronic bodies until Canon developed the EOS system in 1987. I also found a lot of discussion and examples of FD lenses mounted to Sony mirrorless bodies via adapters, a configuration resulting in renewed interest and rising prices in the market for manual focus FD lenses.
After finding a few FD lenses and another film body for these lenses, I recognized I was developing a completely parallel system of cameras and lenses. The "investing" may have satisfied a case of GAS, but from a shooting and usage stand-point, I couldn't lug around all that equipment, both digital and film. The pairs of example images below show the similarity of results from film and digital using two relatively large and heavy cameras. In situations like the Arches National Park, the shooting decision prior to hiking in 100F temps was a question of one or the other, not both, as the bodies could not share lenses.
Arches National Park
Moab, Utah
September 2015
Body - Canon F-1 New
Lens - FD 35mm f/2
Film - Kodak Ektar 100
Arches NP Sept 2015 07 by dpsager, on Flickr

Body - Canon EOS 5DIII
Lens - EF 24mm f/1.4 II USM
Arches NP Sept 2015 21

When considering the pre-EOS professional level Canon models, both the F-1 and T90 bodies let you shoot in Aperture Priority mode, although the F-1 needs a special view-finder. From online discussions, you can find recommendations on adjustments when shooting various film types. For example, the Kodak Ektar shown above is recommended for the reds and greens of the desert southwest. Also, underexposing slightly by adjusting the ISO or using exposure compensation helps to saturate the colors in broad daylight. Using EC was a concept I understood from digital shooting, but not something I'd ever heard of nor considered in shooting film. Until I had a professional body like the F-1 or the T90, the only way to 'compensate' was to adjust the ISO setting on the camera, say setting it to ISO-200 for an ISO-400 rated film.
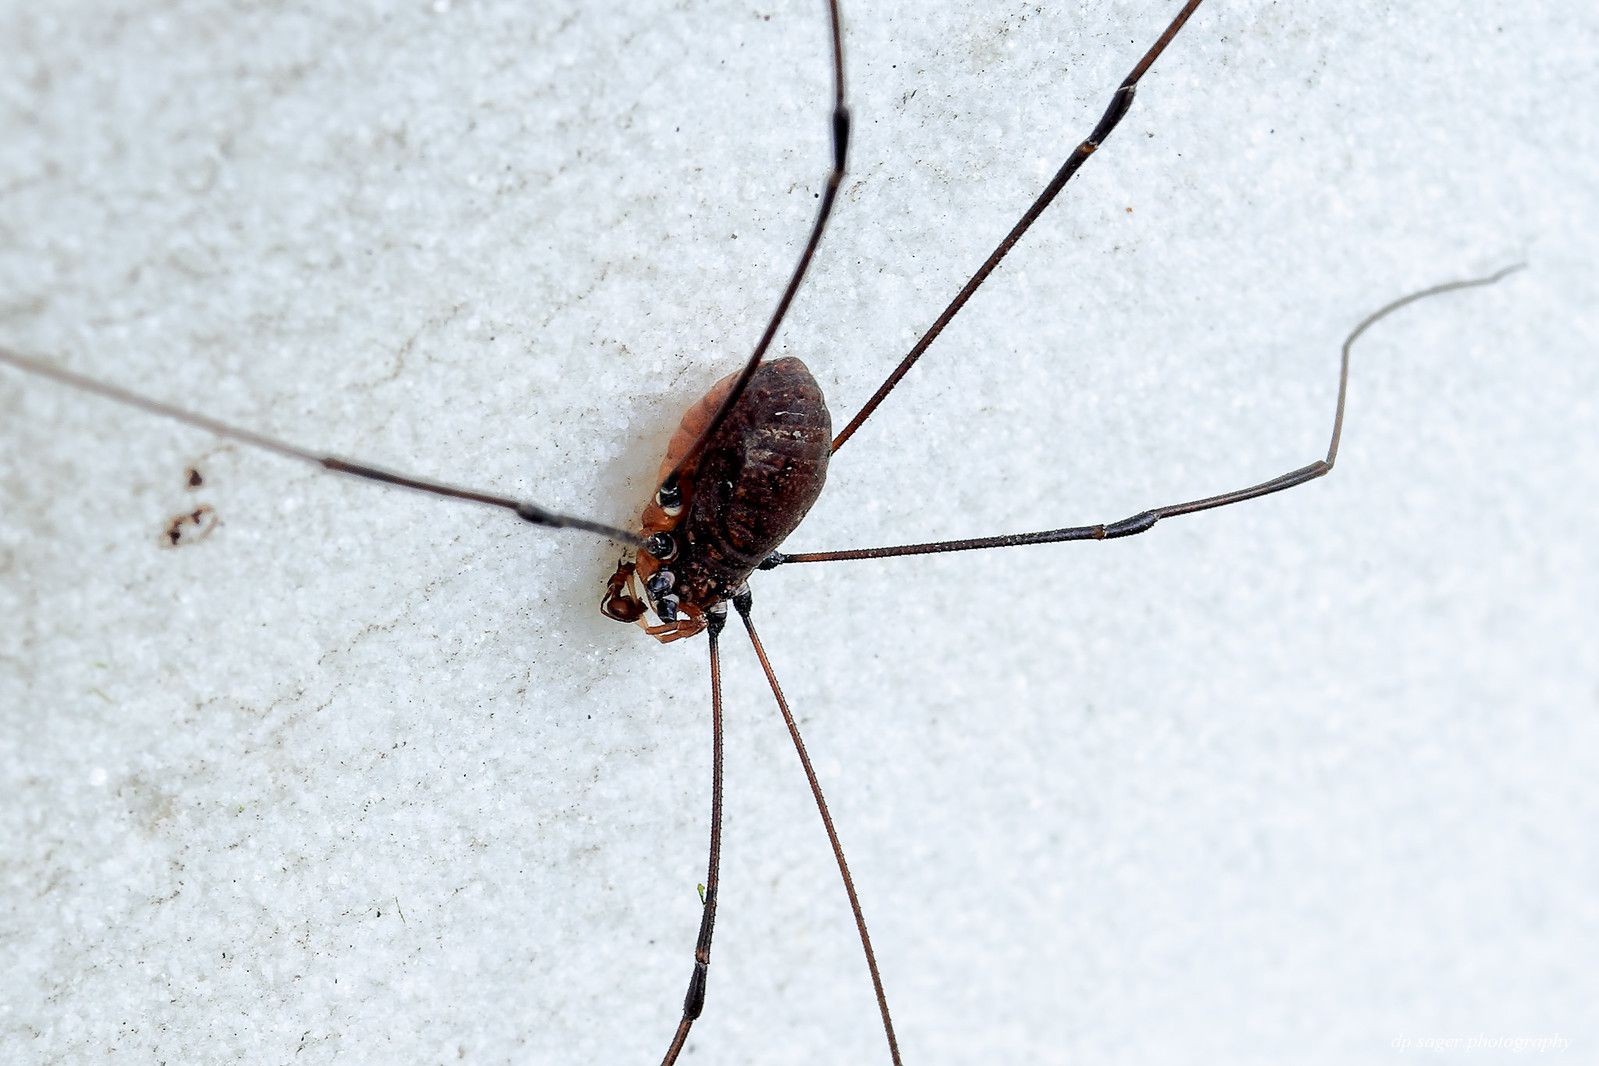
The cost and delayed feedback aspect of film also impacts how much I experiment with technique when shooting with film. The next two images below compare the same daddy long-legs using the same ISO, lens and extension tube. When extended with the EF12 extension tube, the front of the EF 35mm f/1.4L lens was nearly touching the insect. This spider raised a leg, I think in concern to my closeness, and touched the lens. (Technically, this is an Opiliones more closely related to a tick rather than a type of spider / order Araneae.)
When comparing the images later, it seemed that maybe the fine details of the daddy long-legs couldn't be captured on Fuji Superia 400, maybe given this was an expired roll from someone else's freezer. But upon reflection, as I consider these images now while writing, the exposure on the digital image would have been pushed to the right (ETTR - exposed to the right), giving me the 'white' of the white marble and the details in the shadows of the insect's body, while I monitored the histogram on the digital body. Adding 1-stop of exposure (1/40 vs 1/25 on the shutter) may have resulted in the similar details in the film version. I don't have more of this film to confirm this observation. I also only have 2 frames of the film where I took as many versions in digital until I was satisfied I had a good one on the card. The digital version is cropped, but there weren't the details in the film version to bother cropping closer. I find the film version is interesting, but no where near as interesting or as detailed as the digital version.
Zachary Taylor National Cemetery
Louisville, KY
October 2017
Body - Canon EOS 1v
Lens - EF 35mm f/1.4L USM (with unreported Extension Tube EF12)
Film - Fuji Superia 400
Zachary Taylor National Cemetery

Body - Canon EOS 5DIII
Lens - EF 35mm f/1.4L USM (with unreported Extension Tube EF12)
closer - daddy long-legs
Continuing with the comparison and differences between film and digital, the absence of the shooting data is a limitation of film. I've learned to name my folders for the scanned image files to include the film type and camera type. If I stayed with just one prime lens for the entire roll, I usually can remember the lens and focal length and add these details as keywords / EXIF in Lightroom. But, if this data wasn't carefully recorded near the time of shooting and receiving back the scanned images, I have no idea beyond a guess of the lens involved, such as the b&w Roebling Bridge below, where my notes include only the camera and film type. Given the nearly identical perspective of the two images and the reported 36mm focal length of the digital version, I can guess the FD 35 f/2 was involved with the film version.
Roebling Suspension Bridge
Cincinnati, Ohio
July 2014
Body - Canon AE-1
Film - Kodak Tri-X 100
Roebling Suspension Bridge on film

Body - Canon EOS 5DIII
Lens - EF 17-40mm f/4L USM
John A. Roebling Suspension Bridge

My professional background is Information Technology. As a result, I'm somewhat hard-wired toward the idea of having a database of accurate and comparative shooting data, a desire the Lightroom catalog helps to satisfy. Several tools help to adjust the EXIF values of the scanned image files to add the actual shooting date, the camera type, the lens model, ISO setting and other characteristics where the scanned image files can be updated to have nearly the same level of EXIF data as is created natively by digital cameras.
The discussion will conclude in a part V, including a method to obtain shooting data like the examples above from the EOS 1v film camera.
Earlier posts in the series
Comparing film to digital - part I
Comparing film to digital - part II
Comparing film to digital - part III
The images are sized to fill your wide-screen display. Try using <F11> to maximize your browser window for the full effect. If the images overshoot your display, such as a laptop, just click on the image or the URL link and they'll resize to your screen from the host Flickr site. You can click a bit further into the image details on the Flickr page, if desired. EXIF data is available from the host Flickr pages as well. On the Flickr site, use your <L>key for Large and the <F11> for the full-screen.
If the images are not filling your widescreen display due to recent UHH changes, follow this link and update your UHH profile: https://www.uglyhedgehog.com/t-572300-1.html
After finding a few FD lenses and another film body for these lenses, I recognized I was developing a completely parallel system of cameras and lenses. The "investing" may have satisfied a case of GAS, but from a shooting and usage stand-point, I couldn't lug around all that equipment, both digital and film. The pairs of example images below show the similarity of results from film and digital using two relatively large and heavy cameras. In situations like the Arches National Park, the shooting decision prior to hiking in 100F temps was a question of one or the other, not both, as the bodies could not share lenses.
Arches National Park
Moab, Utah
September 2015
Body - Canon F-1 New
Lens - FD 35mm f/2
Film - Kodak Ektar 100
Arches NP Sept 2015 07 by dpsager, on Flickr
Body - Canon EOS 5DIII
Lens - EF 24mm f/1.4 II USM
Arches NP Sept 2015 21
When considering the pre-EOS professional level Canon models, both the F-1 and T90 bodies let you shoot in Aperture Priority mode, although the F-1 needs a special view-finder. From online discussions, you can find recommendations on adjustments when shooting various film types. For example, the Kodak Ektar shown above is recommended for the reds and greens of the desert southwest. Also, underexposing slightly by adjusting the ISO or using exposure compensation helps to saturate the colors in broad daylight. Using EC was a concept I understood from digital shooting, but not something I'd ever heard of nor considered in shooting film. Until I had a professional body like the F-1 or the T90, the only way to 'compensate' was to adjust the ISO setting on the camera, say setting it to ISO-200 for an ISO-400 rated film.
The cost and delayed feedback aspect of film also impacts how much I experiment with technique when shooting with film. The next two images below compare the same daddy long-legs using the same ISO, lens and extension tube. When extended with the EF12 extension tube, the front of the EF 35mm f/1.4L lens was nearly touching the insect. This spider raised a leg, I think in concern to my closeness, and touched the lens. (Technically, this is an Opiliones more closely related to a tick rather than a type of spider / order Araneae.)
When comparing the images later, it seemed that maybe the fine details of the daddy long-legs couldn't be captured on Fuji Superia 400, maybe given this was an expired roll from someone else's freezer. But upon reflection, as I consider these images now while writing, the exposure on the digital image would have been pushed to the right (ETTR - exposed to the right), giving me the 'white' of the white marble and the details in the shadows of the insect's body, while I monitored the histogram on the digital body. Adding 1-stop of exposure (1/40 vs 1/25 on the shutter) may have resulted in the similar details in the film version. I don't have more of this film to confirm this observation. I also only have 2 frames of the film where I took as many versions in digital until I was satisfied I had a good one on the card. The digital version is cropped, but there weren't the details in the film version to bother cropping closer. I find the film version is interesting, but no where near as interesting or as detailed as the digital version.
Zachary Taylor National Cemetery
Louisville, KY
October 2017
Body - Canon EOS 1v
Lens - EF 35mm f/1.4L USM (with unreported Extension Tube EF12)
Film - Fuji Superia 400
Zachary Taylor National Cemetery
Body - Canon EOS 5DIII
Lens - EF 35mm f/1.4L USM (with unreported Extension Tube EF12)
closer - daddy long-legs
Continuing with the comparison and differences between film and digital, the absence of the shooting data is a limitation of film. I've learned to name my folders for the scanned image files to include the film type and camera type. If I stayed with just one prime lens for the entire roll, I usually can remember the lens and focal length and add these details as keywords / EXIF in Lightroom. But, if this data wasn't carefully recorded near the time of shooting and receiving back the scanned images, I have no idea beyond a guess of the lens involved, such as the b&w Roebling Bridge below, where my notes include only the camera and film type. Given the nearly identical perspective of the two images and the reported 36mm focal length of the digital version, I can guess the FD 35 f/2 was involved with the film version.
Roebling Suspension Bridge
Cincinnati, Ohio
July 2014
Body - Canon AE-1
Film - Kodak Tri-X 100
Roebling Suspension Bridge on film
Body - Canon EOS 5DIII
Lens - EF 17-40mm f/4L USM
John A. Roebling Suspension Bridge
My professional background is Information Technology. As a result, I'm somewhat hard-wired toward the idea of having a database of accurate and comparative shooting data, a desire the Lightroom catalog helps to satisfy. Several tools help to adjust the EXIF values of the scanned image files to add the actual shooting date, the camera type, the lens model, ISO setting and other characteristics where the scanned image files can be updated to have nearly the same level of EXIF data as is created natively by digital cameras.
The discussion will conclude in a part V, including a method to obtain shooting data like the examples above from the EOS 1v film camera.
Earlier posts in the series
Comparing film to digital - part I
Comparing film to digital - part II
Comparing film to digital - part III
The images are sized to fill your wide-screen display. Try using <F11> to maximize your browser window for the full effect. If the images overshoot your display, such as a laptop, just click on the image or the URL link and they'll resize to your screen from the host Flickr site. You can click a bit further into the image details on the Flickr page, if desired. EXIF data is available from the host Flickr pages as well. On the Flickr site, use your <L>key for Large and the <F11> for the full-screen.
If the images are not filling your widescreen display due to recent UHH changes, follow this link and update your UHH profile: https://www.uglyhedgehog.com/t-572300-1.html
Mar 15, 2021 20:46:01 #

Mar 22, 2021 08:18:53 #
Cwilson341 wrote:
The film versions in these comparisons really shine!
Thank you Carol! It probably ended about 2017 that I stopped carrying both film and digital together that would create duplicate / comparative images. I now shoot one or the other for a much lighter load.
If you want to reply, then register here. Registration is free and your account is created instantly, so you can post right away.