Recommended resizing parameters for digital images
Feb 8, 2018 16:59:02 #

As DSLRs increase in MegaPixels (MP), larger high quality prints can be made from the larger and larger files created by these cameras. However, these larger files make it more difficult for the photographer to electronically share their images due to these ever larger file sizes. Big is good, but bigger is not always better when working with digital images. This post explains the process of resizing digital images specifically for online display and file sharing.
The documented limit to a single attachment in UHH is 20MB (MegaByte). The high-quality JPEG files created by sensors such as the Nikon D850 now exceed the UHH limit where the photographer will need to use software tools to resize their image under the 20MB size limit. Sharing these images via email to family and friends requires even more action to create files that can be sent using popular email systems such as GMail, YahooMail, etc.
Consider the pixel / megapixel dimensions of a few popular models based on a 3x2 aspect ratio:
Nikon
D850 - 8,256 × 5,504 (45.4 MP)
D7200 - 6000 × 4000 (24 MP)
Canon
5DIV - 6720 × 4480 (30.1 MP)
80D - 6000 × 4000 (24 MP)
This post was developed with input from several UHH experts. The topic is organized with background on the pixel resolution of digital images and high-resolution wide-angle displays. We've collected instructions for popular photo-editing software to demonstrate how to resize digital images for electronic sharing. Special thank you's to members jerryc41, Gene51, Bob Yankle, TheDmann and Rongnongno for help in pulling this together.
Display resolution of your monitor
Many of us are now using "Full High-Definition" monitors. These "FHD1080" screens display at 1920x1080-pixels based on a 16x9 ratio. An image cropped to exactly 1920x1080px will exactly fill the dimensions of the FHD1080 screen when viewed at 100%. Your 1920x1080 image on your 16x9 screen will display "full screen" at a 100% zoom.
But, what about your 3x2 images? The 3x2 image is the traditional ratio of a frame of 35mm film in landscape orientation. As shown for the DSRL models above, 3x2 is the native ratio of images coming from the sensors in these cameras.
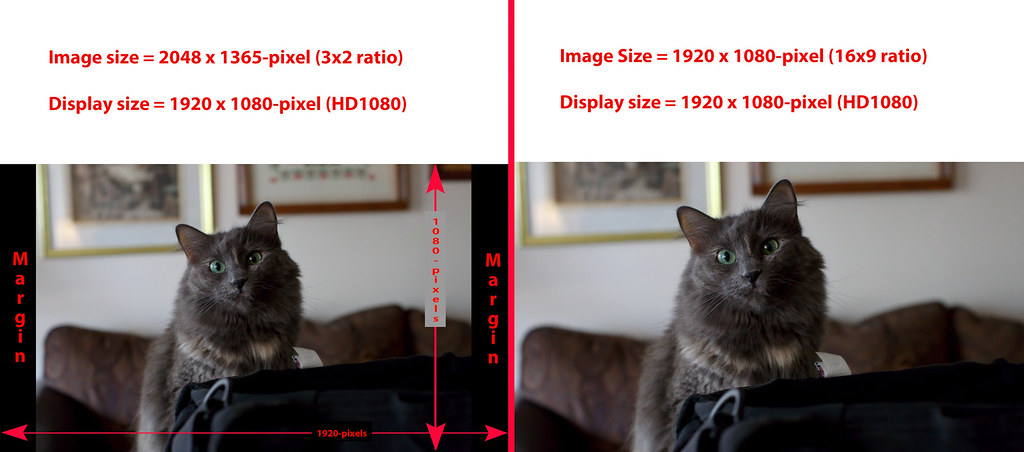
The screen resolution determines how the digital image is displayed. The FHD1080 screen will automatically scale a "large" image to fit the shorter side of the display. If you maintain the 3x2 ratio and use editing software to resize the long-side of your image to 2048-pixels, the "long-size" is wider than the width of the FHD1080 monitor (2048px > 1920px). The "short-side" is also greater than the height of the FHD1080 screen, (1365px > 1080px).
Your 3x2 image, when resized to 2048x1365, will be dynamically resized to 1620x1080 when displayed on your FHD1080. Your 3x2 image "fills" the vertical dimension with some unused margins on the left and right sides (1620px < 1920px). At this point the image is slightly less than 100% as the shorter-side (1365-pixels) has been resized to fit the screen height of 1080px. Clicking on the image to zoom to 100% will "expand" the image to fill the left and right margins of the 1920px display, using a 100% crop of size 1920x1080 from within the larger image having dimensions of 2048x1365.
The example below shows a 3x2 image on the left and a 16x9 crop of the same image on the right, both shown on a 1920x1080 Full High-Definition monitor.
Dynamic Resize Example
Sharing Images on photo sites such as Facebook, UHH, Flickr, etc
When you've completed your edits on an image from your Nikon D7200 and now want to share the image, this is where resizing the image comes into play. How you resize the image depends on the intended use. You can crop the image to 1920x1080 for use on "modern" FHD1080 displays (modern as in circa 2018). When you select a crop using a 16x9 ratio, your crop will maintain the width of your original 3x2 image, but the top and bottom will be cropped from the landscape-oriented image. See the portions of the image “lost” from above and below the cat in the examples above.
An easier approach is to simply maintain the original 3x2 ratio and specify a length on the long-side that matches (or slightly exceeds) the FHD1080 display that uses 1920-pixels on the long-side. The left version of the cat with the "margins" shows a 3x2 image that nearly fills the FHD1080 screen using an image sized 2048px on the long-side. Although you've "oversized" the image, the 2048-pixel long-side is much closer to the screen dimensions for people viewing your image than attempting to send them a file with dimensions 6000x4000-pixels. Unless zooming into a crop of the image, the 6000x4000 image displays like the cat above on the left exactly the same as a file at 2048x1365.
Digital images on image-sharing sites are intended for full-screen display on high-resolution monitors. This usage applies equally to UHH attachments as well as high-resolution uploads to Facebook, Flickr, 500px and similar social media and image sharing sites. Facebook now supports a maximum of 2048-pixels on the long-side. Using 2048-pixels on the long-side allows some "zoom" into the details when viewed at 100% on an FHD1080 monitor. Using 2048px creates a file around 1MB to 3MB when saved to disk, depending on the source camera, whether the image is cropped from the original, and assuming 100% JPEG quality.
Resizing your display files to a standard 2048-pixels on the long-side is intended for general use and for all crop ratios, 4x3, 1x1, 16:9, and so forth.
Sharing images via email
Continuing to use the 2048-pixel length on the long-side, one can begin to adjust the JPEG quality. The goal is to lower the JPEG quality to reduce the file size as an attachment without lowering the quality of the image when viewed by the email recipients. Your friends / family using FHD1080 displays should receive an image that fills (or nearly fills) their screen when viewed.
Sharing a single image as a 1.5MB attachment should not cause undo delay for the email sender nor receiver. But, if you have multiple files to share, you should lower the JPEG quality to reduce the file size. Differences in the quality values from 99% to 80% typically cannot be seen by the human eye when displayed full-screen on an FHD1080 screen. The lower the quality value, the more compression is applied to the JPEG image creating a much smaller file. Below 80% one can begin to see degradation of the image when viewed full-screen on an FHD1080 display.
Creating images for other digital uses
Website design seeks to maximize the viewing experience for the site. Larger images render slower. The page / site Design Lead will specify the exact dimensions and quality settings for images on their site.
If you're interested in image-size recommendations for popular social media sites, visit Always Up-to-date Guide to Social Media Sizes using the link below in the section "Reference Links".
Is 80% Quality the best for all software?
The How-To samples, below, specify a common 80% quality. However, the compression engine specific to each software may differ from the results of others. Consider adjusting the quality value if your results differ when viewed full-screen on your display screen. Consider 5% changes in the JPEG Quality such as 85% or 90% or 95% until you determine the value best for your needs. You might also continue to lower the quality below 80%, again, as needed.
Impact of changes to JPEG Quality

What are DPI / PPI?
Q: Does DPI / PPI affect the image display?
ANS: No
DPI - Dots Per Inch
PPI - Pixels Per Inch
A digital image has only a pixel dimension. The image file may report a DPI value of 72 / 96 / 250 / 300 / etc when the file properties are viewed from the operating system. The DPI value has no impact on how the file is displayed electronically. In the ReSize dialog of many softwares, the DPI does impact the image dimensions when resampling the image. However, for a given pixel size, changing the DPI / PPI value has no effect on the display of the image nor the file size when creating a JPEG. Note the pixel dimensions and DPI values for the files below.
DPI Examples

Images that appear larger when zoomed to 100% simply have a pixel dimension that exceeds the size of the display. This zoom effect is the result of the pixel dimensions, not the number of pixels per inch. Take an image with dimension 5760x3840-pixels, say a JPEG straight from a 22MP camera. If you zoom the original image to 100% on your FHD1080 display, you're simply viewing an 1920x1080 crop of the entire 5760x3840 image. The DPI value has no impact on the image as displayed. DPI values of 1, 10, 72, 96, 300, etc all display exactly the same. The DPI / PPI value has no effect on the display of the image nor the file size when created as a JPEG as long as you don't resample the image.
Why recommend 2048px for 1920px wide screens?
Simplicity. The 2048px image will fill / nearly fill today's popular screen sizes, regardless of device type, including phones, HD TVs, tablets, Macs and PCs. The idea is to pick an easy standard to create a single image file with the widest possible display-uses on current equipment. The 2048 recommendation is based to Facebook's current maximum size. Whether you use Facebook or not, the 2048 recommendation is useful as a general practice for current technology.
Although this write-up considers "Full High-Definition" to be 1920x1080, the vendors use a range of screen sizes covering similar sizes from 1920x1050 to 2560x1600. Using 2048-pixels as a general-purpose size, you've covered all expected display-uses on current technology.
More details are provided below in topic Why 2048 is the recommended size? in the section "Reference Links".
Where are the file dimensions specified in my software?
Below are resize steps for popular edit programs to specify the long-side of the image and the JPEG image quality.
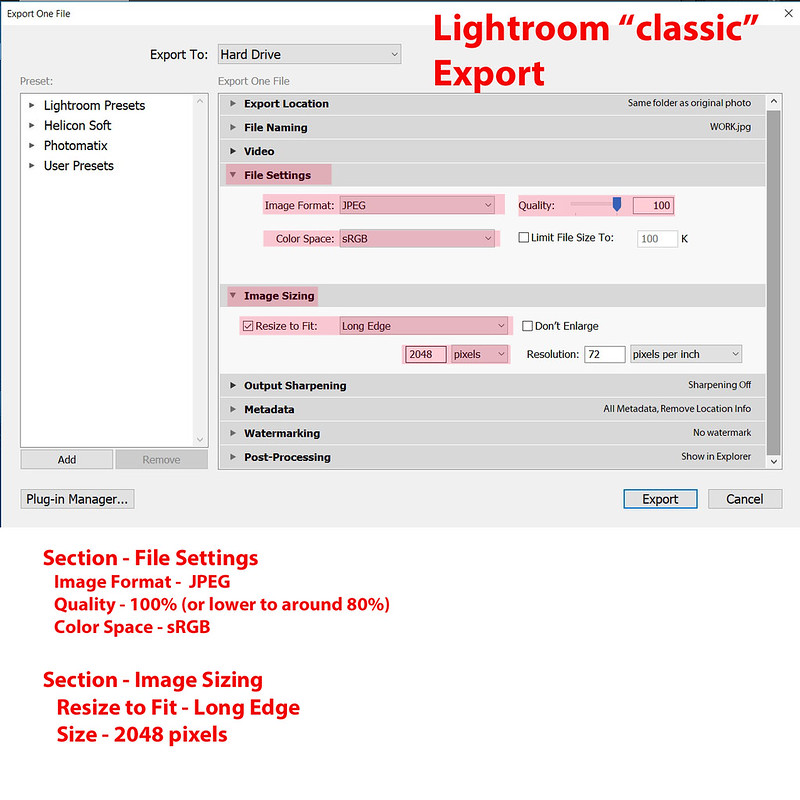
1. Lightroom
The Export Dialog controls the image parameters, where highlighted.
Lightroom Classic Export
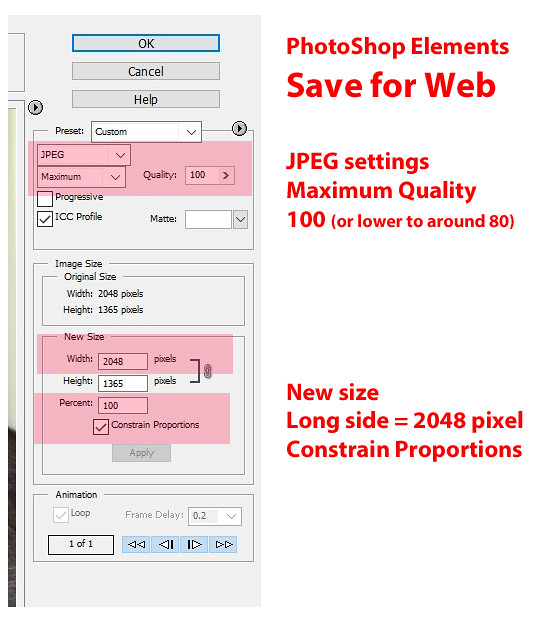
2. PhotoShop / PhotoShop Elements
Depending on the version of PhotoShop, you use either menu commands = File / Export / Save for Web or simply File / Save for Web. This approach is different than the Resize command.
Save For Web
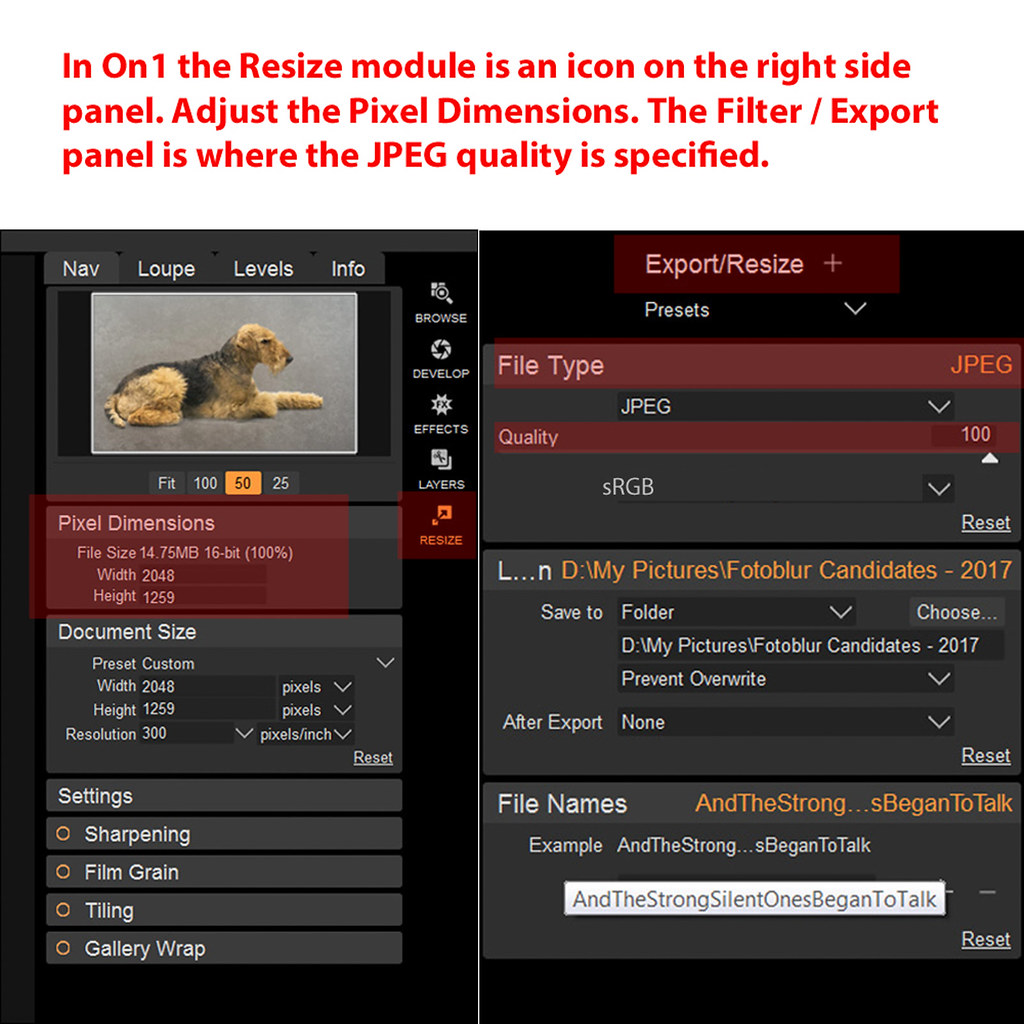
3. On1
Use the Resize module and Filter>Export to specify the pixel dimensions and JPEG quality.
On1 Resize and Export
4. Infraview
Infraview Resize
Reference Links
FAQ: What is PPI, DPI, XMP, EXIF, Etc.? A Brief Primer on Digital Photos
https://www.uglyhedgehog.com/t-286738-1.html
Resize vs Resample
https://www.photoshopessentials.com/essentials/resizing-vs-resampling/
JPEG quality
https://sirv.com/help/resources/jpeg-quality-comparison/
Always Up-to-date Guide to Social Media Sizes
https://sproutsocial.com/insights/social-media-image-sizes-guide/
Why 2048 is the recommended size?
https://photographylife.com/how-to-properly-resize-images-for-facebook
The documented limit to a single attachment in UHH is 20MB (MegaByte). The high-quality JPEG files created by sensors such as the Nikon D850 now exceed the UHH limit where the photographer will need to use software tools to resize their image under the 20MB size limit. Sharing these images via email to family and friends requires even more action to create files that can be sent using popular email systems such as GMail, YahooMail, etc.
Consider the pixel / megapixel dimensions of a few popular models based on a 3x2 aspect ratio:
Nikon
D850 - 8,256 × 5,504 (45.4 MP)
D7200 - 6000 × 4000 (24 MP)
Canon
5DIV - 6720 × 4480 (30.1 MP)
80D - 6000 × 4000 (24 MP)
This post was developed with input from several UHH experts. The topic is organized with background on the pixel resolution of digital images and high-resolution wide-angle displays. We've collected instructions for popular photo-editing software to demonstrate how to resize digital images for electronic sharing. Special thank you's to members jerryc41, Gene51, Bob Yankle, TheDmann and Rongnongno for help in pulling this together.
Display resolution of your monitor
Many of us are now using "Full High-Definition" monitors. These "FHD1080" screens display at 1920x1080-pixels based on a 16x9 ratio. An image cropped to exactly 1920x1080px will exactly fill the dimensions of the FHD1080 screen when viewed at 100%. Your 1920x1080 image on your 16x9 screen will display "full screen" at a 100% zoom.
But, what about your 3x2 images? The 3x2 image is the traditional ratio of a frame of 35mm film in landscape orientation. As shown for the DSRL models above, 3x2 is the native ratio of images coming from the sensors in these cameras.
The screen resolution determines how the digital image is displayed. The FHD1080 screen will automatically scale a "large" image to fit the shorter side of the display. If you maintain the 3x2 ratio and use editing software to resize the long-side of your image to 2048-pixels, the "long-size" is wider than the width of the FHD1080 monitor (2048px > 1920px). The "short-side" is also greater than the height of the FHD1080 screen, (1365px > 1080px).
Your 3x2 image, when resized to 2048x1365, will be dynamically resized to 1620x1080 when displayed on your FHD1080. Your 3x2 image "fills" the vertical dimension with some unused margins on the left and right sides (1620px < 1920px). At this point the image is slightly less than 100% as the shorter-side (1365-pixels) has been resized to fit the screen height of 1080px. Clicking on the image to zoom to 100% will "expand" the image to fill the left and right margins of the 1920px display, using a 100% crop of size 1920x1080 from within the larger image having dimensions of 2048x1365.
The example below shows a 3x2 image on the left and a 16x9 crop of the same image on the right, both shown on a 1920x1080 Full High-Definition monitor.
Dynamic Resize Example
Sharing Images on photo sites such as Facebook, UHH, Flickr, etc
When you've completed your edits on an image from your Nikon D7200 and now want to share the image, this is where resizing the image comes into play. How you resize the image depends on the intended use. You can crop the image to 1920x1080 for use on "modern" FHD1080 displays (modern as in circa 2018). When you select a crop using a 16x9 ratio, your crop will maintain the width of your original 3x2 image, but the top and bottom will be cropped from the landscape-oriented image. See the portions of the image “lost” from above and below the cat in the examples above.
An easier approach is to simply maintain the original 3x2 ratio and specify a length on the long-side that matches (or slightly exceeds) the FHD1080 display that uses 1920-pixels on the long-side. The left version of the cat with the "margins" shows a 3x2 image that nearly fills the FHD1080 screen using an image sized 2048px on the long-side. Although you've "oversized" the image, the 2048-pixel long-side is much closer to the screen dimensions for people viewing your image than attempting to send them a file with dimensions 6000x4000-pixels. Unless zooming into a crop of the image, the 6000x4000 image displays like the cat above on the left exactly the same as a file at 2048x1365.
Digital images on image-sharing sites are intended for full-screen display on high-resolution monitors. This usage applies equally to UHH attachments as well as high-resolution uploads to Facebook, Flickr, 500px and similar social media and image sharing sites. Facebook now supports a maximum of 2048-pixels on the long-side. Using 2048-pixels on the long-side allows some "zoom" into the details when viewed at 100% on an FHD1080 monitor. Using 2048px creates a file around 1MB to 3MB when saved to disk, depending on the source camera, whether the image is cropped from the original, and assuming 100% JPEG quality.
Resizing your display files to a standard 2048-pixels on the long-side is intended for general use and for all crop ratios, 4x3, 1x1, 16:9, and so forth.
Sharing images via email
Continuing to use the 2048-pixel length on the long-side, one can begin to adjust the JPEG quality. The goal is to lower the JPEG quality to reduce the file size as an attachment without lowering the quality of the image when viewed by the email recipients. Your friends / family using FHD1080 displays should receive an image that fills (or nearly fills) their screen when viewed.
Sharing a single image as a 1.5MB attachment should not cause undo delay for the email sender nor receiver. But, if you have multiple files to share, you should lower the JPEG quality to reduce the file size. Differences in the quality values from 99% to 80% typically cannot be seen by the human eye when displayed full-screen on an FHD1080 screen. The lower the quality value, the more compression is applied to the JPEG image creating a much smaller file. Below 80% one can begin to see degradation of the image when viewed full-screen on an FHD1080 display.
Creating images for other digital uses
Website design seeks to maximize the viewing experience for the site. Larger images render slower. The page / site Design Lead will specify the exact dimensions and quality settings for images on their site.
If you're interested in image-size recommendations for popular social media sites, visit Always Up-to-date Guide to Social Media Sizes using the link below in the section "Reference Links".
Is 80% Quality the best for all software?
The How-To samples, below, specify a common 80% quality. However, the compression engine specific to each software may differ from the results of others. Consider adjusting the quality value if your results differ when viewed full-screen on your display screen. Consider 5% changes in the JPEG Quality such as 85% or 90% or 95% until you determine the value best for your needs. You might also continue to lower the quality below 80%, again, as needed.
Impact of changes to JPEG Quality
What are DPI / PPI?
Q: Does DPI / PPI affect the image display?
ANS: No
DPI - Dots Per Inch
PPI - Pixels Per Inch
A digital image has only a pixel dimension. The image file may report a DPI value of 72 / 96 / 250 / 300 / etc when the file properties are viewed from the operating system. The DPI value has no impact on how the file is displayed electronically. In the ReSize dialog of many softwares, the DPI does impact the image dimensions when resampling the image. However, for a given pixel size, changing the DPI / PPI value has no effect on the display of the image nor the file size when creating a JPEG. Note the pixel dimensions and DPI values for the files below.
DPI Examples
Images that appear larger when zoomed to 100% simply have a pixel dimension that exceeds the size of the display. This zoom effect is the result of the pixel dimensions, not the number of pixels per inch. Take an image with dimension 5760x3840-pixels, say a JPEG straight from a 22MP camera. If you zoom the original image to 100% on your FHD1080 display, you're simply viewing an 1920x1080 crop of the entire 5760x3840 image. The DPI value has no impact on the image as displayed. DPI values of 1, 10, 72, 96, 300, etc all display exactly the same. The DPI / PPI value has no effect on the display of the image nor the file size when created as a JPEG as long as you don't resample the image.
Why recommend 2048px for 1920px wide screens?
Simplicity. The 2048px image will fill / nearly fill today's popular screen sizes, regardless of device type, including phones, HD TVs, tablets, Macs and PCs. The idea is to pick an easy standard to create a single image file with the widest possible display-uses on current equipment. The 2048 recommendation is based to Facebook's current maximum size. Whether you use Facebook or not, the 2048 recommendation is useful as a general practice for current technology.
Although this write-up considers "Full High-Definition" to be 1920x1080, the vendors use a range of screen sizes covering similar sizes from 1920x1050 to 2560x1600. Using 2048-pixels as a general-purpose size, you've covered all expected display-uses on current technology.
More details are provided below in topic Why 2048 is the recommended size? in the section "Reference Links".
Where are the file dimensions specified in my software?
Below are resize steps for popular edit programs to specify the long-side of the image and the JPEG image quality.
1. Lightroom
The Export Dialog controls the image parameters, where highlighted.
Lightroom Classic Export
2. PhotoShop / PhotoShop Elements
Depending on the version of PhotoShop, you use either menu commands = File / Export / Save for Web or simply File / Save for Web. This approach is different than the Resize command.
Save For Web
3. On1
Use the Resize module and Filter>Export to specify the pixel dimensions and JPEG quality.
On1 Resize and Export
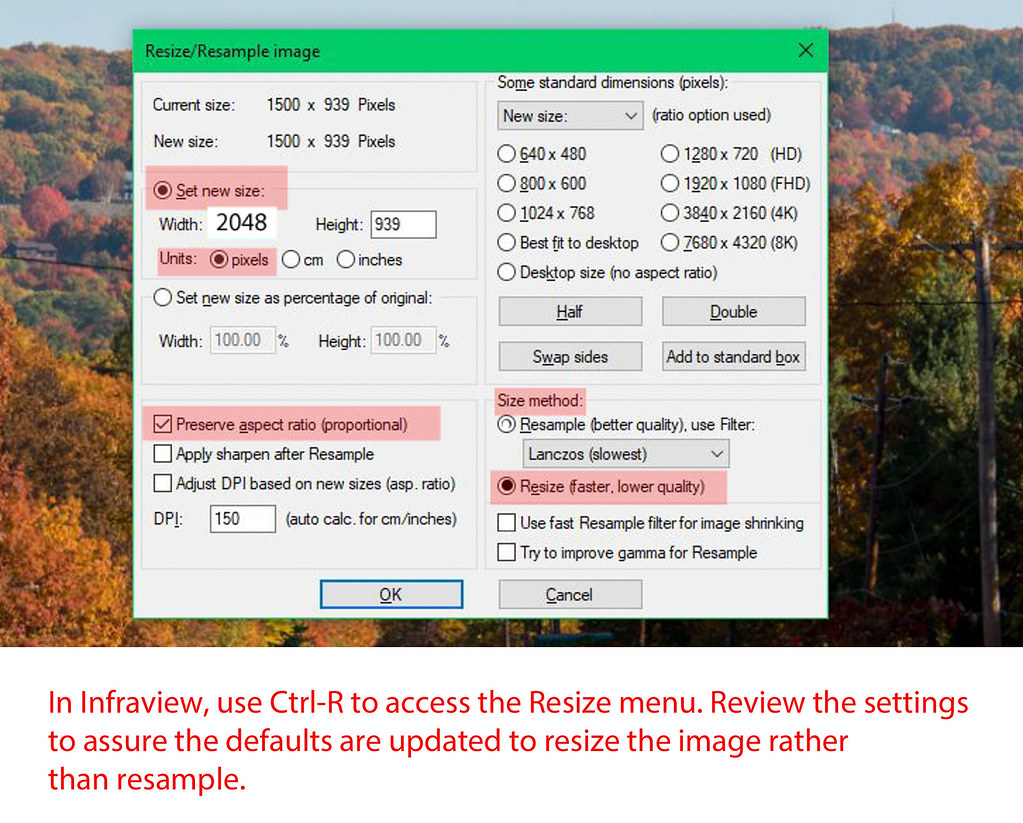
4. Infraview
Infraview Resize
Reference Links
FAQ: What is PPI, DPI, XMP, EXIF, Etc.? A Brief Primer on Digital Photos
https://www.uglyhedgehog.com/t-286738-1.html
Resize vs Resample
https://www.photoshopessentials.com/essentials/resizing-vs-resampling/
JPEG quality
https://sirv.com/help/resources/jpeg-quality-comparison/
Always Up-to-date Guide to Social Media Sizes
https://sproutsocial.com/insights/social-media-image-sizes-guide/
Why 2048 is the recommended size?
https://photographylife.com/how-to-properly-resize-images-for-facebook
Feb 8, 2018 17:48:36 #

Thanks for taking the time to post this information.
Although it is not a question (per se) it serves to elaborate on the thread on "resolution" that was not open long enough to accommodate to more answers and opinions.
I am printing out a hard copy of this post for my reference files.
As a professional photographer who spent many years in the analog darkroom, the enlargement and reduction of images was a simple matter of moving the enlarger up and down on its chassis and using enlarging lenses of various focal length. Any size print from a thumbnail to a photo mural could be easily produced for a given negative provided the negaative was of decent quality and the equipment and facilities were on hand.
Nowadays, in digital work, there are so many display methods and technical differentials in imagining and things can get more complex.
Frankley, as a commercial photographer, I am primarily concerned with shooting, in that the final production usually ends up in the hands of lithographers, commercial printers, ad agencies, graphic designers and menu board and display producers. My main concern is to make sure that the basic file and the edited media is of high quality and prepared in the required DPI at the specified SIZE of the finished print or product or what the printers or production folks require for anything from a small brochure insert to a billboard or a BIG screen for a fast food menu board. For the portrait work, I will usually overkill a bit so I may prep the files for prints an 8x10 wedding album in 11X14 etc.and for large wall hanging portraits, make certain that I have enough resolution and quality to produce PRINTS up to 30X40 inches.
So..in my shop everything is down to a kind of simplified routine, however, there are cases where we need to do certain final production in house and we just are in the process of purchasing a large roll-fed printer. So it is certainly good to study and reference more detailed data. The more theory we understand, the better we can prevent mistakes, conduct troubleshooting when a problem arises and keep up with the latest technology.
Ed
Feb 8, 2018 19:55:14 #

Feb 9, 2018 09:20:20 #

Ed and I apparently are of the same Old School of sizing.
I shoot for the image and adjust the final image for the needed result.
This was a great posting and full of very useful technical reference information.
Thanks
Don
I shoot for the image and adjust the final image for the needed result.
This was a great posting and full of very useful technical reference information.
Thanks
Don
Feb 9, 2018 12:18:20 #

Thanks, CHG,
Your exegesis is a definite “keeper” for ready recall and reference!
Best regards,
Dave
(uuglypher)
Your exegesis is a definite “keeper” for ready recall and reference!
Best regards,
Dave
(uuglypher)
Feb 9, 2018 14:50:31 #
amfoto1
Loc: San Jose, Calif. USA
Good info CHG_Canon!
This post should be made a "sticky" to keep it near the top, where folks can easily find it.
I would only add...
I deliberately keep images shared via the Internet relatively small.... "Thumbnails" that are 700 to 800 pixels on the longest side, at most. I do this because I have a lot of images "stolen" for use on Facebook, etc. I'm okay with that (partly because it's futile to try and stop it, but also because in most cases I use a watermark on them that acts as an advertisement for my commercial website). BUT, I don't want folks to be able to make prints from them, or use them for other purposes without my permission. IMO, the minimum resolution for small print such as a 4x6 would be about 1500 pixels on the long side.
Unless otherwise specified, for printing purposes (and some other things) I usually simply use 300 pixels per inch. That's more than enough for most printing purposes (some would say too much for really big prints), but mainly because the math is simpler. I can do it in my head with reasonable accuracy!
Apr 18, 2020 09:46:17 #
Ed - I agree that the information provided is extremely helpful, although I really need to attend a "Resizing For Dummies" workshop or something like that in order to practice. I used to be a Canon person but switched a couple of years ago to the Sony system. Does the information in the article apply to all images regardless of the equipment used?
Thanks
Thanks
Apr 18, 2020 10:03:09 #
MMac wrote:
Ed - I agree that the information provided is extremely helpful, although I really need to attend a "Resizing For Dummies" workshop or something like that in order to practice. I used to be a Canon person but switched a couple of years ago to the Sony system. Does the information in the article apply to all images regardless of the equipment used?
Thanks
Thanks
Yes, digital images are digital images. The ideas presented apply to any file type measured in pixels.
Apr 18, 2020 10:11:37 #
May 3, 2020 11:47:34 #
Tomcat5133
Loc: Gladwyne PA
Great post CHG_CANON. As usual you make great contributions to this forum. Interesting that I have been working on taking small imagers and blowing them up for possible gallery prints. So enlarging small or decent size stills with things like Exposure Blowup. My biggest issue is taking my 10 bit video pulls and laundering the
to be a decent size print. I am being very; abstract so arty might work. Sharpness is not the way I am going. Thanks again. Tom PS I have seen some software any thoughts on good ones.
to be a decent size print. I am being very; abstract so arty might work. Sharpness is not the way I am going. Thanks again. Tom PS I have seen some software any thoughts on good ones.
May 20, 2020 19:48:24 #

Again I learned something from you thank you I converted this section to a PDF and saved it to my IPAD for future use lots of inherent.
May 20, 2020 19:59:49 #
richandtd wrote:
Again I learned something from you thank you I converted this section to a PDF and saved it to my IPAD for future use lots of inherent.
Glad to help! You might use the bookmark feature too. Bookmarks, with a short comment of why I saved the link, have become the best way for me to 'save' prior UHH posts I want to quickly find again.
May 29, 2020 09:10:52 #
Bird Dawg
Loc: Georgia
Thanks. A lot of great, helpful information. I’m on LR 5.7 and I select a picture And hit the email button on LR. ( do not Export ) My family says “ pictures are not clear.” LR gives me 3 or 4 levels of Quality and I’ve tried all of them, even the one marked “ email”.
Where am I going wrong?
Thanks again for your help
Wes in GA
Where am I going wrong?
Thanks again for your help
Wes in GA
May 29, 2020 09:39:56 #
Bird Dawg wrote:
Thanks. A lot of great, helpful information. I’m on LR 5.7 and I select a picture And hit the email button on LR. ( do not Export ) My family says “ pictures are not clear.” LR gives me 3 or 4 levels of Quality and I’ve tried all of them, even the one marked “ email”.
Where am I going wrong?
Thanks again for your help
Wes in GA
Where am I going wrong?
Thanks again for your help
Wes in GA
Wes, I'd suggest the following:
1. Create a 2048px export at 100% quality based on the settings / examples in this UHH post creating a JPEG file.
2. Test the various email option of the same image, just email to yourself. Detach the files from the emails and compare to the 2048px JPEG. Use the 'file properties' from an OS window looking at the files to see the pixel resolution and / or make notes about the JPEG quality.
3. You should be able to determine the differences, both visually and from the pixel resolution. Open a new thread (or PM me directly) if you are unsure of the technical properties to be reviewed.
4. When you arrive to the best mix of export parameters to your needs, create your own custom Export preset. You can even do this for an Email export. Again, we can discussed the detailed process of 'how' via a 1 on 1 discussion, if needed.
May 29, 2020 13:49:41 #
If you want to reply, then register here. Registration is free and your account is created instantly, so you can post right away.