flash light meter
Mar 26, 2019 19:35:41 #
Timmers
Loc: San Antonio Texas.
KEH.com
Used Light Meters:
Minolta Flash Meter IV $100 to $150.
Minolta Flash Meter III $65
KEH has a super reputation.
Used Light Meters:
Minolta Flash Meter IV $100 to $150.
Minolta Flash Meter III $65
KEH has a super reputation.
Mar 26, 2019 21:05:12 #
Mar 26, 2019 23:10:00 #
I know manually how to set up my strobes in my home studio. When you use a meter, and meter each light, whether it be Flash or strobe, and you obtain those numbers from the meter...What the heck do you then do with those numbers, and how does that transfer to setting camera...I'm really quite lost. Where do you even start to set each Flash/Strobe output too? If I have a key light, Fill light, and rim light? I meter each individually, get figures for each, then what??? Can't find a video anywhere that explains any of this. I need a complete comprehensive walk through of the whole procedure from the time you set up each flash/strobe onward. I know its asking a lot, but this whole metering thing is all foreign to me.
Thank you in advance.
p.s. sorry for hijacking the thread but I thought it was relevant.
Thank you in advance.
p.s. sorry for hijacking the thread but I thought it was relevant.
Mar 26, 2019 23:49:37 #
penndragonn wrote:
I know manually how to set up my strobes in my hom... (show quote)
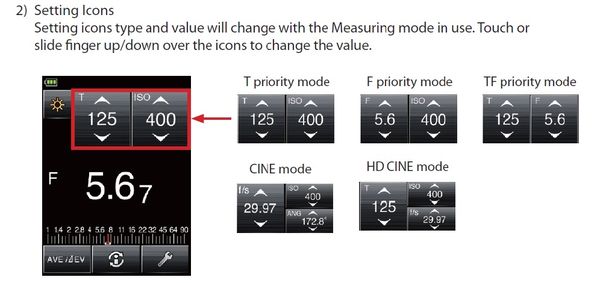
In the photography groups I'm in we typically set the ISO at 100 to 200 to assure low digital noise. We use a shutter speed that's a little bit below the sync speed of the camera. It's best not to go all the way to the sync speed of the camera but stay under. The meter then gives us the correct f-stop number. We put the camera in manual mode and enter those readings.
In the example here, they set in ISO 400 and a shutter speed of 1/125 second. The meter gave the f-stop to be f/5.6. If you want say fill light that was 2-stops below that, you would adjust the strobe output level until the meter is giving you f/2.8.
Mar 27, 2019 00:59:30 #
SaR_foto
Loc: Northeast Wisconsin
I use a Sekonic L-358.....got it used on ebay ....nearly new for under $125. Does everything I need.....multiply flash, incident, and reflective. Saves me a lot of time setting up for a shoot.
Mar 27, 2019 01:05:39 #
CO wrote:
In the photography groups I'm in we typically set ... (show quote)
So there is still guess work involved?
Just like doing it as I do, all manually?
What would be the point of the meter then? Still lost.
Let's back up. How would I even meter and then set key light? Do I first guess what I want the output of key light to be, meter that, then what? And then repeat the guess work on fill and Rim lights? Seems like just as much guess work. Surely I'm missing something here. I do greatly appreciate your explanation, but as you can see, still VERY CONFUSED.
Mar 27, 2019 01:06:48 #
gofast wrote:
I went back to college to learn how to be better w... (show quote)
What type of hand-held light meter you need (or whether you need one at all)
depends on the type of photography you do and how you prefer to work.
For example, as you probably know, cinematographers wouldn't consider using anything
but a incident light meter. That's because the light on an actress's face is very important--
so you want to hold that meter right up to that famous face.. In the old days, most used the
Norton Director.
Continuing with ancient history: Zone System photographers were incredibly fond of
Weston meters -- this may be because the Weston had a range of ten stops on its dial--
and guess how many zones ther are in Ansel Adam's original system. Plus, you could
buy a special version of the meterlabeled in Zones! Later, they became attached to
Pentax spotmeters.
News flash: different photographers still need different equipment!
Types of hand-held light meters for photography:
* Reflected light (luminance)
-- averaging
-- spot
* Incident light (illuminance)
-- continuous
-- flash
These days, a meter that can measure incident light, flash incident light, and
reflected light isn't much more expensive than a plain reflected light meter.
(The only job it can't do is spot meter.)
Regardless of type, light meters vary in:
* Sensitivity
* Graunlarity
* Linearity
* Range (some have dual ranges for more accuracy)
* Unit of measure
Historically, technology also varies:
1. Extinction meters
2. Photovoltaic --no battery, but not very sensitive
1. Selenium (doesn't age well--sometimes can be rejuvenated)
2. Silicon
3. Photoresitive -- requires a battery
1. Cadmium sulfide (some last, some fail with age)
2. Silicon
Today they are all silicon photoresistor and require a battery.
Finally, user interfaces vary:
1. Indicator needle and mechanical dial cacluator
2. Digital display
a. Without a microprocessor
b. With a microprocessor
All lightmeters are analog. Digital displays are no guarantee of accuracy
(or even of granularity: a meter that displays tenths of an EV may increment
in units of 0.3 EV!).
As with camers, some people always want the latest one. Which means you
can often get a deal on last year's model, either new-old-stock or used.
I bought a used Sekonic L-308b FlashMate used because I wanted a smaller meter,
and it works fine. It doesn't allow me to take a reading, then step though different
aperture/shutter pairs. (In some ways, you can't beat a lightmeter with a dial caculator!)
I also own lightmeters from Gossen, Pentax, Minolta, Vivitar, Agfa, Weston and GE
(the latter two now just keepsakes).
Light meter photocells do drift over time, so an older meter may be out of
calibration. Most are fairly easy to calibrate, though usually only one-point
calibration is available. All you have to do is find another meter of the same
brand that you trust, and a featureless wall that is uniformly illuminated.
If you shoot several different cameras, then a handheld meter will give you
the same EV readings all the time. Different brands of camera are calibrated
differently, and most cameras havent' been calibrated since they left the
factory. And if it's an interchangable lens camera, then different lenses
absorb different amounts of light -- good for autoexposure, bad if you
want an EV reading.
The came for using the camera's built-in light meter is compelling:
* it's always there
* automatically takes into account filter factor
* automatically takes into account light absoprtion by lens ("t-stop")--
important when you go from a 3-element achromat to a 33-element zoom
log-of-glass.
But there are some things you just can't do without a hand held light meter:
For example, in portraiture, if you want to measure the lighting ratio of two
continues lights, you need either an incident light meter or a set of special
gray cards (such as Kodak used to sell). But if you want to measure the
ratio of two flashes, only a flash meter will do. Of course, most photographers
never actually measure light ratios--it depends on how you work.
The are orther things that camera meters just don't do well:
* Taking incident light readings (gray card method suck)
* Taking spot meter readings (spot meter mode sucks)
Anyone who can take an incident light reading using a gray card without shading
the card has a career awating him as a circus contortionist. And gray cards are
flat, so really don't measure what a incident light meter dome would measure
(ah, the Weston V "Invacone" dome -- how good it was!).
Moreover, the standard 18% gray card is the wrong reflectivity to match luminiance
meter readings (as Kodak stated in the instructions to its original gray card, you need
to subtract about half a stop. Yuck.)
In landscape photography, nothing really replaces a hand-held spotmeter. Th
Spot meter mode in cameras is a joke: you can never be sure what angle
it is measuring. But a 2% hand-held spot meter always measure 2%.
It's very cumbersome to take several spot meter readings with a camera.
A hand-held spotmeter is like aiming a pistol. It's still the only way to
really know the exposure challenge you are facing.
The best way I can describe the process of taking a phtograph is as a dialogue
between the photographer and his instruments.. If you don't ask the right questions
in the right order, you'll never arrive at the correct answer. One of the most
important questions are:
"What challenges dos this scene present for exposure?"
A hand-held spot meter will allow you to answer that quesion (provided you
know the dyanmic range of your sensor and of your medium of your final
image) 'Cause like the Great Man said, what really matters is the final image,
so you have to visualize what you want.
Possible answers to the above question include any or all of:
* backlighting
* extremely contrasty
* some area (such as a skin tone) that must be placed on a certain tone
* a particular dark shadow in which you need to see detail
* a particular bright highlight in which you need to see detail
So really it comes down to control. Putting the camera in manual exposure mode
doesn't really put you in control unless you have some way of getting the information
you need. The camera's meter's really isn't designed to do that (at least, not as its
primary function) -- it's desgned to measure what autoexposure needs.
And as you know, the goal of autoexposure is to place whatever it meters (average,
spot or matrix) on a middle tone. What else can it do? It doesn't know what it's
looking at and it can't read the photographer's mind. It has no idea what you plan
to do with the image. It's just machine (and far less intelligent than a mouse).
Consider all that, autoexposure works extraordinarliy well. And autoexposure plus
exposure compenstation works ever better. But you still need information about
the scene lighting--and the naked eye is the worst light meter of all: it can only see
10 stops of contrast at a time, and cannot distinguish between different dark tones.
So think of a light meter as a sort of "lie detector": it will tell you when your eyes are
lying, and sometimes it will tell you when your camera's meter is lying.
Recommendations
For a compact luminance/iluminance/flash meter with digital interface and micrprocessor,
the latest Sekonic FlashMate would do the job. Or buy an older model used. (There are
better flashmeters, but they are very pricey.)
For an needle and dial calculator luminance illuminance meter (with battery), you have
many good choices--but only a few still in production. So I'd probably buy used meters
for cheap until you find one you like (Just make sure the batteries are still available: some
of the older ones were dsigned for mercury batteries.)
For a spot meter with digital display and microprocessor, I'd recomment an old Minolta M
(it allows you to split the difference between two readings!) or Pentax Digital Spotmeter.
For an all-analog spotmeter, I'd recommend the old Pentax Spotmeter V.
Mar 27, 2019 01:54:59 #
penndragonn wrote:
So there is still guess work involved? br Just l... (show quote)
The meter gets you quickly there, but at the very end you may choose to have the light a little hotter or colder. Much of that is personal taste. Also as mentioned, if other lights need to be used with applied ratios, it gets you there effortlessly. Keep in mind we could be talking 1/10 of a stop increments found in studio lights or a speedlight using 1/3 stops. Lighting is as much of an art as the pose, the scene or the emotion being conveyed.
Sorry CO, hope you don't mind me stepping in here.
The meter got to me close with this. How much definition in the rim lighting I preferred was ultimately gauged by me.

Mar 27, 2019 06:18:03 #

You might start with some of the Joe Brady Sekonic videos on YouTube...
Mark Wallace is another guy with metering and portrait videos on YouTube.
For those starting with a single Speedlite and a reflector or two take a look at what Robert Harrington does at his B&H seminars on YouTube also. He does some nice shots and doesn't get into a handheld meter though.
Mark Wallace is another guy with metering and portrait videos on YouTube.
For those starting with a single Speedlite and a reflector or two take a look at what Robert Harrington does at his B&H seminars on YouTube also. He does some nice shots and doesn't get into a handheld meter though.
penndragonn wrote:
I know manually how to set up my strobes in my hom... (show quote)
Mar 27, 2019 06:42:59 #
penndragonn wrote:
So there is still guess work involved? br Just l... (show quote)
There's a small amount of guess work initially. We start with ISO 100 to ISO 200 and a shutter speed of 1/125 second. We adjust the strobe output level until the meter is showing us an aperture of around f/8. Here are the reasons we start with those setting:
1) The camera will produce low digital noise around ISO 100 to ISO 200. (using different ISO settings will affect how much ambient light is in the exposure - you have to take a shot and see if the amount of ambient light is to your liking)
2) Most cameras have a sync speed of 1/200 second (some 1/250 second). It's best to not to use a shutter speed right at the sync speed. There's a possibility of getting a black band across the image if your at or faster than the sync speed.
3) We like to use an aperture of around f/5.6 to f/8 because that's in the sweet spot for lens sharpness. It also give good depth of field.
That's for the key light. We then go on the the fill lights or hair lights. If we used f/8 for the key light and we want the fill light to be 2-stops under that, we adjust the fill light output level until the meter is showing f/4.
Mar 27, 2019 07:02:49 #
Timmers
Loc: San Antonio Texas.
Using a Flash Meter in the studio or on location.
A flash meter is a tool like any other tool, if you know how to use that tool you will get a lot out of it.
I had a Minolta Flash Meter III and it was great for any general type of work, especially on location. It did many of the functions that a flash meter is to do. It falls short of the Minolta Flash Meter IV (note Minolta like all companies muddies the water, there is a smaller less functions Minolta Flash Meter IV with a small case letter after the Roman Numeral, that is NOT the meter I will speak about, it does not have the capacity of the Meter IV).
There are other meters out there made by Gossen and Sekonic and perhaps others, I don't use these companies meters and you have to discover what these meters do and how they work.
When you purchase the Minolta Flash Meter IV you will need BOTH the flat white front and the dome front. When you get the meter first remove the cover diffusion front and look at the bare unit's front. Note two features, deep inside the recess there is a glass cover with a golden looking chip below. This widow protects the sensor and in 30 years of using mine I have NEVER needed to clean this glass, so keep the modifier on the holder. Check to see that nothing is obstructing this sealed glass cover. Next, there is a spring loaded pin in the grove of the bayonet mounting ring, this is used by the meter's maker to adjust the meter for different attachments made for the meter.
Start with the basics for a high end meter like the Minolta Flash Meter IV. It is both a flash meter and an ambient/continuous light meter that is integrated for both types of light. The important word here is integrated. The Minolta Flash Meter IV will read both types of light OR can be used to read one or the other while excluding the other. Unlike certain basic meters out there this meter is capable of calculating and adjusting for these different types of light.
First is calibration. The Minolta Flash Meter IV is calibrated to 'standards'. That standard is 18% gray (.80 density). IF you want to alter the calibration go to the rear of the meter, open the battery compartment and you will find a small dial that is set at the mid point position. The dial rotates in 1/3 exposures, that is .10 density more and less indicated by the '+' or '-" symbol. The meter should be set in the upright or '0' position unless you have some reason to move it and then it should always be returned to the '0' position. Always check to see that your Minolta Flash Meter IV is in the null position. If new it should be in this position.
You will see that you set the ISO (ASA), the f stop and the shutter speed on the meter. The Minolta Flash Meter IV is a smart meter and so it is capable of amazing things. But we are doing basics first so lets stick to that first. In the holder for the Minolta Flash Meter IV you should find a small pouch that will hold a flat diffusion disk, it is where the 180 degree dome is to be stored when the flat diffusion disk is mounted on the meter. You will need both of theses white diffusion disks.
These diffusion discs serve the function of read light from 180 degrees or in the case of the flat diffuser only the light that is coming from the direction to which it is pointed. You choose what area that the light being considered is to be read.
Here is an example, you are looking at several different lights and want to know how much light is coming from that light source. Remember, this will work for hot lights as well as flash. The flat diffuser is on the meter and you point the meter at that light alone, then take a meter reading. You will get a reading for that specific light AND any bouncing around light from the other lights, diffusers, reflectors, walls, and ceilings (and you also!) of the studio/environment. This is because in the world of actual and practical photography this is what we need to know to assess what that light is doing with regards to our intended photograph. You need to make this reading at the location of where the subject is located, remember that light falls off at the square of the distance FROM the light to the SUBJECT.
Now for your vary first accessory to purchase! Minolta makes a black disc that looks exactly like the dissuasion flat, it just doesn't have anything but a hole in it. This is most important, remember that spring loaded pin in the head of the meter? That is what tells the meter it has the open non-diffusion ring in place so a 'correct' calibration is made to the meter during metering. What does this ring do? It allows the meter to do the same reading but excludes any of the ambient diffusion that is on the set. Is it 100%, no but it is so close that it is relatively correct to show you what the light is doing while excluding the other lights on the set. Remember, this reads ambient/continuous as well as flash.
You can see that you can get readings for just about anything you wish for natural light, natural light with flash or just flash.
Lets take a look at all the du-dads on your meter.
There are switches on the side, sliding bars that allow you the 'normal' photographer settings, but with the flip a slider you can read in LUX and Foot Candles. If you want to work with these types of settings then I suggest you read about these things and see how these can help you to do better work. Engineer types love this functions and use the meter to determine environmental information for different purposes. We are focused on doing photography so lets slide the side slider to read out in f-stops.
You have a number of items on the front of the meter that give you control over the two functions the meter reads, one is ambient/continuous light, flash only, and of course ambient/continuous with flash out put. For what ever reason information is the key to what you are looking for. If you set the meter slider to read f stops and then press the button for a reading you appear to get nothing. The meter sits there dead until you manually fire the flash with the open flash control of your flash unit. Bingo! You have a reading (good for a time delay of one minute). This read out is for the flash only.
Next, you plug a PC cord into the front of the meter and you press the button and the flash is triggered and you get a new reading, this reading shows you the exposure for the flash and the ambient/continuous light. Of course, if you remove the PC contact from the front post and press the button you will get only a reading for the ambient/continuous light.
These are the basic functions of the flash meter. This is how a flash meter works to give you the information that you need to control the light in your studio/location.
I did say that this was a smart meter and from the sides of the meter with all the different sliders and dials this meter is obviously vary capable of assisting the user if the user acquaints themselves of the meter's use.
Lets go back to a basic function to help illustrate this statement. You have your meter set up to read and you have the PC cord plugged into the flash port at the front of the meter, so you will now get a read out of the flash AND the ambient/continuous light that is falling on your subject. Before we press that reading button, look at the sync speed. Lets say your DSLR can sync tops out at 1/250 of a second. Now we all know that with flash the sync speed is a value related to the two focal plane shutter curtains and that we can not sync above that speed but we can sync below that top speed. We also know that at lower speeds the ambient/continuous light will begin to have a effect on our exposure. Where is that point?
We make our reading and the flash meter is set for a sync speed of 1/250 second. This is a smart meter. We now take the meter and begin dialing the shutter speed function down to lower speeds. We reach 1/8 second and the meter reading alters by 1/10 of an f stop. At1/8 second this is now the CORRECT exposure because the ambient/continuous light is NOW having an impact on the exposure. At an exposure ABOVE 1/8 second we can use any speed above 1/8 second and 'exposure' will be the same. But we run a series of exposures and discover that there is a slight color shift, vary shuttle but it is there say three speeds above that 1/8 second. Now we dial down the modeling lights a bit more and we run another exposure test and we have the same correct exposure at a sync speed of 1/250 second, no surprise there. Then we roll the dial for f stops and now we see that an exposure change will not happen until we see a change of 1/10 stop on the meter for an exposure time of 1/2 second. We do a series of exposures starting at 1/2 second and we see a slight color shift for the next three exposures of sync speed.
This shows us that there is a correlation between sync speed, exposure and color renditions at different sync speeds. This is excellent information that we can use when working with our studio practices.
Consider if you will, changing the modeling lights in the studio flash heads from 250 watt modeling lights to 75 watt modeling lights.
If you experiment with different sync speeds and proper exposure, and add say a portrait involving a blond subject, how will the warming of the modeling lights shift the yellow in the hair as well as skin tones? Does this shift work for the images that you are doing?
There are quite a lot of new possibilities that a good quality flash meter can provide to the studio/location photographer as the craft is honed. It is up to the worker to decide what and how to make a great tool improve options for the work.
Mar 27, 2019 07:29:44 #
Good advice CO, that’s the same as I would suggest as a starting point.
CO wrote:
There's a small amount of guess work initially. We... (show quote)
Mar 27, 2019 08:42:15 #
Timmers wrote:
Using a Flash Meter in the studio or on location. ... (show quote)
I purchased a Minolta IVF system used quite a few years ago when I was doing 4x5 work, not so much for the flash capability but for the remote sensor that would fit behind the viewing screen on large format cameras. The remote worked but for me was more trouble than it was worth. My Pentax spot meter was much easier to use. I ended up giving the meter (minus the remote sensor) to my granddaughter who likes using film and uses it on a regular basis.
Mar 27, 2019 10:25:17 #
CO wrote:
There's a small amount of guess work initially. We... (show quote)
Now that's more like the info I needed !
All the technical stuff is fine, but needed the real world approach. Thank you.
Mar 27, 2019 10:29:55 #
Much appreciated CO. I'll try these settings out as well. Pic made a lot of sense. Pic are always good! 🙂
If you want to reply, then register here. Registration is free and your account is created instantly, so you can post right away.