Challenge: edit this jpg in your raw editor
Mar 25, 2019 08:14:22 #
Linda From Maine wrote:
Thanks very much! I will figure out this challenge thing at some point: gotta make the next one more, um, challenging, right? 
Well, the image was nice to start with so IMO, there wasn't much needed. Also, it's hard to do challenges with JPEGS. The cake is already baked so to speak and you can't deconstruct the ingredients. I wish we could post RAW images and let people take it from there.
Mar 25, 2019 08:35:25 #

Fstop12 wrote:
You can post any file if it's small enough. I and others have been able to post dng's to the weekly challenge in For Your Consideration. Site says 20 mb, but I've been able to upload a 22 mb file.... I wish we could post RAW images and let people take it from there.
There is no thumbnail, but the download works fine. If you decide to host a challenge, please include a jpg also for those without raw editing capabilities.
This particular challenge was specifically about editing jpg's in ACR. I referenced R.G.'s comment in another thread, but I didn't quote what he said. Another thing I struggle with more and more these days: getting what's into my head onto the page

R.G.'s comment is here: https://www.uglyhedgehog.com/t-584362-1.html#9999978
.
Mar 25, 2019 09:02:08 #

Fstop12 wrote:
Well, the image was nice to start with so IMO, there wasn't much needed. Also, it's hard to do challenges with JPEGS. The cake is already baked so to speak and you can't deconstruct the ingredients. I wish we could post RAW images and let people take it from there.
In addition to what Linda suggested, you can put a raw file in Dropbox and post a link to it in your topic that allows anyone to download that particular file. Then size is never an issue.
Mar 25, 2019 09:03:34 #
minniev wrote:
🤗In addition to what Linda suggested, you can put a raw file in Dropbox and post a link to it in your topic that allows anyone to download that particular file. Then size is never an issue.
Mar 25, 2019 10:50:16 #
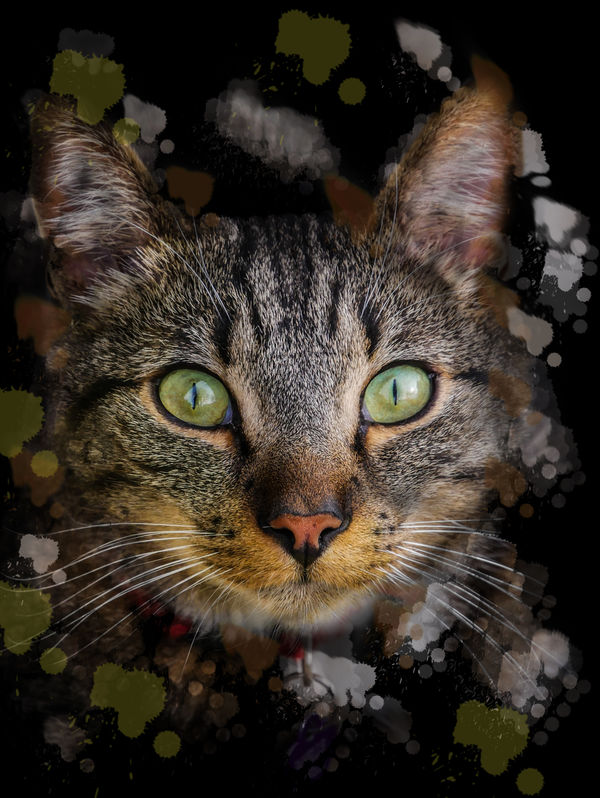
Since the usual supurb edits have been done, I thought I'd have a play with masks and brushes.
In camera raw I gave it a kind of grungy look by upping the contrast, clarity and saturation.
Place a black layer over this and add a layer mask. Reduce the opacity to about 80% until you see the cat start to emerge.
Using a large soft brush bring the cats nose, eyes & mouth back. When you are happy, bring the opacity back to 100%.
Select a splash brush and with the brushes opacity at about 50%, dab in black on the mask to bring back the ears and other parts of the cat you want visible.
On a new layer, paint with the same brush the splashes using different parts of the cat for colours and varying opacities. Use the smudge tool to give them a motion effect. Since these are on their own layer you can adjust the opacity of the layer to get the effect you want.
Put a new layer under the mask layer and with a large, soft warm brush paint around the light areas and along the left side of the cheek. Change the blend mode to soft light and reduce the opacity of the layer to give a warm glow effect. If you need to remove any use a mask.
Using the colour you have just created, go back to the splash brush and add a few more splashes around the picture.
Save as jpg and post to UHH.
Alan
Mar 25, 2019 11:05:17 #

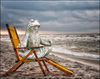
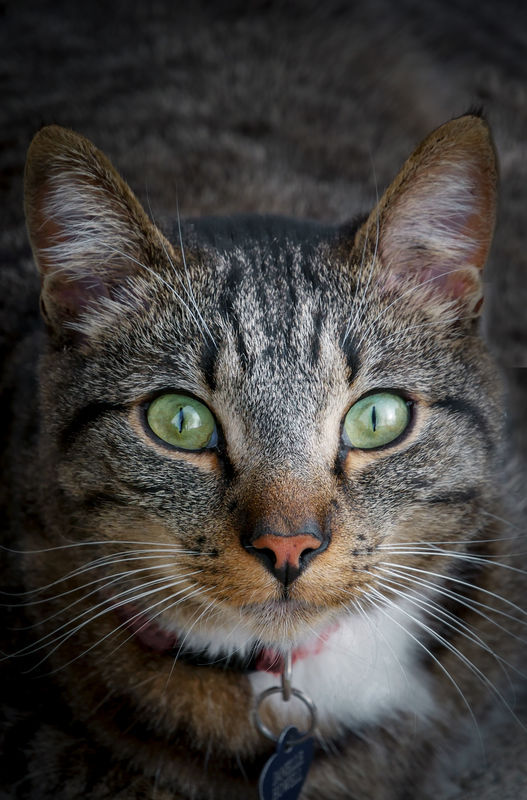
Y'all know I don't do anything fancy, and I don't like adding things to pictures. So, in LR all I did was basic editing, then cropped a bit more closely.
Mar 25, 2019 11:14:05 #
AlMac wrote:
Hi Alan, thanks for your participation! The reason you are seeing the "usual superb edits" is because this challenge was very limited and specific Since the usual supurb edits have been done, I tho... (show quote)
 I do struggle to make myself clear sometimes, lol.
I appreciate your time in explaining your steps in careful detail and hope others will try your ideas.
Mar 25, 2019 11:18:07 #
AzPicLady wrote:
Such expressive eyes! The fur may be a tiny bit crunchy for my tastes, but you have offered a lovely rendition. Many thanks for your interest, Kathy.Y'all know I don't do anything fancy, and I don't like adding things to pictures. So, in LR all I did was basic editing, then cropped a bit more closely.
Mar 25, 2019 14:02:18 #
Cats are special. All cats deserve a Portrait. Butter wouldn't melt in my mouth--but a sparrow now
Processed in ACR
Processed in ACR
Mar 25, 2019 15:15:38 #
Linda From Maine wrote:
This topic was inspired by R.G.'s comment in anoth... (show quote)
Hi Linda, nice challenge while I'm here recovering from the flu. Yes, I did get the flu shot.
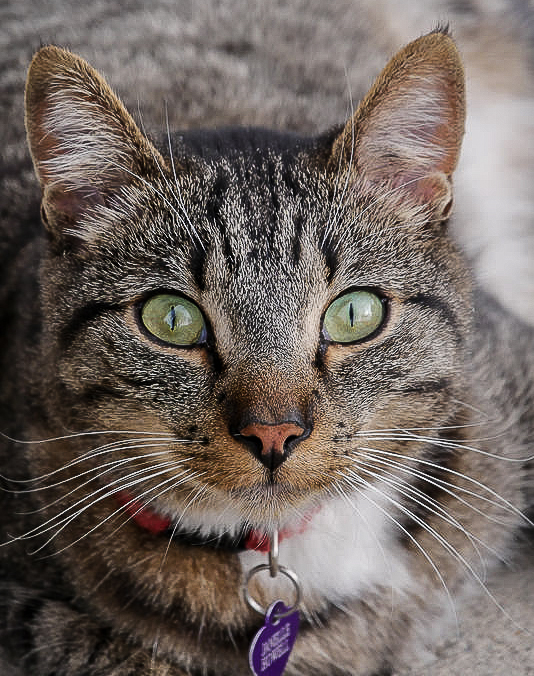
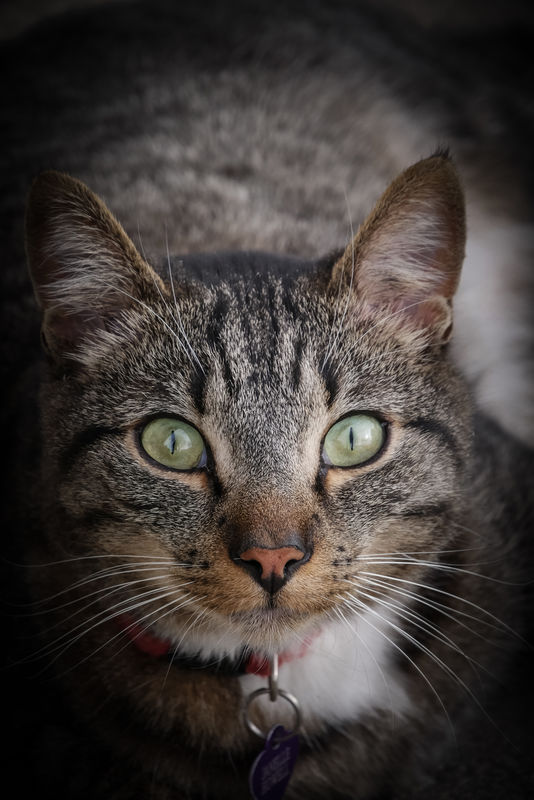
Here's my edit using ACR only. I could have used LR since the engines are the same. Here's what I did:
1. Cropped and leveled the eyes.
2. To draw the viewer directly to the cat's face, I applied a strong vignette around the face using the radial filter.
3. Darkened the distracting area to the right of the cat's face. Since it was flat, I used the spot removal tool to add some detail back into the area.
4. Darkened, sharpened, added a little clarity and emphasized the catch light in the eyes.
5. Deemphasized the red collar, the reflections off the chain and the purple name tag.
6. Dodged and burned using the brush filter to add a little depth to facial features.
7. Finished, using curves, adding a slight increase in overall contrast.
Mike
Mar 25, 2019 15:55:42 #
Curmudgeon wrote:
Nicely done, like the vignette! Thanks so much for your participation.Cats are special. All cats deserve a Portrait. Butter wouldn't melt in my mouth--but a sparrow now
Processed in ACR
Processed in ACR
Mar 25, 2019 15:59:21 #
SalvageDiver wrote:
Beautiful work, Mike! No flu bug affecting your abilities, nor the fact you're working with a jpg Hi Linda, nice challenge while I'm here recovering... (show quote)
Appreciate your interest in the thread.Mar 25, 2019 16:28:16 #
Linda From Maine wrote:
Beautiful work, Mike! No flu bug affecting your abilities, nor the fact you're working with a jpg Appreciate your interest in the thread.
Appreciate your interest in the thread.Thanks Linda. I find working with jpegs almost as easy as working with raw as long as 2 conditions are met, 1) the image is properly exposed, i.e., no clipped highlight or shadows and 2) no jpg artifacts from excessive compression. The main remaining difference is you're constrained to working with an 8-bit vs 16-bit image. You still have full control of tones, colors, sharpness, noise removal, etc. You can make WB changes but no auto presets in LR or PS, you make WB changes manually. I'm not one that subscribes to the idea that a jpg is fully baked out of the camera. However, I primarily shoot raw for the added DR and 16-bit workspace.
Mar 25, 2019 16:32:24 #
SalvageDiver wrote:
Well said. With regards to white balance, PS Elements' version of ACR is similar: no pre-sets if you import a jpg. I've never tried to adjust a jpg in ACR that started with a very "off" WB. I'm kinda curious how hard it would be Thanks Linda. I find working with jpegs almost as... (show quote)
Mar 25, 2019 17:45:40 #
Fotoartist wrote:
Photoshop CC, Adobe Camera Raw
I really love this one. Nice work. But everyone did a great job and it was really interesting to see how everyone interpreted the original photo.
If you want to reply, then register here. Registration is free and your account is created instantly, so you can post right away.