JPEG Camera settings for Optimum Dynamic Range
Dec 24, 2022 04:41:02 #
Ysarex wrote:
And the 8 bit structure of a JPEG is sufficient to store that same target output so it's not a limiting factor. Glad we agree now.
No we dont.
I am explaining why JPEG can not handle a wide dynamic scene straight out the camera.
Why other steps are needed to cheat the data in, that is out of bounds, and how those step works.
You are only insisting that everything is ok, Jpeg can handle it because we save JPEG.
Its simple logic. If JPEG can contain all that wide dynamic range you are so insisting it can straight out of the camera, We'll just shoot JPEG and its done.
So why shoot RAW? Why have single image bracketing like D-lighting or any similar tech? Why need multiple image braketing and merge? Why process the image if JPEG is enough? Why all those?
Dec 24, 2022 09:44:57 #
Ysarex
Loc: St. Louis
Wallen wrote:
No we dont.
I am explaining why JPEG can not handle a wide dynamic scene straight out the camera.
I am explaining why JPEG can not handle a wide dynamic scene straight out the camera.
And in your explanation you've identified the structure of a JPEG file as the reason we can not handle a wide DR scene SOOC. You said, "The bit size and compression limits the dynamic range of a jpeg image." That's not the reason why our cameras have trouble handling wide DR scenes SOOC.
You've already agreed with me. Now you want to disagree with yourself?
I previously identified the reason SOOC images, JPEG or TIFF or HEIF, can't handle wide DR scenes very well: "We are limited by the processing options built into the camera image processor."
You responded directly to that statement; "Agreed. In-camera processing options are limited..."
I then further explained; "Both the camera image processor and our raw processing software must produce a final image to the same target output."
Your direct response to that statement: "Yes."
I've identified then the reason SOOC images can't handle wide DR scenes as well as by-hand raw processing.
Two things to understand:
1. Regardless of automated camera processing or by-hand raw file processing the same output target requirement is in place. That's the limiting factor. You agreed. So it can't be the structure of a JPEG file.
2. And the in-camera processing options are much more limited than the by-hand processing options. And again you agreed.
Wallen wrote:
Why other steps are needed to cheat the data in, that is out of bounds, and how those step works.
You are only insisting that everything is ok, Jpeg can handle it because we save JPEG.
Its simple logic. If JPEG can contain all that wide dynamic range you are so insisting it can
You are only insisting that everything is ok, Jpeg can handle it because we save JPEG.
Its simple logic. If JPEG can contain all that wide dynamic range you are so insisting it can
I never said that. Show me where I said that.
The camera captures the sensor output and that sensor output contains all that wide dynamic range. The sensor output must then be processed to a required standard output target. The camera image processor does that or we do that. Only then, with that processing completed, do we save the processed output to JPEG. And that standard output target can be adequately contained by the JPEG file structure.
The camera is not struggling to push, pull, shove, "cheat the data," compress all that wide dynamic range down because the JPEG file structure is forcing it to do so. That's what you implied and that's not correct. The camera (or photographer) has to do that in order to achieve a standard output target regardless of the file type used to store the final image. That is the limiting factor.
Wallen wrote:
straight out of the camera, We'll just shoot JPEG and its done.
So why shoot RAW? Why have single image bracketing like D-lighting or any similar tech? Why need multiple image braketing and merge? Why process the image if JPEG is enough? Why all those?
So why shoot RAW? Why have single image bracketing like D-lighting or any similar tech? Why need multiple image braketing and merge? Why process the image if JPEG is enough? Why all those?
Dec 24, 2022 13:01:41 #
Your back in your game of twisting words to fit your narrative and including subjects we are not talking about to confuse the discussion. Now your lying again to say that I am disagreeing with myself.
You never said what? Then what are you arguing me for when I declared JPEG can not contain all the dynamic range of a high dynamic range scene?
1. "... and as such 8 bit digital storage is output sufficient."
2. "OP is not being stymied by the fact that JPEG is an 8 bit storage format."
3. "that is the limiting factor, not that JPEGs are 8 bit."
4. "Yes, and as such 8 bit digital storage is output sufficient."
Those are some of where you keep insisting that Jpeg is enought.
For the last time,
I explained why JPEG can not handle a wide dynamic scene straight out the camera.
Why other steps are needed to cheat the data in, that is out of bounds, and how those step works.
You have changed your stand on camera processor.
your first stand: "It's not the bit depth or compression used by the JPEG algorithm that is limiting. The camera's image processor is the limiting factor"
then you change to:"We are limited by the processing options built into the camera image processor."
That is where I agree. Cameras have limited option and even clarified that "processors which are blank slates is another matter".
I agreed that both processor, camera or pc will convert the image to JPEG. That agreement do not support your claim that the camera processor is the reason why it can not do a proper compression. Because if an intermediary step is done in the camera, like single shot merging (active-d lighting or the like) or multiple shot merging of photos, then it is possible to get similar output as the PC processed image.
I stand by my previous post:
1. The bit size and compression limits the dynamic range of a jpeg image.
2. Otherwise no one will use RAW to capture a photo.
3. We are discussing the OP's JPEG SOOC inadequacy. Not post processing RAW and converting to JPEG is adequate.
You have not answer any of my previous question because you know I am right.
This is my last reply. Go believe what you want. Make the last coment for all I care.
Merry Christmas.
Dec 24, 2022 16:10:44 #
Ysarex
Loc: St. Louis
Wallen wrote:
For the last time,
I explained why JPEG can not handle a wide dynamic scene straight out the camera.
Why other steps are needed to cheat the data in, that is out of bounds, and how those step works.
I explained why JPEG can not handle a wide dynamic scene straight out the camera.
Why other steps are needed to cheat the data in, that is out of bounds, and how those step works.
Here's what you originally said: "The bit size and compression limits the dynamic range of a jpeg image. If the scene has a narrow dynamic range, this would not be a problem. If the scene has a wider dynamic range, you need to bracket the scene and merge it at post to capture as much as possible."
I read that and I re-read that and I come to the conclusion that you are saying the structure of a JPEG (8 bit + compression) is why our cameras have to go through "other steps" "to cheat the data in." In other words if the JPEG structure was different those other steps wouldn't be necessary.
You said, "If the scene has a narrow dynamic range, this would not be a problem." The pronoun this in your sentence refers to the JPEG file structure. You follow that with, [but] "If the scene has a wider dynamic range, you need to...." take other steps to cheat the data in. To cheat the data into what? According to you the JPEG file structure. That's incorrect.
It is true that for wide DR scenes, "...other steps are needed to cheat the data in, that is out of bounds,..." However those other needed steps are not needed to cheat the data into the JPEG file structure. That's where what you're saying is wrong. Those other steps are needed to cheat the data into the standard output target.
You're saying that it is the JPEG file structure that is forcing us to employ other steps to cheat the data in and that's wrong. It's the standard output target that is forcing us to employ other steps to cheat the data in.
---------------------------------------------------------------------
In case anyone else is still reading this and finds it confusing, let's begin at the beginning:
We have in the photo industry a standard output target. It's a photographic print.
We start with a piece of paper. We make it as white as we possibly can. We even coat it with stuff to make it whiter. Then we make black ink. We search for dies and pigments to make the ink as black as we possibly can. We put the black ink on the white paper and that's the "real" dynamic range of that print material. It's basically four stops.
Well we take photos of scenes that have lots more than four stops in the scene. So what happens that we can make a print? We apply a curve (tone curve) to the data and compress both ends of the scene DR so we can fit it onto the paper. It works and we find the result convincing. How much then in the actual scene can we get onto the final print? About 6.5 stops. Why not more? The curve becomes to severe and the image starts to look unnatural. We figured all this out long ago before any of us were born.
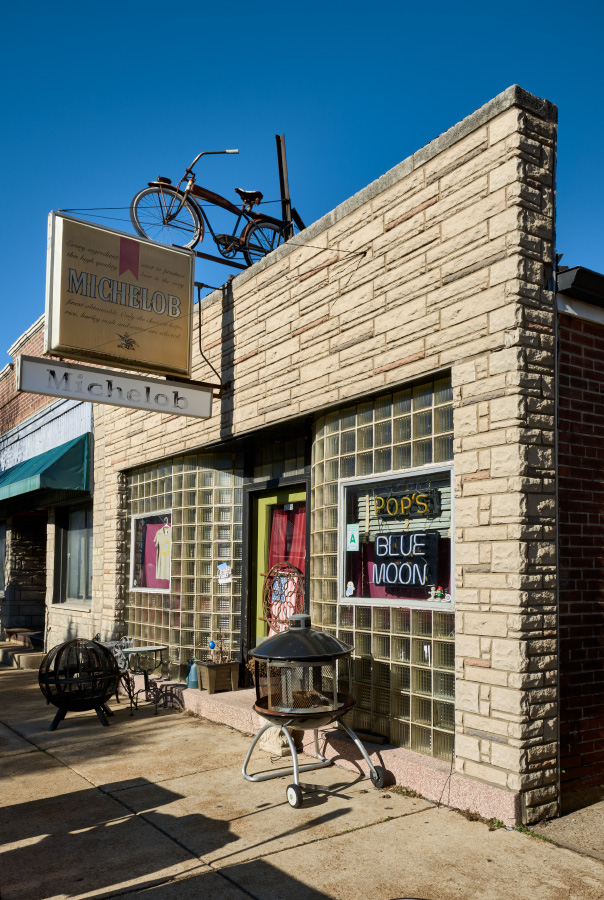
Let's look at a photo. Below is a snap of Pop's Blue Moon, a local bar in my neighborhood. The conditions are blue sky on a sunny afternoon with the subject directly sunlit -- the average photo. My camera (Fuji X-T4) recorded 9.5 stops of usable data. But I chose not to show all that data. Look at the green awning on the building in the background. Up under that awning my camera recorded plenty of usable data. I however am letting that data go as black shadows. The photo would look unnatural if I didn't have those dark shadows. How much visible dynamic range from the scene actually shows in the photo? 6.5 stops.
So here's the trick. Every camera and photo software vendor knows this and all their products are designed to this standard output target (print). When we calibrate our displays guess what the calibration hardware and software is calibrating them to? So when your camera goes to create a JPEG what is the camera processor adjusting the image for -- the standard output target.
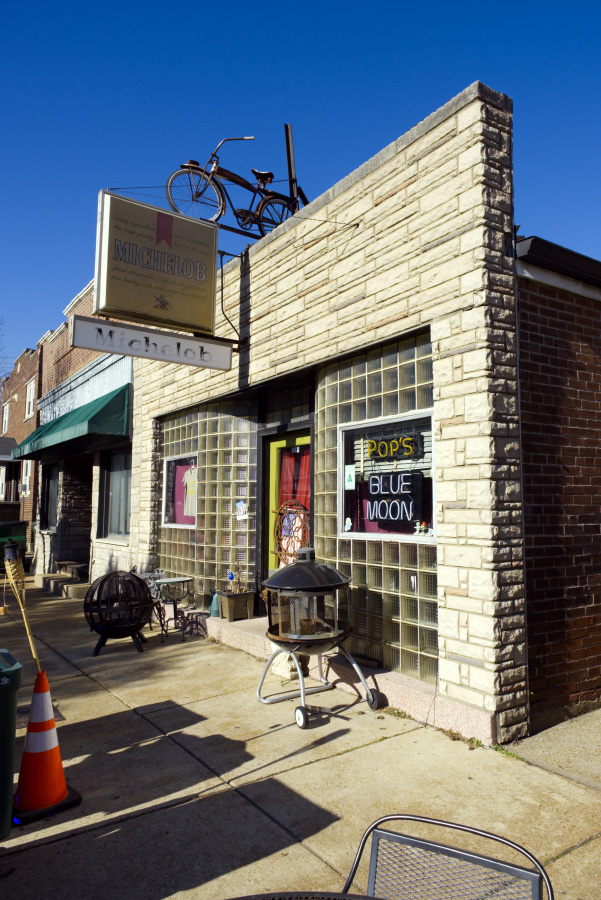
That image of Pop's was saved by my camera as a 14 bit raw file. As I noted it recorded 9.5 stops of data not 6.5. What happens if I let a software editor process that file and make all the choices automatically? Let's give the image to the newest version of Affinity Photo and that image is below my version. Look how AP handled the shadows and highlights -- almost identical to what I did. We both worked to the same standard output target. AP knows what that is. And so does my camera -- so do all our cameras. And if you leave your camera to do it's default best and if you just click auto as I did in AP you consistently get a best effort from the engineers who designed your camera and your processing software to deliver a standard output target image.
Now here's an important point. What if you really want to display 9 or even more stops of DR in a photo. Can you process to a different output target? The answer is no. Not if you want to ultimately make a print or see your image on a standard display. What we have to do in that case is apply more sophisticated methods than just the standard tone curve and very often we have to adjust parts of the image separate from other parts. But we still have to deliver a printable/viewable image that meets the standard output target parameters. That's a critical point.
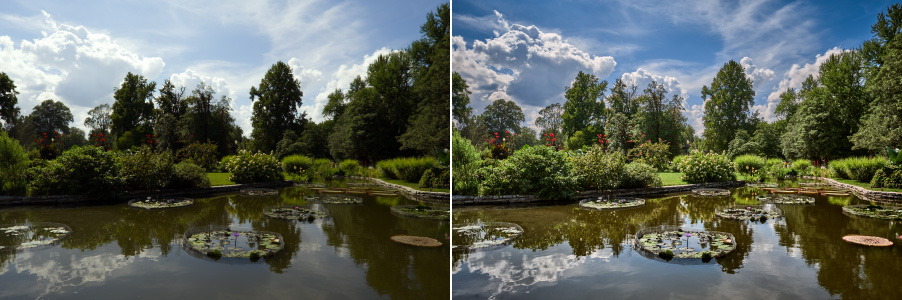
So let's look at another image. I placed two versions of a photo from our park side by side. This photo is backlit and my camera recorded it's full sensor capacity of 10.5 stops of data. On your left is AP's auto version of the photo. On your right is my hand processed version of the photo. Both are processed to the same standard output target. The black in the AP version is the same as the black in my version. AP doesn't have a blacker black. The whites in my version are the same as the whites in the AP version. The range of the output target is the same. What's different is the distribution of everything in the middle. AP blew highlights in the clouds and I didn't. AP's middle tones are too dark and muddy. AP's shadows are too blocked up. AP did much better with a more normal frontlit sunny image. Backlight requires more effort. To create my version of the photo required me to apply masks and adjust local areas of the image separately -- too sophisticated for the camera software or AP's auto function. They work with images that respond to a default tone curve.
But as I worked to apply my manipulations I still had to work within the parameters of the standard output target if eventually I'm going to print the photo or view it on a calibrated display. In other words I can't really produce an image that would require printing paper with more than 4 real stops of DR or try and force more than 6.5 stops of curve adjusted data onto the printing paper. That's why in this previous post https://www.uglyhedgehog.com/t-760595-2.html#13629216 Jersey guy correctly noted that my earlier example looked HDRish -- staying within the limits of the standard output target but overstuffing data beyond the point of looking natural.
The standard output target's limits don't change and except in rare cases we need to work to meet those limits. As I said we figured this out long ago and when digital showed up one of the earliest and obvious questions that had to be answered was, "how much digital storage do we require to adequately store the standard output target?" The answer is 8 bit and that's why JPEGs are an 8 bit file format. The storage capacity of a JPEG is sufficient to store a standard output target image.
Dec 25, 2022 18:18:09 #

Jan 7, 2023 23:46:08 #
imagemeister wrote:
You have a very high contrast subject - as mentioned use the DR function at lowest possible ISO. If I were shooting this, I would use the in camera auto HDR function of my Sonys - where it combines 3 exposures - but it is still hard to get perfection SOOC !
I have to agree - 'perfection' out of SOOC... it's very rarely possible, if ever.
I use Canon 5D Mark 4, and like the Sony, it also has a built-in auto HDR function from three exposures. It works okay, but quite often I find the best exposure of the three is very similar to the camera's processed HDR JPEG. Of course, that does depend on the DR of the scene though, and whether I use straight 'Auto' or choose to use one of the 'custom' options instead, which are : +/-1 EV, +/-2 EV, and +/-3 EV.
And the camera's processed HDR is JPEG only, so really, it's better to use the three RAW files and processed them with your own style choosing as far as how you want the final HDR to look. But really, I agree with others, although a well exposed SOOC JPEG shot in good or controlled lighting situations can be pretty good when you get everything right. However, keep in mind that JPEG's are 8bit compressed files and that can cause deterioration of quality when it comes to printing, such as the dreaded banding in graduated colours, such as in skies and the like. So it's best to process the RAW file and save as 16bit TIFF in case you ever want to print in top quality as some point, and save a copy of the TIFF in JPEG for online posts. If you only ever post online though, then that doesn't matter.
Jan 25, 2023 23:57:01 #
rbtree
Loc: Shoreline, WA, United States
rwm283main wrote:
Thank you for commenting. I was hoping that I could tweak some of the many jpeg settings in the camera so that I could achieve what I’m looking for. But, even if it came close and I still needed to make adjustments I’d be better off shooting in RAW, where I have the greatest control over the image dynamics.
As the above poster stated, use your built in HDR. If you don't like the result, process the best raw file.
And shoot raw.
Mar 23, 2023 23:04:32 #
rwm283main wrote:
I'm shooting with Fujifilm cameras, I have an X-T2... (show quote)
Yes, if you are willing to use a three-stop graduated ND filter to darken the sky. It works fantastically.
Apr 6, 2023 09:26:28 #
May 7, 2023 18:03:00 #
larryepage
Loc: North Texas area
rwm283main wrote:
I'm shooting with Fujifilm cameras, I have an X-T2... (show quote)
No one in four pages has mentioned the best possible tool to try to get you where you want to go. It appears that the sun is directly to your left and is still above the horizon, even though it was very close to setting. This is a textbook case in which a polarizing filter could be used to selectively darken the sky versus the landscape elements. Doing so would reduce the dynamic range by probably two stops. The result would be increased saturation in the blue of the sky and increased detail in the highlights of the clouds.
I don't know what sort of detailed adjustments are available within your cameras' picture controls. But another "trick," if you should be caught without your polarizer, is to increase color saturation, if that adjustment is available to you. You need to experiment to determine the correct amount, but my suggestion is not to be shy about it.
I have interests very similar to yours around producing nice JPEGs straight from the camera. It's not that I never want to do post processing, but rather that I have learned that much more is possible than is allowed to be acknowledged within the UHH mantra. As a result, I no longer discuss it here. My suggestion is to experiment with the adjustments that are available in your cameras. Don't be afraid to "overdo it" to learn the effects, then back off to make the results what you want them to be. Remember...you still have your raw file even if you completely destroy the JPEG.
One hint...make sure you are saving full-resolution, minimally compressed JPEGs. In my cameras, those are called Fine/Large. It's usually two settings.
Dec 24, 2023 10:54:25 #
Leinik
Loc: Rochester NY
Well, the obvious question is "what does "good" mean to you? What does it entail? What are you looking for".
In any case what you get from the JPG is going to be more limited than what you get from the raw file (dynamic range, 8 bits (JPG) versus 14 bots (RAF)). My advice to get the most leeway is to use the raw file and to expose for the highlights (a lot can be retrieved from the shadows these days). Good luck.
In any case what you get from the JPG is going to be more limited than what you get from the raw file (dynamic range, 8 bits (JPG) versus 14 bots (RAF)). My advice to get the most leeway is to use the raw file and to expose for the highlights (a lot can be retrieved from the shadows these days). Good luck.
Feb 6, 2024 15:11:14 #
flyboy61
Loc: The Great American Desert
O.k., a bit off the wall here, but how about reading the light off the stonework or the mid-tone green, then add a soft-edge 2 stop ND filter, or a plain polarizer? Just my $.02.
If you want to reply, then register here. Registration is free and your account is created instantly, so you can post right away.