PS CC - Everything you do not want to know about layers. (Advanced users)
Jun 27, 2022 11:56:58 #

PS CC power relies on layers.
Mac users, sorry, I have no clue what the keystrokes are or even if you even have a dual button mouse and a wheel. Ctrl- is the command key on a Mac
What is a layer according to Adobe?
► The first layer or base layer is by default named Background. This is locked and in theory should not be modified. You will quickly learn otherwise as you progress.

► A layer is a container placed above the Background layer. Think of a layer as a slice of information or as a transparency.

Layers location
Layers are grouped in a tab (Layer) located in the workspace pallet area as a default.
Mac users, sorry, I have no clue what the keystrokes are or even if you even have a dual button mouse and a wheel. Ctrl- is the command key on a Mac
What is a layer according to Adobe?
► The first layer or base layer is by default named Background. This is locked and in theory should not be modified. You will quickly learn otherwise as you progress.
► A layer is a container placed above the Background layer. Think of a layer as a slice of information or as a transparency.
Layers location
Layers are grouped in a tab (Layer) located in the workspace pallet area as a default.
Jun 27, 2022 11:58:11 #
Creating Layers
There are several ways to create layers
► Using the adjustment panel (illustration)
► Using the layer options located at the bottom of the layer tab (illustration)
► Using the layer menu located in the dropdown menu area (illustration
► Using a keyboard shortcut if available
► Using copy and paste from a selection (can be from another program as long as it is pixel based) (Ctrl-C►Ctrl-V)
► Opening an existing image or compliant document on the active document window
Other methods using existing layers.
► Duplicating an existing layer (Ctrl-J)
► Using Ctrl-Alt-G to create a duplicated, linked layer (works with all layers type)
► Merge visible (Merges all the layers that are visible into one and ignores those that are not)
► Merge (selected) layers (Create a single layers with those selected) The new layer takes the name of the top most of the selected layers(Ctrl-E)
► Merge (selected) layers and create an additional new layer. It adds (Merged) next to the layer name. (Alt-Ctrl-E)
► Flatten image (merges all layers - Creates a new base/background layer)
Jun 27, 2022 12:01:39 #
Layers cosmetic options
This will not influence anything other than making working with layers easier.
► Rename (Double-click on existing layer name) Renaming the background layer will remove the lock
► Hide (Illustration) (Right-click on eye icon - visibility)
► Color (Illustration) (Right-click on eye icon - visibility)
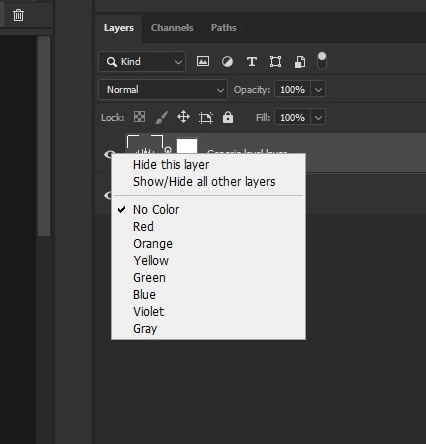
► Thumbnail customization (Illustration) (Right click on thumbnail)
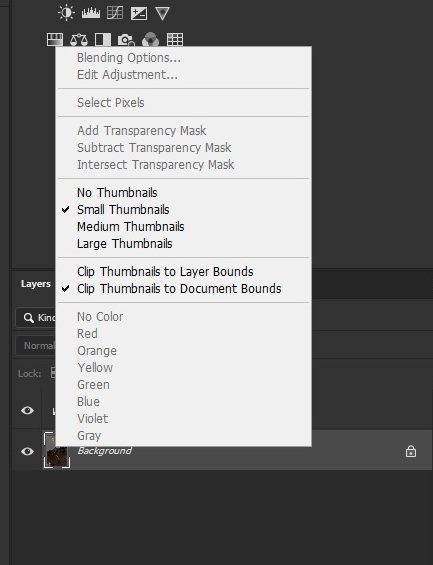
Note: Some options are grayed out because the background layer is partially locked.
These options are great to help to organize layers, especially if you have many that are similar.
This will not influence anything other than making working with layers easier.
► Rename (Double-click on existing layer name) Renaming the background layer will remove the lock
► Hide (Illustration) (Right-click on eye icon - visibility)
► Color (Illustration) (Right-click on eye icon - visibility)
► Thumbnail customization (Illustration) (Right click on thumbnail)
Note: Some options are grayed out because the background layer is partially locked.
These options are great to help to organize layers, especially if you have many that are similar.
Jun 27, 2022 12:02:47 #
Layer types
Please download the graphic.

Layer description from the bottom
► Background layer (Partial lock, limited edit allowed)
► Smart object (Not editable)
► Adjustment (not editable, use layer properties)
► Empty layer (editable)
► Fill layer (Not editable, fill color can be changed)
► Text layer (Not editable)
► Video layer (Not editable, the timeline window needs to be enabled to see the content)
► Embedded and linked layers (Not directly editable)
Notes:
Not editable means you cannot directly paint on it, the layer would need to be rasterized (made into pixels)
Missing layers:
► Artboard layer (Not editable)
► Shape layer (vector not editable)
ALL layers can use layer options and masking
Please download the graphic.
Layer description from the bottom
► Background layer (Partial lock, limited edit allowed)
► Smart object (Not editable)
► Adjustment (not editable, use layer properties)
► Empty layer (editable)
► Fill layer (Not editable, fill color can be changed)
► Text layer (Not editable)
► Video layer (Not editable, the timeline window needs to be enabled to see the content)
► Embedded and linked layers (Not directly editable)
Notes:
Not editable means you cannot directly paint on it, the layer would need to be rasterized (made into pixels)
Missing layers:
► Artboard layer (Not editable)
► Shape layer (vector not editable)
ALL layers can use layer options and masking
Jun 27, 2022 12:05:26 #
Generic layer options

► Tab selection (Layer)
► Layer filter Allows seeing only one type of layer, last icon sets this option on/off.
► Layer blending and Opacity. Opacity adjusts in %. It is the transparency of a layer
► Layer lock settings & Fill. Fill is adjusted in %. It is apparently similar to opacity.
It is really active when layer style is used - This is an advanced option.
You have four ways to adjust both Opacity and Fill values. The methods are identical.
● Hover over the name (opacity or fill), click drag the popup arrows
● Click on the down arrow, click drag the slider
● Type in a number in the value area 0~100
● click in the value area and use the mouse wheel to change the value. Please note that this the simplest way to modify the opacity/fill values accurately.
The Opacity and Fill option appears in other menus.
Jun 27, 2022 12:15:29 #
Layer icons and information
Please refer to the graphic for visual information, click on it for larger version.

I use abbreviations in the illustration for space
Icons and conventions
Using the illustration to decipher the icons, from top to bottom, left to right.
► Layer 1 (Red)
→ Layer is selected (Gray)
→ Eye, visibility switch if gray, the layer is not visible to other layers.
→ Folder icon = group.
→ Vertical chain link: indicates the mask that follow is linked to the image, if absent, no chain link appears.
→ Pixel mask: Normal Black and White, Black hides, White reveal.
→ Four white corners around the mask: Active part of the layer.
→ Vertical chain link
→ Vector mask
→ Name (can be changed by double clicking on it)
► Layer 2 (Yellow)
→ Eye
→ Clipping down arrow: The layer is linked to the layer below.
→ Logo icon: It shows what adjustment layer is used, in this case a Lever Layer
→ Vertical chain link
→ Pixel mask, in this case a luminosity mask
→ Name
► Layer 3 (Shades of green)
→ Eye
→ Smart object thumbnail
→ Double square: a layer style is used
→ White lock: The layer if fully locked
→ Double circles: Smart filters are used
→ Fx icon: Layers effects are used
→ Up arrow: Shows the layer content, if down it hides it.
○ Sub feature/layers
• Effects
A Eye, if gray, no effects is applied
B Group name (Effects, non-changeable).
- Eye, if gray, the effect will not be applied.
- Effect name, double-click on it to edit it.
• Smart filters
A Eye, if gray, no smart filter is applied
B Pixel mask, it can be edited, deleted. If deleted, right click on layer name, recreate a blnk one.
C Group name (Smart filters, non-changeable)
- Eye, if gray the smart filter will not be applied
- Filter name, in this case a Gaussian filter
- Blending option (far right icon)
- Eye
- Adjustment logo, in this case Level*
- Blending option (far right icon)
* This type of filter is not readily available unless you know your program shortcuts. In this case (Level) it is CTRL-L
► Layer 4 (Blue)
→ Eye
→ Image thumbnail
→ Name, please note that this the background/base layer
→ Partial lock (Gray)
Some icons are missing because the features are not used:
► Horizontal link when two layers are linked to each other. This can be hidden because a lock has been set on a liked layer. It cannot be unlinked as long as a lock exists.
► Artboard link
► Video layer icon
► Embeded/linked layer icon
► Possibly others I am ignorant of
Please refer to the graphic for visual information, click on it for larger version.
I use abbreviations in the illustration for space
Icons and conventions
Using the illustration to decipher the icons, from top to bottom, left to right.
► Layer 1 (Red)
→ Layer is selected (Gray)
→ Eye, visibility switch if gray, the layer is not visible to other layers.
→ Folder icon = group.
→ Vertical chain link: indicates the mask that follow is linked to the image, if absent, no chain link appears.
→ Pixel mask: Normal Black and White, Black hides, White reveal.
→ Four white corners around the mask: Active part of the layer.
→ Vertical chain link
→ Vector mask
→ Name (can be changed by double clicking on it)
► Layer 2 (Yellow)
→ Eye
→ Clipping down arrow: The layer is linked to the layer below.
→ Logo icon: It shows what adjustment layer is used, in this case a Lever Layer
→ Vertical chain link
→ Pixel mask, in this case a luminosity mask
→ Name
► Layer 3 (Shades of green)
→ Eye
→ Smart object thumbnail
→ Double square: a layer style is used
→ White lock: The layer if fully locked
→ Double circles: Smart filters are used
→ Fx icon: Layers effects are used
→ Up arrow: Shows the layer content, if down it hides it.
○ Sub feature/layers
• Effects
A Eye, if gray, no effects is applied
B Group name (Effects, non-changeable).
- Eye, if gray, the effect will not be applied.
- Effect name, double-click on it to edit it.
• Smart filters
A Eye, if gray, no smart filter is applied
B Pixel mask, it can be edited, deleted. If deleted, right click on layer name, recreate a blnk one.
C Group name (Smart filters, non-changeable)
- Eye, if gray the smart filter will not be applied
- Filter name, in this case a Gaussian filter
- Blending option (far right icon)
- Eye
- Adjustment logo, in this case Level*
- Blending option (far right icon)
* This type of filter is not readily available unless you know your program shortcuts. In this case (Level) it is CTRL-L
► Layer 4 (Blue)
→ Eye
→ Image thumbnail
→ Name, please note that this the background/base layer
→ Partial lock (Gray)
Some icons are missing because the features are not used:
► Horizontal link when two layers are linked to each other. This can be hidden because a lock has been set on a liked layer. It cannot be unlinked as long as a lock exists.
► Artboard link
► Video layer icon
► Embeded/linked layer icon
► Possibly others I am ignorant of
Jun 27, 2022 21:53:10 #
As mentioned, a layer modifies layers that underneath, same as a transparency does on top of another document.
Here are some of the controls:
Controlling a Layer effect:
► Opacity (in %)
► Fill (in %)
► Blend mode (Drop down menu, advanced feature)
► Masking
→ B&W, pixel based
→ Vector
► Clip Linking to the layer below, including to a group. Forces the effect to be applied only to that layer (Ctrl-G)* **
► Layer style (Double-click on layer)
→ Styles (Fx icon)
→ Blending options (Double square icon)
► Visibility (great to compare before/after)
► Organization
----------------
* When two layers are linked together, inserting a new layer in between makes it automatically linked.
** When using this technic, There is a major issue: Broken layer clip if the latter is moved. Correction: Use the layer link as well
Jun 28, 2022 07:06:19 #
Well, this is really an advanced feature that is seldom understood.
Blend mode does not necessarily blend as a transparency. To add to this confusing issue in layer style yo can play with switches that enable one thing or another under some condition related to the luminosity, the channel used (R,G,B isolated or by pair or... All together, separately).
In blending, it is a real mess that is hard to describe correctly.
I will not even try at the moment. I do not know half of the subject. I am ignorant, basically.
I will not lead a blind person if I am wearing a blindfold. The non seeing person will always be able to expertly negotiate the dark better than I ever will.
So, then what?
When I use a blend mode during a tutorial, I will describe what I am doing and why. At least this way, I will know what I will be typing about.
Wikipedia A good reading material but... Generic for our purpose.
A better explanation than anything else so far
Jun 28, 2022 07:06:33 #
Masking
► Pixel based, B&W and shades of gray
→ Painted on, usually in Black or in White. Black hides, White shows. Grey, anything in between the B&W.
→ Luminosity mask (Usually based on channel)
→ Painted and luminosity Masks can be edited at will, same as any pixel layer. Changes are committed immediately. Make sure the layer mask is selected (White corners)
► Vector based
→ Scalable
Note: Interesting learning curve to create and use, but then again...
Mask options:
These are available under mask properties
► Density. Similar to opacity as it adjust the mask transparency ( 0~100%)
► Feathering
Warning:
Masks are applied after the layer effect is created. This is important as if you use some filters, bleeding can take place among others issues.
Jun 28, 2022 07:09:23 #
Layer organization
► Descriptive layer name
► Grouping (several layers bundled into a group) Select consecutive layers *, press Ctlr-G
→ Allows for comparison using the visibility icon
→ Reduces clutter (visible layers) by using the up/down arrow (Hide/Show the default is hide)
→ Reduces the number of masks used or adds a complementary one
► Linking layers together, including a group, a horizontal chain link will appear to the right when this option is used. This allows to use the move tool with the selected layers. The layers do not need to be consecutive.
► Changing order of layers (Drag/Drop)
----------------------
* Warning:
► Grouping layers that are not consecutive can create an unintentional result. Remedy: Ctrl-Z (Undo)
► Linked layers should not be moved if they are not consecutive.
► Descriptive layer name
► Grouping (several layers bundled into a group) Select consecutive layers *, press Ctlr-G
→ Allows for comparison using the visibility icon
→ Reduces clutter (visible layers) by using the up/down arrow (Hide/Show the default is hide)
→ Reduces the number of masks used or adds a complementary one
► Linking layers together, including a group, a horizontal chain link
will appear to the right when this option is used. This allows to use the move tool with the selected layers. The layers do not need to be consecutive.► Changing order of layers (Drag/Drop)
----------------------
* Warning:
► Grouping layers that are not consecutive can create an unintentional result. Remedy: Ctrl-Z (Undo)
► Linked layers should not be moved if they are not consecutive.
Jun 28, 2022 11:24:17 #
Please note that while you can comment, most will be removed as I add onto this topic.
Please mention all errors - including grammar or spelling - when you see them.
Please mention all errors - including grammar or spelling - when you see them.
If you want to reply, then register here. Registration is free and your account is created instantly, so you can post right away.