Angle of Incidence 1.02 Light Field and Dark Field
Mar 9, 2022 19:35:33 #

Yet anotere function and a good reason to fully understand and know the practical aspects of the angle of incidents theory is LIGHT FILED.
If you are interested in rending various surfaces, especially more problematic ones such as high polished metals, woods, and other materials and being and to record fine detail, engravings and textures, this is for you.
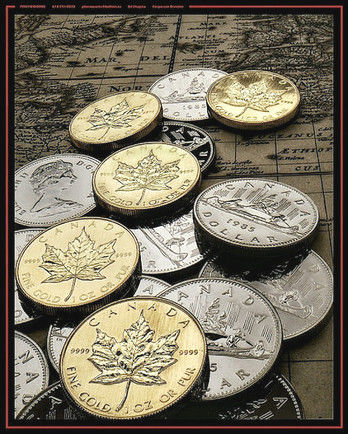
In my photograph of the gold and silver coins, you will notice that the majority of the coins, obviously, look like gold and silver medals. A few were recorded as black. They are not black or tarnished but because of a very slight difference in the angle of incident and that of reflecting, they did not "SEE" the light and therefore coud not reflect it back to the camera. The more look comic in a LIGHT FIED and the penalty BLACK one are in a DARK FIELD.
When you photograph a highly polished, highly reflective and/or mirror-like surface, you are actually taking a picture or a mirror or semi-mirror image of the ligt source. Some of it is a soft broad source such as a large softbox, a smooth natural rendition. If you use a hard concentrated light source, you may get hot spots, those are light field areas on a dark field that may not look natural.
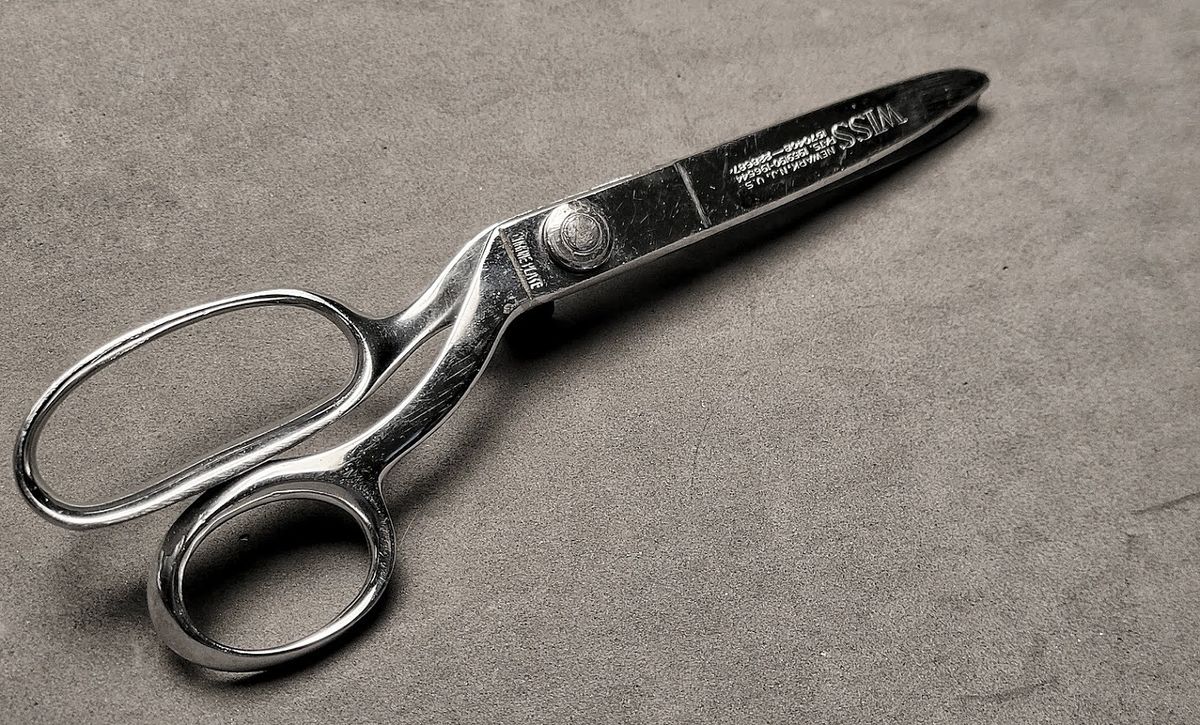
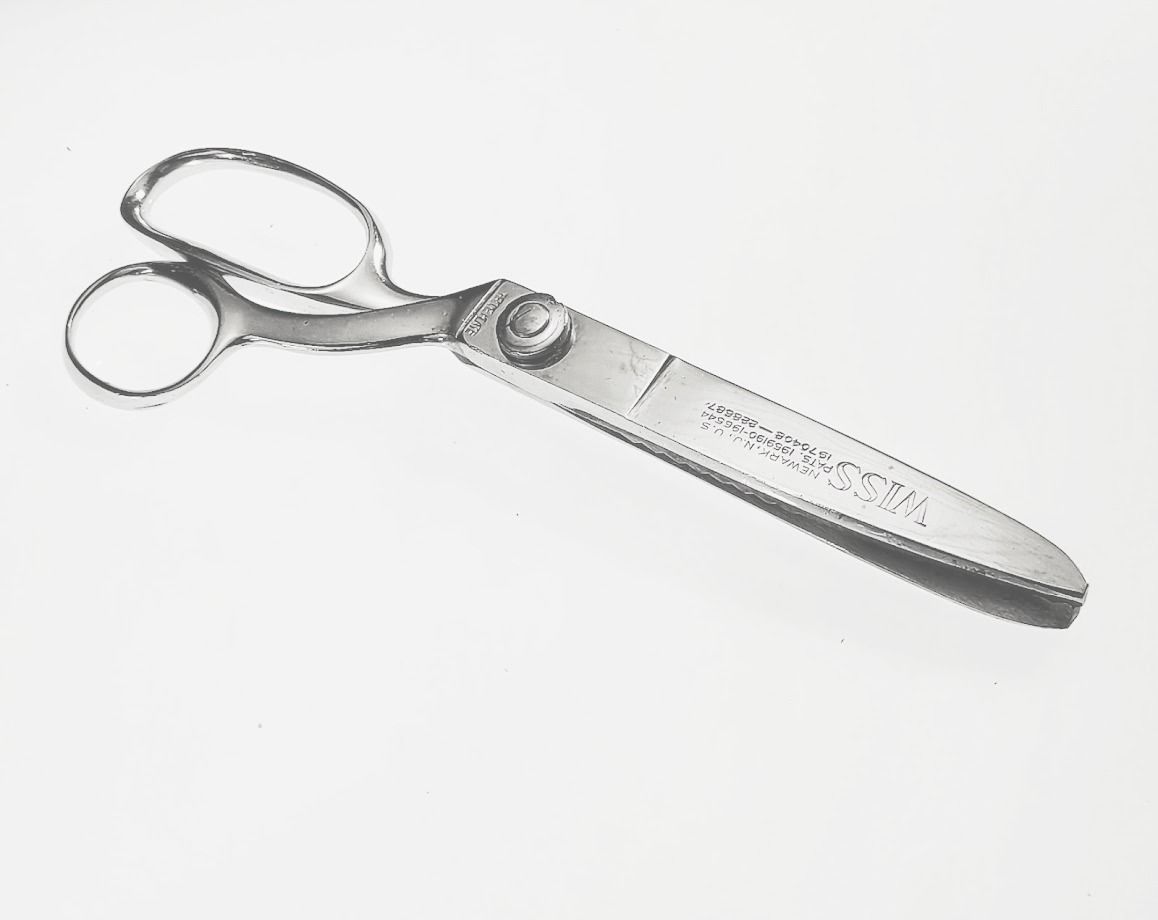
I shot my old pair of pinking shears as an experiment. By adjusting the angle of incidence- the angle at which the light strikes the subject, and the camera position to where the reflecttion shows it to the camera, AND sometimes til the subject a clear way, you can see the difference between light and darkfield rendition. In a dark field, most of the scissor seems dark or black and we know it is a silver colour metal chrome plated item. In a light field, it appears more realistically.
We could build a little tent around it or use one of hose "lightboxes" so the item does do not "see" or reflect dark fields. If we did that, however, we would lose the shape, so you need some dark field to define that shape.
If we want a completely white background, we can shoot on transilluminated white Plexiglass. Seeing the backlight that is pretty much at 180 degrees to the lens, the angle of incidence is such that it will render pure white.
In both light and dark fields, we are still able to define the engraving, the various facets of the metal, the scratches and the shape. of the handles.
All I used for this experiment/exercise. is one Monolight a softbox and a simple cardboard reflector. The white back is a sheet of white Plexiglas that is transilluminated with one monolight.
This is an easy exercise to try at home. You will see how various items, shapes, and surfaces receive and reflect light and use this to define shapes, form and add detail and dimension.
If you are interested in rending various surfaces, especially more problematic ones such as high polished metals, woods, and other materials and being and to record fine detail, engravings and textures, this is for you.
In my photograph of the gold and silver coins, you will notice that the majority of the coins, obviously, look like gold and silver medals. A few were recorded as black. They are not black or tarnished but because of a very slight difference in the angle of incident and that of reflecting, they did not "SEE" the light and therefore coud not reflect it back to the camera. The more look comic in a LIGHT FIED and the penalty BLACK one are in a DARK FIELD.
When you photograph a highly polished, highly reflective and/or mirror-like surface, you are actually taking a picture or a mirror or semi-mirror image of the ligt source. Some of it is a soft broad source such as a large softbox, a smooth natural rendition. If you use a hard concentrated light source, you may get hot spots, those are light field areas on a dark field that may not look natural.
I shot my old pair of pinking shears as an experiment. By adjusting the angle of incidence- the angle at which the light strikes the subject, and the camera position to where the reflecttion shows it to the camera, AND sometimes til the subject a clear way, you can see the difference between light and darkfield rendition. In a dark field, most of the scissor seems dark or black and we know it is a silver colour metal chrome plated item. In a light field, it appears more realistically.
We could build a little tent around it or use one of hose "lightboxes" so the item does do not "see" or reflect dark fields. If we did that, however, we would lose the shape, so you need some dark field to define that shape.
If we want a completely white background, we can shoot on transilluminated white Plexiglass. Seeing the backlight that is pretty much at 180 degrees to the lens, the angle of incidence is such that it will render pure white.
In both light and dark fields, we are still able to define the engraving, the various facets of the metal, the scratches and the shape. of the handles.
All I used for this experiment/exercise. is one Monolight a softbox and a simple cardboard reflector. The white back is a sheet of white Plexiglas that is transilluminated with one monolight.
This is an easy exercise to try at home. You will see how various items, shapes, and surfaces receive and reflect light and use this to define shapes, form and add detail and dimension.
Coins
Dark Field
Light Field
Mixture and light and dark fields to define shape.
Mar 10, 2022 06:21:31 #

Thank you for starting this section. In just the few days since starting I have learned much and am planning to practice this weekend.
Mar 10, 2022 06:25:51 #
Thank you for starting this section. In just the few days since starting I have learned much and am planning to practice and experiment this weekend.
Mar 10, 2022 06:45:36 #

Mar 10, 2022 08:31:12 #

Mar 10, 2022 11:30:34 #
JimmyTB wrote:
Thank you for starting this section. In just the few days since starting I have learned much and am planning to practice and experiment this weekend.
When you practice or experiment, post your stuff here. It doesn't matter if it is perfect or not, or a work in progress. That will provide a workshop-like environment for our section.
Mar 10, 2022 15:09:27 #
E.L.. Shapiro wrote:
When you practice or experiment, post your stuff here. It doesn't matter if it is perfect or not, or a work in progress. That will provide a workshop-like environment for our section.
That's an excellent idea. I would love to get feed back.
May 1, 2022 19:27:38 #
E.L.. Shapiro wrote:
When you practice or experiment, post your stuff here. It doesn't matter if it is perfect or not, or a work in progress. That will provide a workshop-like environment for our section.
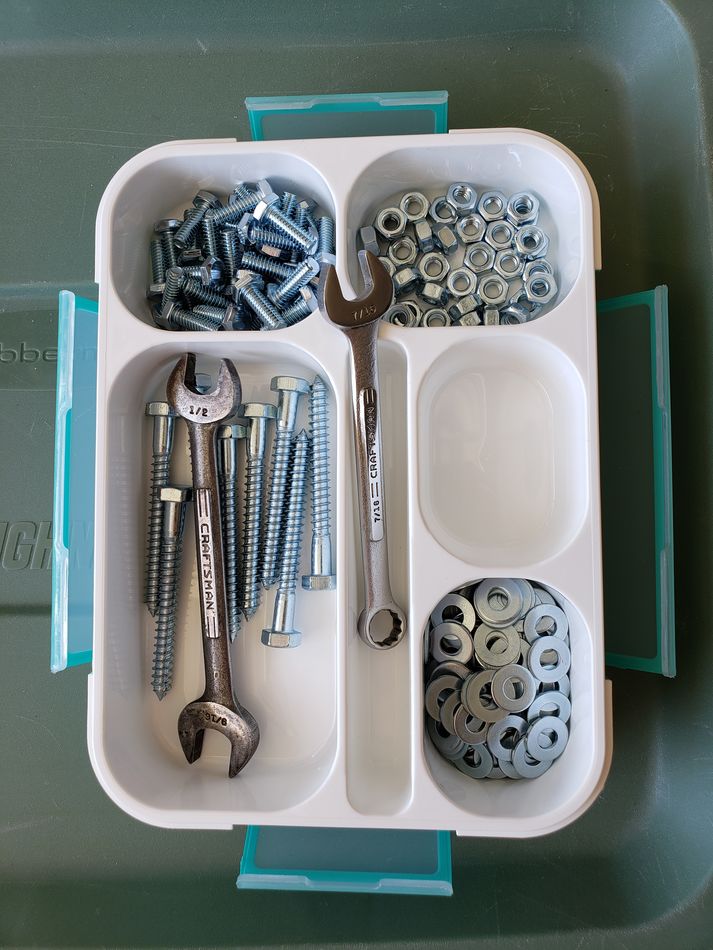
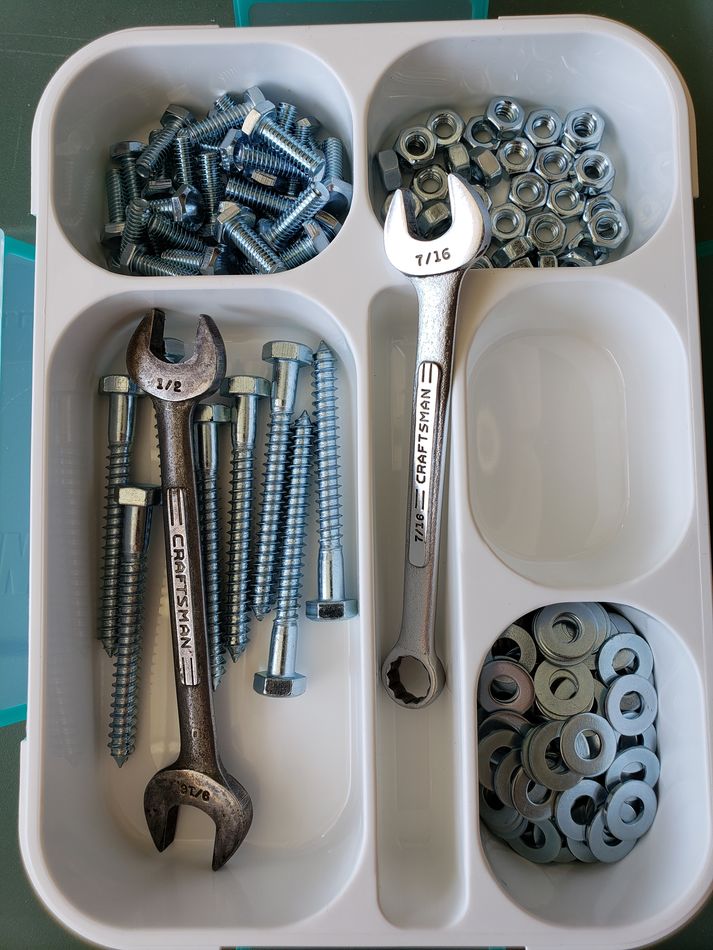
In response to your invitation, attached are two 'product shots' that incidentally (accidentally?) produced a dark field shot.
Background: my daughter,who sells children's lunch boxes on Amazon, was in town and we were discussing repurposing the boxes to broaden her market. I put some nuts, bolts, washers etc. in one and we photographed it for her web site. Having recently read this thread, I noticed the darkfield effect on the wrench that made the size hard to read. Photo1 So I changed the angle of the wrench and re shot it. Photo 2.
Thank you E.L. for the tutorial.
May 1, 2022 23:12:27 #
Wasabi wrote:
In response to your invitation, attached are two '... (show quote)
Great examples! There is a good mixture of light and dark fields. The light field illustrates the chrome finish on the wrench. The dark fields defined the shapes of the hardware and the threads on the lag bolts.
Apr 4, 2023 17:23:27 #
Al Vocinq
Loc: The wilds of upstate New York
E.L.. Shapiro wrote:
Yet anotere function and a good reason to fully un... (show quote)
Thank you for this most illuminating treatise.
Apr 4, 2023 22:37:27 #
Al Vocinq wrote:
Thank you for this most illuminating treatise.

Apr 25, 2023 20:46:07 #
lancewit
Loc: Gold Coast Australia
Thank You for your insight on this subject. Appreciated, Regards Lance Whittington
Apr 25, 2023 22:48:59 #
lancewit wrote:
Thank You for your insight on this subject. Appreciated, Regards Lance Whittington
Your kind comment is appreciated. I hope you find the information useful.
If you want to reply, then register here. Registration is free and your account is created instantly, so you can post right away.