Angle of Incidence 10.1
Mar 4, 2022 11:13:47 #

The Angle of Incidence.
I have a love/hate relationship with lighting diagrams. Of course, diagrams are useful in illustrating the general layout or plan of any lighting situation or setup A diagram can indicate the position that any light source is placed or existing concerning the position of the subject and the camera. There may be an indication of the height of an artificial light source. This pertains to the placement of a subject to accommodate natural light as well.
The negative issue I have with the diagrams is that many folks will tend to use them as a final method as opposed to a guideline or starting point to get them into the ballpark and the using their EYES and the knowledge of their lighting theory to customize the lighting exactly to the subject. When the theory is fully understood and mastered, the photogrh will be equipped to control lighting and workaround many existing light situations without specific diagrams or instructions. It becomes part of your skillsets. This also helps in communicating and teaching you methods by augmenting your lighting language.
I will certainly use diagrams to illustrate various lighting designs but firstly I would like to stress some basic theories to keep in mind. The angle incidence theory is one of the foundational components of effective lighting knowledge and technique. Understanding the applied method will help you solve the most complex lighting issues and the good news is the nuts and bolts of it are simple. The geometry that is involved, even if you never took it up in high school or are not big-time into math is also very simple. A few angles are all you need to keep in mind and once you grasp the concept your eyes will do the rest. The goal is to SEE light.
How light strikes any subject, how that subject reflects light back to the camera and where the camera placed in relation to this lighting scenario is all encompassed the angle of incidence theory. A basic understanding of this theory enables the photographer to create the illusion of dimension in lighting, rendering a wide variety of textures and surfaces and gaining better control over many other aspects of lighting. It's important to start any series of tutorials with some of this basic, review for some, new to others because these ANGLES will be referred to in many of the more advanced topics, critiques and other discussions. This does not mean that one has to pack a protractor or some kind of surveying instrument and calculate angles while shooting. It's just sothat folk can immediately recognize how light is affecting or affecting the subject and how to take advantage of it, modify it or correct it.
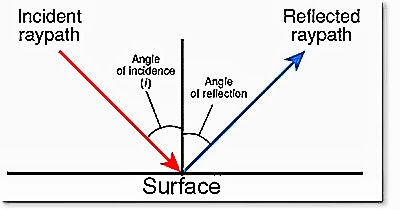
The basic angle of incidents theory is quite simple. The angle of incidents is equal to the angle of reflection. (e.g.) If the light strikes a surface at 45 degrees, it will be reflected from the surface at 45 degrees. This could apply to any angle. If the camera is placed at 45-degrees a more intense effect may be obtained than it is placed at another angle.
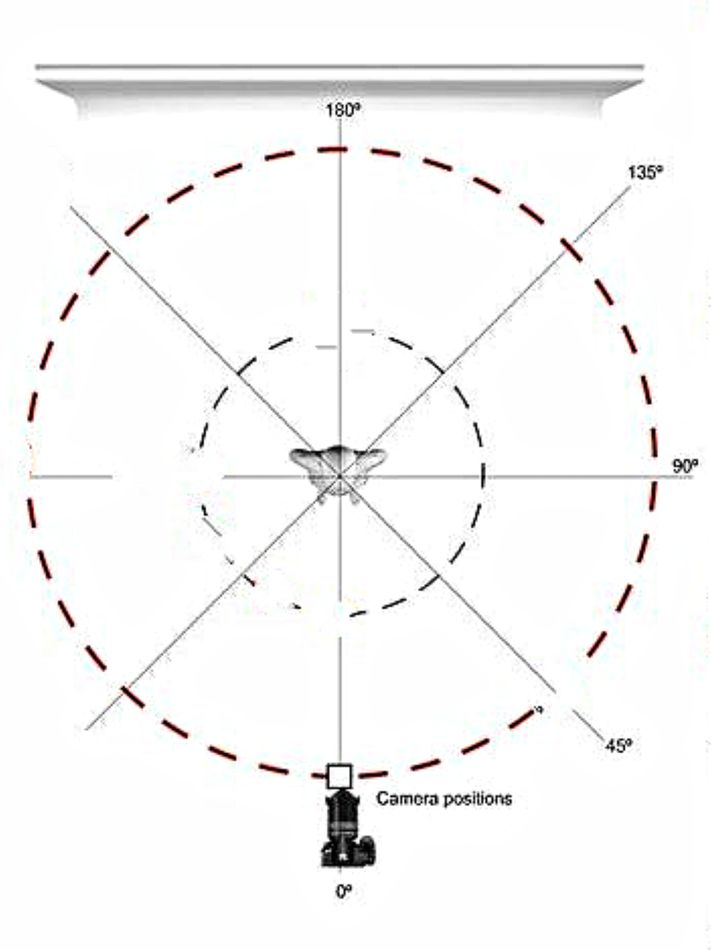
There are a few attached diagrams. One to illustrate a few common angles at what ligh can stririlea subject. The line between the subject and the ends directly behind at 180 degrees is the CAMERA/SUBJECT AXIS. All ages pertain to that line. The red dashes indicate all the angles at whi the camer can be placed to accommodate a non-movable ligh source.
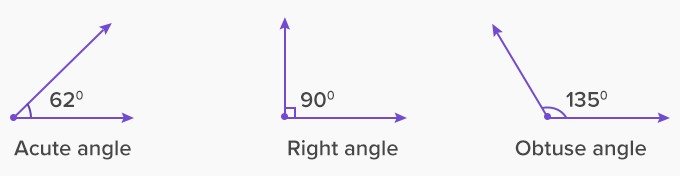
There are only 3 kids of angles to keep in mind, 90 degrees
(a RIGHT ANGLE), and ayn angle that is less than 90 degrees (an ACUTE ANGLE), and any angle that is more than 90 degrees (an OBTUSE ANGLE).
So, thats' it for geometry class- the rest is gonna be fun because once you start to apply the theory, you will begin to SEE light.
As an example, let's say we are making a headshot portal or a commercial image of a spherical object such as a basketball. Just using one ligh, if we start with ligt (flat) ar 0-Degrees-degrees, as we move the ligh increment toward the 90 degrees position the appearance of ligh and shadow, the illusion of dimensionality becomes more dramatic. Then weh we venture it the OBTUSE (not having to do with my personality) the lig seem to be more intense, (even the same power and distance) the separate for any backgron will be more delineated, and more intense specular highlights will appear. The position of the camer facts in because that position is where the angle of REFLECTION kicks into the formula. When you move the camera the relationship can change.
In a controlled studio or studio-like situation, you can move the lights around to suit your purposes and arrive late at the angle of incidence of your choice. When working in natural light, out of doors, or with existing ligh, you can move the subject if possible or change your camer position to achieve the results you want. You may have to come back to a scene at a different time of day. The manthing is, you will be able to identify the light, its effect and recognize various lighting forms who you SEE them.
The angle of incidence theory is invaluable in successfully photographing many objects, especially those with problematic surfaces such as highly polished metals, glass, rendering fine detail and textures, and eliminating unwanted reflection and hot spots. It can help you retain highlight detail in such subjects as bird's feathers, mals' coats, and fine detailing plants and flowers.
The understanding angle of incidence theory will improve your bounce ligh techniques and maximize your usage of many lig modifiers sucha s umbrellas, beauty dishes, and softboxes, and do all kinds of effective lighting with simple flair reflectors. It's gonna be surprising what can do with a few simple mirrors.
Much more to come!
I have a love/hate relationship with lighting diagrams. Of course, diagrams are useful in illustrating the general layout or plan of any lighting situation or setup A diagram can indicate the position that any light source is placed or existing concerning the position of the subject and the camera. There may be an indication of the height of an artificial light source. This pertains to the placement of a subject to accommodate natural light as well.
The negative issue I have with the diagrams is that many folks will tend to use them as a final method as opposed to a guideline or starting point to get them into the ballpark and the using their EYES and the knowledge of their lighting theory to customize the lighting exactly to the subject. When the theory is fully understood and mastered, the photogrh will be equipped to control lighting and workaround many existing light situations without specific diagrams or instructions. It becomes part of your skillsets. This also helps in communicating and teaching you methods by augmenting your lighting language.
I will certainly use diagrams to illustrate various lighting designs but firstly I would like to stress some basic theories to keep in mind. The angle incidence theory is one of the foundational components of effective lighting knowledge and technique. Understanding the applied method will help you solve the most complex lighting issues and the good news is the nuts and bolts of it are simple. The geometry that is involved, even if you never took it up in high school or are not big-time into math is also very simple. A few angles are all you need to keep in mind and once you grasp the concept your eyes will do the rest. The goal is to SEE light.
How light strikes any subject, how that subject reflects light back to the camera and where the camera placed in relation to this lighting scenario is all encompassed the angle of incidence theory. A basic understanding of this theory enables the photographer to create the illusion of dimension in lighting, rendering a wide variety of textures and surfaces and gaining better control over many other aspects of lighting. It's important to start any series of tutorials with some of this basic, review for some, new to others because these ANGLES will be referred to in many of the more advanced topics, critiques and other discussions. This does not mean that one has to pack a protractor or some kind of surveying instrument and calculate angles while shooting. It's just sothat folk can immediately recognize how light is affecting or affecting the subject and how to take advantage of it, modify it or correct it.
The basic angle of incidents theory is quite simple. The angle of incidents is equal to the angle of reflection. (e.g.) If the light strikes a surface at 45 degrees, it will be reflected from the surface at 45 degrees. This could apply to any angle. If the camera is placed at 45-degrees a more intense effect may be obtained than it is placed at another angle.
There are a few attached diagrams. One to illustrate a few common angles at what ligh can stririlea subject. The line between the subject and the ends directly behind at 180 degrees is the CAMERA/SUBJECT AXIS. All ages pertain to that line. The red dashes indicate all the angles at whi the camer can be placed to accommodate a non-movable ligh source.
There are only 3 kids of angles to keep in mind, 90 degrees
(a RIGHT ANGLE), and ayn angle that is less than 90 degrees (an ACUTE ANGLE), and any angle that is more than 90 degrees (an OBTUSE ANGLE).
So, thats' it for geometry class- the rest is gonna be fun because once you start to apply the theory, you will begin to SEE light.
As an example, let's say we are making a headshot portal or a commercial image of a spherical object such as a basketball. Just using one ligh, if we start with ligt (flat) ar 0-Degrees-degrees, as we move the ligh increment toward the 90 degrees position the appearance of ligh and shadow, the illusion of dimensionality becomes more dramatic. Then weh we venture it the OBTUSE (not having to do with my personality) the lig seem to be more intense, (even the same power and distance) the separate for any backgron will be more delineated, and more intense specular highlights will appear. The position of the camer facts in because that position is where the angle of REFLECTION kicks into the formula. When you move the camera the relationship can change.
In a controlled studio or studio-like situation, you can move the lights around to suit your purposes and arrive late at the angle of incidence of your choice. When working in natural light, out of doors, or with existing ligh, you can move the subject if possible or change your camer position to achieve the results you want. You may have to come back to a scene at a different time of day. The manthing is, you will be able to identify the light, its effect and recognize various lighting forms who you SEE them.
The angle of incidence theory is invaluable in successfully photographing many objects, especially those with problematic surfaces such as highly polished metals, glass, rendering fine detail and textures, and eliminating unwanted reflection and hot spots. It can help you retain highlight detail in such subjects as bird's feathers, mals' coats, and fine detailing plants and flowers.
The understanding angle of incidence theory will improve your bounce ligh techniques and maximize your usage of many lig modifiers sucha s umbrellas, beauty dishes, and softboxes, and do all kinds of effective lighting with simple flair reflectors. It's gonna be surprising what can do with a few simple mirrors.
Much more to come!
Mar 4, 2022 12:02:36 #

Mar 4, 2022 12:26:48 #
He is not talking just about studio lighting.
He is talking about ANY lighting!
I use these angles a LOT, outdoors.
Of course, I have to move me, not the light source, to change the angle.
He is talking about ANY lighting!
I use these angles a LOT, outdoors.
Of course, I have to move me, not the light source, to change the angle.
Mar 4, 2022 12:44:13 #
Najataagihe wrote:
He is not talking just about studio lighting.
He is talking about ANY lighting!
I use these angles a LOT, outdoors.
Of course, I have to move me, not the light source, to change the angle.
He is talking about ANY lighting!
I use these angles a LOT, outdoors.
Of course, I have to move me, not the light source, to change the angle.
That's right! If you study "studio lighting" and learn the principles, you will discover that many of the observational techniques are applicable to all kinds of ambient, natural and available lighting situations. Inversely, if you are observant and can see many lighting opportunities in natural circumstances, you will more easily simulate them in a studio.
A studio or studio-like setup is a good kinda lighting laboratory because we can move the lights around, modify, experiment, and observe. You, of course, can not move the sun, the sky, or even a window where light is streaming in but you can sometimes move the subject and the camera into the pattern that yields the effect you are looking for.
Mar 4, 2022 22:32:33 #
Steve DeMott
Loc: St. Louis, Missouri (Oakville area)
Thanks Ed. I'm really looking forward to this section.
Here is a fantastic book on light.
Light: Science and Magic: An Introduction to Photographic Lighting
Fil Hunter, Paul Fuqua
used book for $5.00. 344 pages paperback. Look for: condition Good or better. I've ordered more then 20 books from them and only had one that the condition was not as expected.
https://www.abebooks.com/servlet/SearchResults?sts=t&cm_sp=SearchF-_-NullResults-_-Results&an=fil%20hunter
Mar 4, 2022 22:49:50 #
Steve DeMott wrote:
Thanks Ed. I'm really looking forward to this sect... (show quote)
Good reading material! Thanks!
Mar 5, 2022 13:59:46 #
Steve DeMott wrote:
Thanks Ed. I'm really looking forward to this sect... (show quote)
I have a copy of that book, Third edition published in 2007. However, I think the theory and descriptions would be nearly the same and applicable to today. I looked it up and there is a Sixth edition with expanded charters and information updated on equipment for studio and outdoor photography. Of course the new edition is a bit higher priced.
Mar 5, 2022 16:28:20 #
Steve DeMott
Loc: St. Louis, Missouri (Oakville area)
PhotogHobbyist wrote:
I have a copy of that book, Third edition published in 2007. However, I think the theory and descriptions would be nearly the same and applicable to today. I looked it up and there is a Sixth edition with expanded charters and information updated on equipment for studio and outdoor photography. Of course the new edition is a bit higher priced.
I think it's a steal for $23.00 on amazon. I have a couple otherd from Fil Hunter and they are a fantastic read.
Mar 5, 2022 19:32:54 #
E.L.. Shapiro wrote:
The Angle of Incidence. br br I have a love/hate... (show quote)
The angles you define are important to understand how light interacts with a surface. I would add one more thing to your description: scattering.
When light strikes a surface that is not purely reflective, three things happen to the light. Some of the light can bounce off the surface as you describe (reflection), with the angle of incidence equal to the angle of reflection. Some of the light can be absorbed, i.e. the energy goes into heating the surface. And some of the light can be scattered, i.e. the light bounces off the surface, but not all the light goes in the direction defined by the angle of reflection. I have transmogrified your last image to show scattering. The following image shows the scattered ray going off at the angle of scattering, but this is NOT to say that all the scattered light goes in this direction. In fact, the scattered light goes in all directions, including into and out of the page. The power of the light in any given scattered direction is generally proportional to the square of the cosine of the angle of scattering. That is shown by the oval, which represents the power of the ray that goes in any given direction (from the point at which the ray strikes the surface).
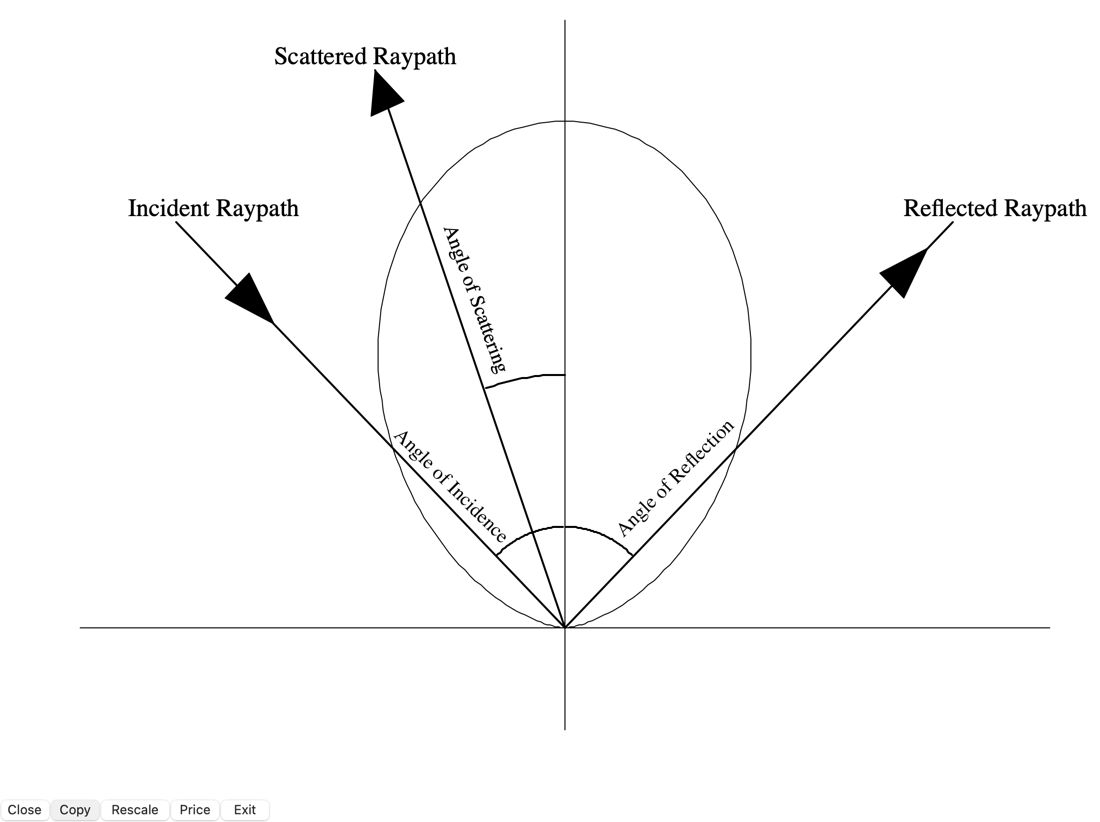
Of course, the actual power distribution is dependent on the actual surface doing the scattering, so not all the scattered light will follow the above relationship, but it's a good estimate for most surfaces we will encounter.
Scattering of light is important for some lighting techniques, such as bounce lighting (which could include continuous lights or speed lights).
Mar 5, 2022 22:47:12 #
DirtFarmer wrote:
The angles you define are important to understand ... (show quote)
Of course, that is is correct. I did not say that a mirror, textured metal, black velvet, twill fabric, foliage, or glass will all absorb or reflect or scatter light in the same manner. In portraits, even folks with different skin colours may react differently in the final result. The same exact lighting angle on a human face, a loaf of bread or a black leather shoe will not record exactly the same way
As a rudimentary starting point, I just want the get the general concept of basic light paths and will elaborate on the variations in more advanced posts to come. There is lots of science but to start off with I want to keep it relatively simple and stress the more applied approaches and not get into too many complexities.
As an example, I will be talking about parabolic umbrella usage. Some photograher just use them to defuse or spread ligt. If, however, the shape and exact geometry of some umbrellas is considered, and the photographer has a basic concept angle of incense, they can utilize an umbrella for more exactly controlled lighting. Of course, there's going to be a difference if the inner surface of the umbrella is white, matte-silver or a more "shiny" super silver.
I am not the "teacher" here, so I do welcome every post, addition, suggestion, correction and am willing to discuss anything that has to do with light. As for my contribution, I want to introduce things incrementally.
Another important concept is LIGHT and DARK field lighting, which is especially useful in photography metallic and high polished surfaces. This totally depends on the angle of incense.
Most photographic lighting equipments are not lasers. Light is not only scatterers when it is reflected off of a particular subject, it scatters all over the place, especially in indoor settings where it bounces off many reflective surfaces. I am going to write a post on "unseen secondary light" which can affect lighting ratios and contrast. It is especially prevalent with electronic flash usage because the dimmer modelling lamps do not show the effect of all the stray light in the room. It can help with certain high-key effects and hider many low-key efforts if not considered.
Aug 4, 2023 00:03:55 #
E.L.. Shapiro wrote:
br br Of course, that is is correct. I did not s... (show quote)

One thing i find so frustrating to play with are the reflective & mirrored subject/objects. They are a pain to put lighting on.
Aug 4, 2023 10:57:27 #
Wallen wrote:
One thing I find so frustrating to play with are the reflective & mirrored subject/objects. They are a pain to put lighting on.
One thing I find so frustrating to play with are the reflective & mirrored subject/objects. They are a pain to put lighting on.
An easy way to approach mirrors, mirror-like and highly polished surfaces is to understand that when you are shootingg such subjects, you are shooting a mirror image of the ligt source. If it is large lare enough, in proportion tothe subject, and even enough to record without unwanted glare or hot spots, you just need to determine the angle of incidence and angle of reflaction. You can still pick up textures and details if the lights are placed accordingly.

Aug 4, 2023 14:53:08 #
E.L.. Shapiro wrote:
An easy way to approach mirrors, mirror-like and highly polished surfaces is to understand that when you are shootingg such subjects, you are shooting a mirror image of the ligt source. If it is large lare enough, in proportion tothe subject, and even enough to record without unwanted glare or hot spots, you just need to determine the angle of incidence and angle of reflaction. You can still pick up textures and details if the lights are placed accordingly.
That is fine with flat or somewhat flat objects. With mirrored wine bottles, all bets are off and out the window

Aug 4, 2023 15:41:57 #
Wallen wrote:
That is fine with flat or somewhat flat objects. With mirrored wine bottles, all bets are off and out the window
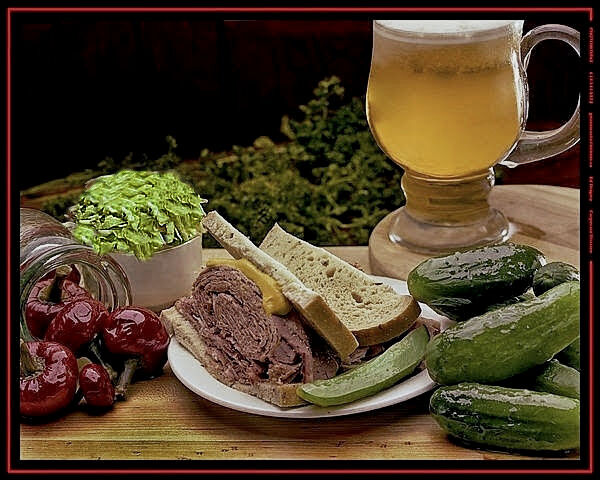
Not really! Check out the beer glass in the sandwich shot and the salad dressing bottle in the salad shot. Look at what I wrote in your other post in the man section. If you remove all the reflections you're going to have flat images with no specualr highlights- the trick is to put the reflections in the right places.

Aug 5, 2023 16:17:15 #
E.L.. Shapiro wrote:
Not really! Check out the beer glass in the sandwich shot and the salad dressing bottle in the salad shot. Look at what I wrote in your other post in the man section. If you remove all the reflections you're going to have flat images with no specualr highlights- the trick is to put the reflections in the right places.
That is exactly the dilema. All reflections should not be removed but controlled as many times, those relections themselves do make the product look well.
With textured items this is not a problem.
It is the very smooth mirrored objects that are a pain to shoot.
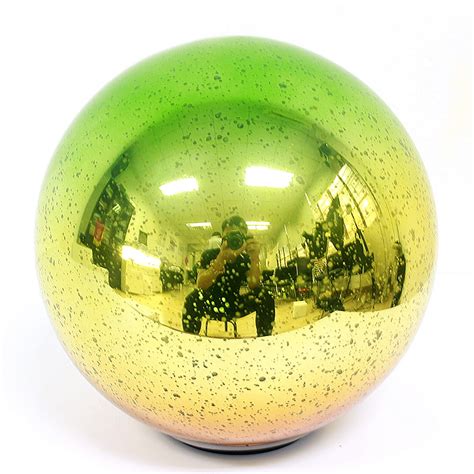
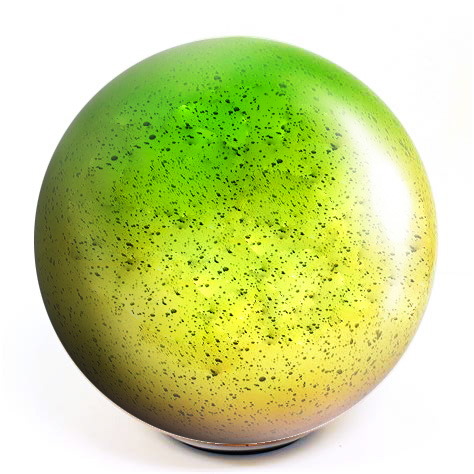
As this example below. (not my photo, just grabbed from the net)
When taken in a group setting, some work around is possible, but when taken as items per se, I always end up drawing on the photos (excessive retouching on second image) to get the desired effect
If you want to reply, then register here. Registration is free and your account is created instantly, so you can post right away.