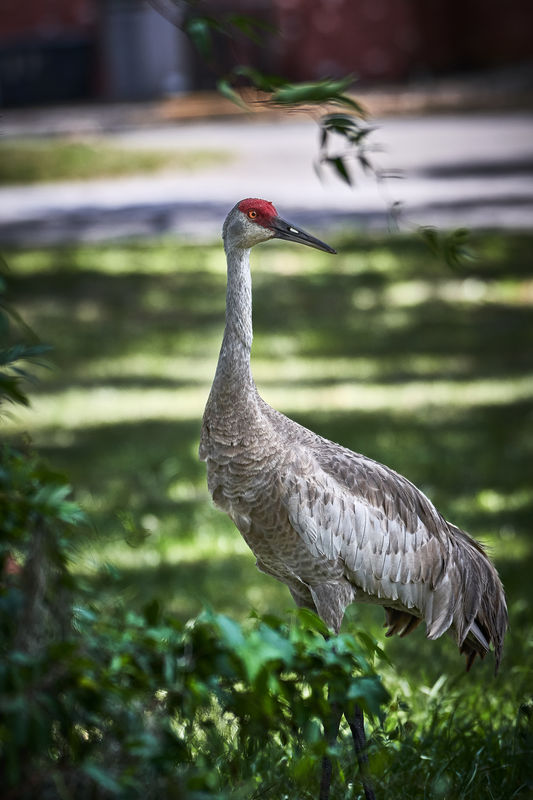
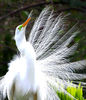
This is a "how to fix" photo of a Sandhill Crane.
May 17, 2021 20:15:14 #

I like everything about this shot, except the bright sunlight patch behind his head. I thought the branch hanging down behind him would break it up enough that it would distract me but it still bothers me.
Would it help to darken the bright area behind his head in PP, or would that looks too artificial?
Am I overreacting?
Nikon D7500
AF-S NIKKOR 200-500mm 1:5.6E ED VR
ISO 640, 1/320, f5.6, 270mm
Date: 05/17/2021
Edited in: Capture One 21
Would it help to darken the bright area behind his head in PP, or would that looks too artificial?
Am I overreacting?
Nikon D7500
AF-S NIKKOR 200-500mm 1:5.6E ED VR
ISO 640, 1/320, f5.6, 270mm
Date: 05/17/2021
Edited in: Capture One 21

May 17, 2021 20:31:48 #
frankNichols wrote:
I like everything about this shot, except the bright sunlight patch behind his head. I thought the branch hanging down behind him would break it up enough that it would distract me but it still bothers me.
Would it help to darken the bright area behind his head in PP, or would that looks too artificial?
Am I overreacting?
Nikon D7500
AF-S NIKKOR 200-500mm 1:5.6E ED VR
ISO 640, 1/320, f5.6, 270mm
Date: 05/17/2021
Edited in: Capture One 21
Would it help to darken the bright area behind his head in PP, or would that looks too artificial?
Am I overreacting?
Nikon D7500
AF-S NIKKOR 200-500mm 1:5.6E ED VR
ISO 640, 1/320, f5.6, 270mm
Date: 05/17/2021
Edited in: Capture One 21
Darkening it may work. Or, consider cropping it out down to just under that green island on the left. Then clone out the remaining leaves. You could then darken the bright water a little and it would not be so prominent.
May 17, 2021 20:33:30 #
fantom wrote:
Darkening it may work. Or, consider cropping it out down to just under that green island on the left. Then clone out the remaining leaves. You could then darken the bright water a little and it would not be so prominent.
Thank you, I will give it a try,
I kind of like the elongated ratio to emphasize the vertical bird, but that bright area does bother me now.
May 17, 2021 21:00:18 #
I would clone out the branch and do a local adjustment to the bright spot to darken it. I would leave the crop as is.
May 17, 2021 21:01:02 #

Actually Moose Peterson had an article about using a horizonal crop to reduce an issue like this. If you cropped it vertical rather than capturing it that way, you might try the other way and / or check his site for the article.
May 17, 2021 21:13:05 #
frankNichols wrote:
I like everything about this shot, except the bright sunlight patch behind his head. I thought the branch hanging down behind him would break it up enough that it would distract me but it still bothers me.
Would it help to darken the bright area behind his head in PP, or would that looks too artificial?
Am I overreacting?
Nikon D7500
AF-S NIKKOR 200-500mm 1:5.6E ED VR
ISO 640, 1/320, f5.6, 270mm
Date: 05/17/2021
Edited in: Capture One 21
Would it help to darken the bright area behind his head in PP, or would that looks too artificial?
Am I overreacting?
Nikon D7500
AF-S NIKKOR 200-500mm 1:5.6E ED VR
ISO 640, 1/320, f5.6, 270mm
Date: 05/17/2021
Edited in: Capture One 21
Consider clone stamp the green area to the great white area.Its a great image but you can make it super.
May 17, 2021 21:23:04 #
frankNichols wrote:
Thank you, I will give it a try,
I kind of like the elongated ratio to emphasize the vertical bird, but that bright area does bother me now.
I kind of like the elongated ratio to emphasize the vertical bird, but that bright area does bother me now.
I just occurred to me that you could select the entire bird and put it on any background that you like. Pretty easy to do with the fairly recent improvements in PS like select subject etc.
May 18, 2021 08:26:06 #

If you shot in raw, try reducing contrast, lightening the blacks and darkening the whites while still in raw editor. If jpg only, you may still have those options (I'm not familiar with your software). Then selectively brighten the bird, give it more color saturation and clarity (details/structure).
May 18, 2021 09:55:11 #

frankNichols wrote:
I like everything about this shot, except the bright sunlight patch behind his head. I thought the branch hanging down behind him would break it up enough that it would distract me but it still bothers me.
Would it help to darken the bright area behind his head in PP, or would that looks too artificial?
Am I overreacting?
Nikon D7500
AF-S NIKKOR 200-500mm 1:5.6E ED VR
ISO 640, 1/320, f5.6, 270mm
Date: 05/17/2021
Edited in: Capture One 21
Would it help to darken the bright area behind his head in PP, or would that looks too artificial?
Am I overreacting?
Nikon D7500
AF-S NIKKOR 200-500mm 1:5.6E ED VR
ISO 640, 1/320, f5.6, 270mm
Date: 05/17/2021
Edited in: Capture One 21
I think people are "distracted" too easily. It's there, but the bird is beautiful - and it's a fine shot

May 18, 2021 10:25:41 #
Rick from NY
Loc: Sarasota FL
Relatively simple with PS layer adjustments. Simplest way to start is to use “select subject”, create an adjustment layer for curves or levels, increase the brightness of the crane (yours is too dark), duplicate the layer (control j), invert the new layer (control I) darken the background using any of the adjustment tools and you’ll have improved the image. Using healing brush or clone tool in that large an area will take a long time and the results will probably be more distracting than the original hot spot
May 18, 2021 10:29:50 #

I like it the way that it is and I recommend a few very minor tweaks. The first is to remove the green tree limb by its head for it adds nothing to the scene. The next would be to straighten the horizontal blur at the top of the image. It's a bit like having an ocean horizon out of level and it pulls my eye to it.
It takes dark to show light and darkening the area around the head would take a lot of burn to make the dark red and medium grey of the birds head stand out. The inverse may be a better approach which would be to lighten by dodging the birds head ever so slightly with a soft brush and limited flow.
It takes dark to show light and darkening the area around the head would take a lot of burn to make the dark red and medium grey of the birds head stand out. The inverse may be a better approach which would be to lighten by dodging the birds head ever so slightly with a soft brush and limited flow.
May 18, 2021 10:38:27 #
Rick from NY
Loc: Sarasota FL
Rick from NY wrote:
Relatively simple with PS layer adjustments. Simp... (show quote)
I did just these 6 steps to your image. Took me 60 seconds. Obviously could spend more time cleaning it up even better (opening up the birds legs and tweaking his eyes) , but this will give you the idea. You can even place the bright area on separate layer and tone it down further.
May 18, 2021 11:03:05 #
Rick from NY wrote:
I did just these 6 steps to your image. Took me 60 seconds. Obviously could spend more time cleaning it up even better (opening up the birds legs and tweaking his eyes) , but this will give you the idea. You can even place the bright area on separate layer and tone it down further.
Thank you. Nice
May 18, 2021 11:05:00 #
May 18, 2021 11:27:42 #
I used curves to lighten mid-tones and darken whites. A bit of dodge (selective lightening) on the bird and burn (darkening) of near foliage. Detail extractor filter from Nik Color Efex applied to the bird.

If you want to reply, then register here. Registration is free and your account is created instantly, so you can post right away.