Affinty Tutorial - "Splintered Glass" effect - Red Leaf
May 4, 2021 10:36:20 #

Years ago I created a style I called Splintered Glass - kind of a modern version of Cubism. It creates almost an abstract composite of elements, combining natural objects with an abstract background. It uses a third party software program called FotoSketcher [Emergence 2] (which is a free download) to create the "splintered glass" look.
I decided to rewrite this tutorial to outline the steps I used in Affinity Photo. The original was written for Photoshop and can be found here: https://www.uglyhedgehog.com/t-329743-1.html
I decided to rewrite this tutorial to outline the steps I used in Affinity Photo. The original was written for Photoshop and can be found here: https://www.uglyhedgehog.com/t-329743-1.html

May 4, 2021 10:37:03 #
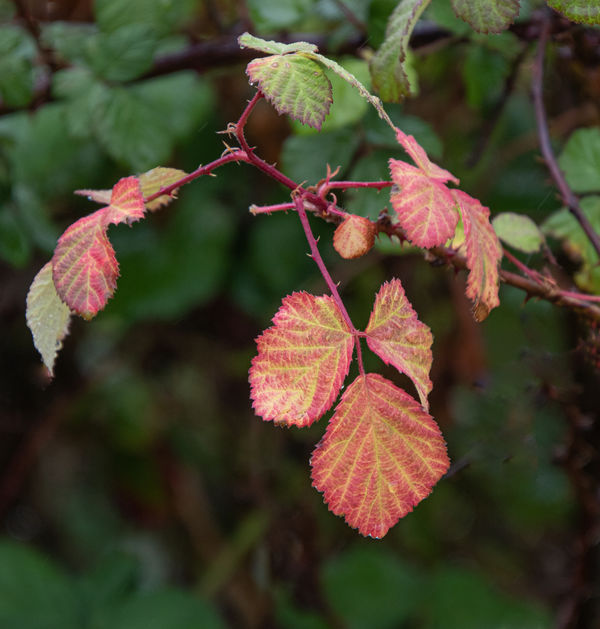
Start by choosing an image you like, something with plenty of color, but with a background you wouldn't mind de-emphasizing. I exported this image from Affinity to a file I called "TutorialSplinteredGlassRedLeaf_Original.jpg"
May 4, 2021 10:42:21 #
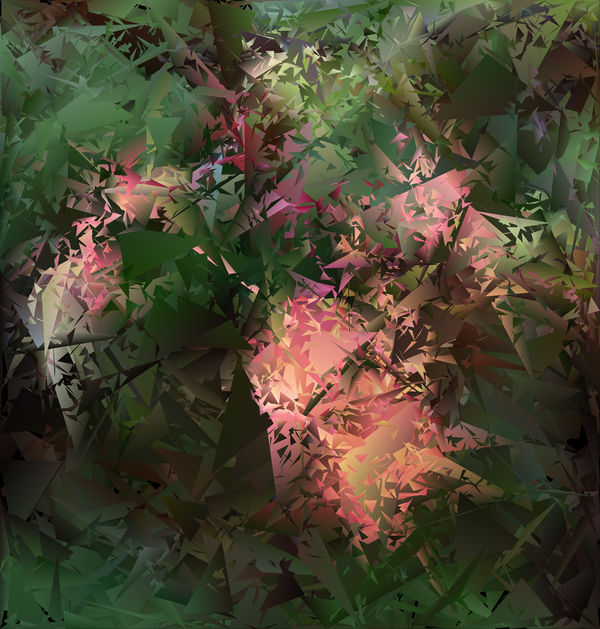
I opened the file listed immediately above in Fotosketcher with File>Open a picture. I chose the Drawing Style "Emergence 2". I then hit the Draw button, but hit the Esc key when the drawing effects reached 22% completion. The longer you let the transformation run, the smaller the glass shards get. I kept them "fairly" large. I then saved the image, File>Save the image as>"TutorialSplinteredGlassRedLeaf_FotoSketcher.jpg"
May 4, 2021 10:43:35 #
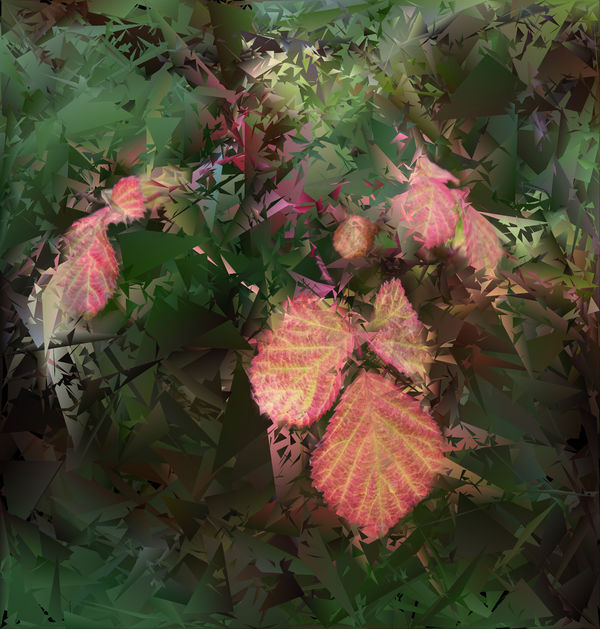
Back in Affinity Photo, I already had the Original photo opened. I opened the other file, "TutorialSplinteredGlassRedLeaf_Fotosketcher.jpg". I then placed a Rectangular Marquis around the whole image,
then executed the Menu commands Select>Select All and Edit>Copy.
I selected the Original image, then, and executed Edit>Paste. This placed a copy of the Fotosketcher in its own layer at the top of the photo stack.
From there, it was a matter of masking out portions of the FotoSketcher so the Original layer Red Leafs would "show through". With the FotoSketcher layer selected, I hit the icon in the bottom left hand corner of the Layers panel, "Mask Layer". then selected the Mask Layer immediately under the FotoSketcher layer. I selected the Paint Brush tool and changed the parameters to Opacity: 56%; Flow: 71%; Hardness: 53%. I then painted over the section of the Mask where I wanted the original subject matter to become visible.
May 4, 2021 10:45:22 #
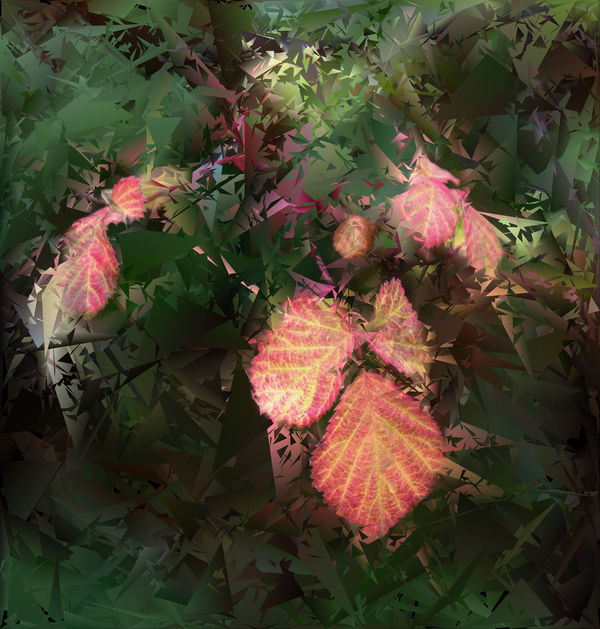
At this point I was ready for some finishing touches. When I add a Filtered Layer, I always execute the Layers>Merge visible command. This saves all my previous changes into a new Pixel layer. I used Filters>Plugins>On1> On1 Develop 2021 to add some more visibility to the Midtones, and repeated the process using Filters>Plugins>Anthropics>Smart Photo Editor [Softblur preset]. After each of these I used the Opacity slider at the top of each of those layers to blend them in with merged images below them.
I finally exported the image as a jpeg file I called "TutorialSplinteredGlassRedLeaf_FiltersApplied.jpg"
I finally exported the image as a jpeg file I called "TutorialSplinteredGlassRedLeaf_FiltersApplied.jpg"
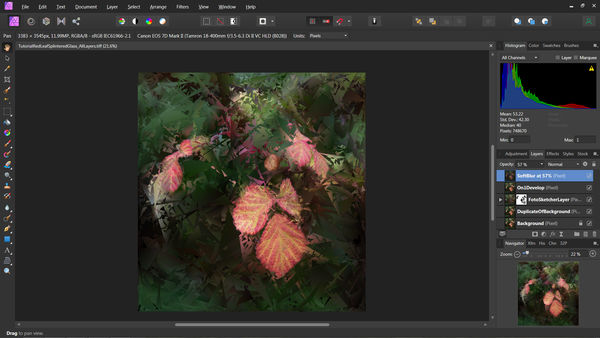
May 4, 2021 10:46:17 #
I have included a Screenshot of my Affinity Photo workflow to show the various layers used to composite this image.
May 4, 2021 11:21:49 #

Thank you so much for doing this Bob. We're getting quite a few Affinity users these days and they should appreciate this as do I.
May 4, 2021 11:32:13 #
Cwilson341 wrote:
Thank you so much for doing this Bob. We're getting quite a few Affinity users these days and they should appreciate this as do I.
You're welcome Carol. I, for one, would appreciate more of these.
May 4, 2021 11:46:54 #

I've added this new tutorial to our resource list, pinned on page 1:
https://www.uglyhedgehog.com/t-693893-1.html
Folks, please contact Carol or me if you know of others we should add. Thanks!
https://www.uglyhedgehog.com/t-693893-1.html
Folks, please contact Carol or me if you know of others we should add. Thanks!
May 4, 2021 12:42:15 #

Thanks for the post. My Affinity trial just ended. Not sure if I will buy the product as I have become so accustomed to On1.
May 4, 2021 16:45:53 #
kpmac wrote:
Thanks for the post. My Affinity trial just ended. Not sure if I will buy the product as I have become so accustomed to On1.
You're welcome, kpmac. ON1 is in my Toolbox as well and I would dearly love some one to explain a full workload from opening a Raw file to saving results as a .tiff (with layers) and then as a .jpg, adding in Filters as they go.
May 5, 2021 08:28:53 #

May 5, 2021 08:40:50 #
May 5, 2021 09:12:49 #

Thank you Bob... copied each paragraph and image and pasted to word, 4 pages including images... saved.
May 5, 2021 09:34:02 #
tcthome
Loc: NJ
Thanks for the post. Have you tried using the Place option from the file drop down menu? I have seen a video on it & used this method for messing with a sky replacement. Just use an opacity, Y/N?
If you want to reply, then register here. Registration is free and your account is created instantly, so you can post right away.