My Photoshop CC Tips & Tricks WIth Layers Part 2
Apr 7, 2021 13:13:11 #
PART 2
A reminder that these are subtle moves that are made to enhance or correct areas, not moves to change the entire look or mood of the picture. I've been asked how I did various corrections and here are some of them. I think some of you will never use these and totally disagree with my work flow, that's fine. Photoshop has many different ways for doing the same thing.
So now for the rest of the moves.
Sky has been done and some blue tint added to the foreground as mentioned in part 1.
Next you could delete or just keep the Sky Replacement Group turned off, your choice although you might want to use one of the masks again.
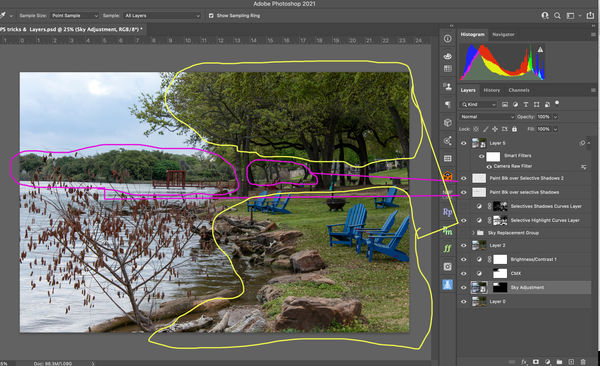
I need to make a merged layer. This will be a reference layer for shadows & highlight adjustments. Highlight the layer just under the Sky Replacement Group. (click >key in from of the file folder in front of Sky Replacement Group to collapse the Sky Replacement group if you haven't already done that.)
Make sure you highlight the layer just below the Sky Group. In my example it's Brightness/Contrast 1 layer. Just click over it to highlight it.
Create merged layer. (Command+Option-Mac/Alt-PC+Shift and hit E). Now you have a merged layer.
Now I want to make a Selective Highlight Layer
Go to Select>Color Range> Top bar change to Highlights. This next part will be up to you as you start to understand the adjustments you are changing. I think in this image I used Fuzziness: about 63% and Range: around 130. Hit OK. You will now see the marching ants.
Go to the lower right corner of Photoshop screen and hit the half white circle and choose Curves.
This will automatically apply the amount of highlights you just made to a curves layer. I moved the middle of the curve up about 22 points. Input 120 Output 142. In this case I watched the leaves in the trees open up showing additional detail.
I moved the layer above the Sky Replacement Group just my choice not necessary to do.
Now I want to make a Shadow Selection.
Go to Select>Color Range> Top bar change to Shadows. I think in this image I used Fuzziness: about 3% and Range: around 43. Hit OK. You will now see the marching ants. Go to the lower right corner of Photoshop screen and hit the half white circle and choose Curves. You can try and bend the curves at this point and see if you like the changes and be done. The problem I've come across is the adjustment spreads to the mid tones. Try and see if you like it.
This is where it might get controversial.
If you open, for example this image, in Camera Raw and adjust the shadows the image stays sort of flat not contrasty because the slider is affecting too much.
Many of you will totally disagree with me. You'l have to try it on one of your images and see if it works. I've used it several times and found people liked my moves.
Make a new blank layer. Move to the Shadows mask. Make the Shadow mask an image in Blk&White. Hold Option/Alt key and click. I want draw in the edges of this mask.
Go to Image>Adjustments>Levels move the center slider to the right about 10 points. This helps to not effect the midtones. Hold the Option/Alt key and click, to get the mask back to normal.
Select the Mask Command Click. Now you see the marching ants again. Go to the new blank mask you previously made. Paint over the background bushes not the whole image with a small 100% Black brush. Set you layer to Multiply and change the opacity to something you like in my case it was 52%
I wanted to include the grey bush in the center but the adjustment was too strong. Made a new blank layer. Selected and highlighted the shadow mask again. Highlighted my newest layer and painted black over the grey bushes. Changed the layer to Multiply and set the opacity this time to 33%
At this point everything looks pretty good but maybe a little slider move in Camera Raw will help just a bit more.
Made a Composite layer (Command+Option-Mac/Alt-PC+Shift and hit E) Converted to Smart Object so I can make changes again up or down. Opened Camera Raw Filter and made minor slider moves.
A reminder that these are subtle moves that are made to enhance or correct areas, not moves to change the entire look or mood of the picture. I've been asked how I did various corrections and here are some of them. I think some of you will never use these and totally disagree with my work flow, that's fine. Photoshop has many different ways for doing the same thing.
So now for the rest of the moves.
Sky has been done and some blue tint added to the foreground as mentioned in part 1.
Next you could delete or just keep the Sky Replacement Group turned off, your choice although you might want to use one of the masks again.
I need to make a merged layer. This will be a reference layer for shadows & highlight adjustments. Highlight the layer just under the Sky Replacement Group. (click >key in from of the file folder in front of Sky Replacement Group to collapse the Sky Replacement group if you haven't already done that.)
Make sure you highlight the layer just below the Sky Group. In my example it's Brightness/Contrast 1 layer. Just click over it to highlight it.
Create merged layer. (Command+Option-Mac/Alt-PC+Shift and hit E). Now you have a merged layer.
Now I want to make a Selective Highlight Layer
Go to Select>Color Range> Top bar change to Highlights. This next part will be up to you as you start to understand the adjustments you are changing. I think in this image I used Fuzziness: about 63% and Range: around 130. Hit OK. You will now see the marching ants.
Go to the lower right corner of Photoshop screen and hit the half white circle and choose Curves.
This will automatically apply the amount of highlights you just made to a curves layer. I moved the middle of the curve up about 22 points. Input 120 Output 142. In this case I watched the leaves in the trees open up showing additional detail.
I moved the layer above the Sky Replacement Group just my choice not necessary to do.
Now I want to make a Shadow Selection.
Go to Select>Color Range> Top bar change to Shadows. I think in this image I used Fuzziness: about 3% and Range: around 43. Hit OK. You will now see the marching ants. Go to the lower right corner of Photoshop screen and hit the half white circle and choose Curves. You can try and bend the curves at this point and see if you like the changes and be done. The problem I've come across is the adjustment spreads to the mid tones. Try and see if you like it.
This is where it might get controversial.
If you open, for example this image, in Camera Raw and adjust the shadows the image stays sort of flat not contrasty because the slider is affecting too much.
Many of you will totally disagree with me. You'l have to try it on one of your images and see if it works. I've used it several times and found people liked my moves.
Make a new blank layer. Move to the Shadows mask. Make the Shadow mask an image in Blk&White. Hold Option/Alt key and click. I want draw in the edges of this mask.
Go to Image>Adjustments>Levels move the center slider to the right about 10 points. This helps to not effect the midtones. Hold the Option/Alt key and click, to get the mask back to normal.
Select the Mask Command Click. Now you see the marching ants again. Go to the new blank mask you previously made. Paint over the background bushes not the whole image with a small 100% Black brush. Set you layer to Multiply and change the opacity to something you like in my case it was 52%
I wanted to include the grey bush in the center but the adjustment was too strong. Made a new blank layer. Selected and highlighted the shadow mask again. Highlighted my newest layer and painted black over the grey bushes. Changed the layer to Multiply and set the opacity this time to 33%
At this point everything looks pretty good but maybe a little slider move in Camera Raw will help just a bit more.
Made a Composite layer (Command+Option-Mac/Alt-PC+Shift and hit E) Converted to Smart Object so I can make changes again up or down. Opened Camera Raw Filter and made minor slider moves.
Apr 7, 2021 13:51:00 #
IMHO, removing the dead branch and all the smaller chairs would improve the image a lot. Actually itching to do it LOL.
Apr 7, 2021 15:06:10 #

Jim-Pops wrote:
PART 2 br A reminder that these are subtle moves t... (show quote)
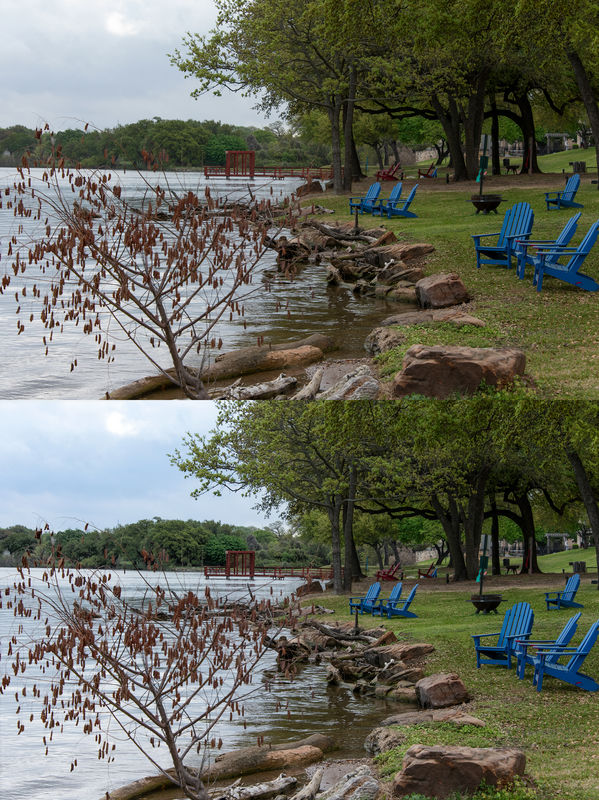
You might want to post a separate before and after with a download so that a real comparison can take place?
Apr 7, 2021 17:23:39 #
Rongnongno wrote:
You might want to post a separate before and after with a download so that a real comparison can take place?
The pictures I posted with the Before & After over one another is a composite of the real pictures not a screen capture. As I previously mentioned the changes are subtle. I wanted to show how to make small changes improving a picture but not changing the look or mood of the setting.
If you want to reply, then register here. Registration is free and your account is created instantly, so you can post right away.