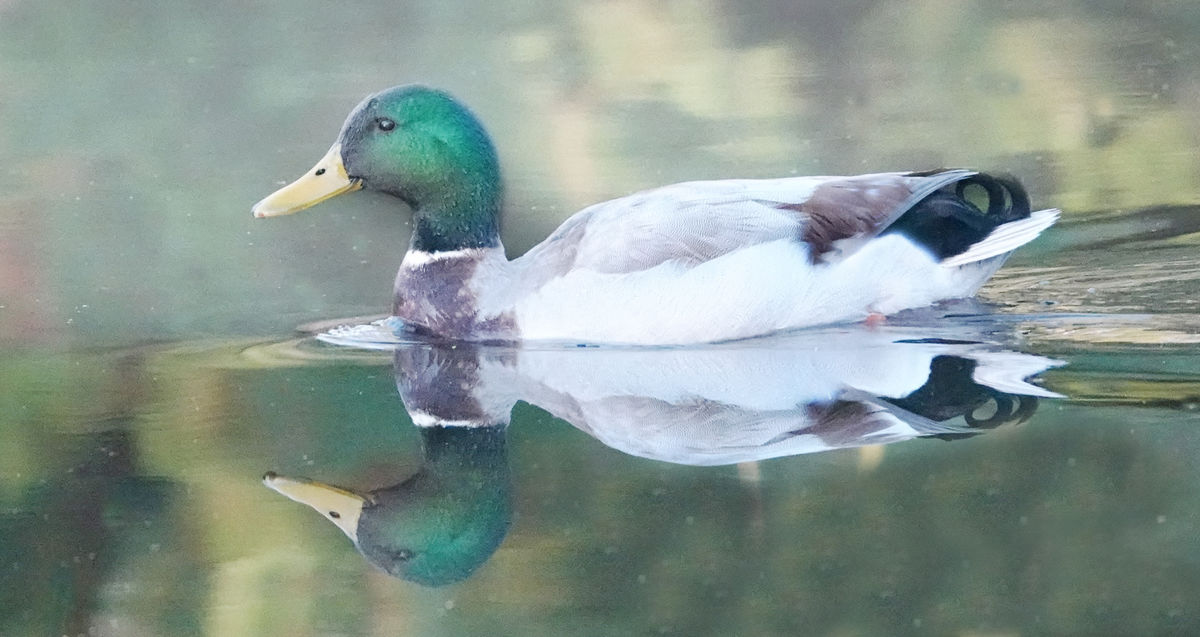
What is the Best Way to Darken the Background and Lighten the Subject Without Blowing Out the White?
Nov 3, 2021 15:22:54 #

MyPharo wrote:
I liked the photo. It looks Pre processed. Was it.
I used the newest photoshop program and opened the photo in Camera raw filter and made some adjustments ..
Was able to bring out some more details I think.
I used the newest photoshop program and opened the photo in Camera raw filter and made some adjustments ..
Was able to bring out some more details I think.
Stupendous shot of a handsome gentleman
🔥💞🏆💞🔥
Dec 2, 2021 11:05:14 #
Dec 9, 2021 14:18:54 #
goldenyears
Loc: Lake Osewgo
Shooter41 wrote:
I like my shot of the male Mallard taken when he w... (show quote)
In Luminar AI there is an option to select the background portion of an image which can then be edited. But as you can see, the program produces a slanted background, so I didn't go any further. Was the original rotated during editing? If so, and you supply it, I would do additional editing to see what is possible with Luminar.
Dec 9, 2021 15:14:40 #
Shooter41
Loc: Wichita, KS
goldenyears wrote:
In Luminar AI there is an option to select the background portion of an image which can then be edited. But as you can see, the program produces a slanted background, so I didn't go any further. Was the original rotated during editing? If so, and you supply it, I would do additional editing to see what is possible with Luminar.
Dear goldenyears...
The slanted background was caused by me when I took the shot. With scoliosis in my back and being eighty-years-old, most all of my pictures that are taken hand held are slanted. I am slanted as well. If you want to rotate the image slightly to make it "no longer slanted" and do additional editing, please feel free and share the results with me.
Shooter41
Dec 19, 2021 10:52:30 #
Shooter it's never a great idea to try to "save" a challenged exposure.
From your image: (Auto exposure, Shutter priority AE, 1/1,250 sec, f/4, ISO 6400, Compensation: +0.7)
Best Advice? Shoot bracketed sets (your Sony will give you a bunch of exposures to choose from in a wink of an eye)... and maybe seriously consider avoiding ISO 6400 on your Sony DSC-RX10M4 since it's not handling it well... Here you are shooting a proverbial "Sitting Duck" so 1/250 is more than adequate for a FL of 219.3 mm (from your EXIF data). That's nearly 3 stops! Problem likely solved...
Like the man said "Know your song before you start singing"
a.k.a. Know the limits of your kit and do everything possible to avoid them.
Maybe invest so quality time on Steve Perry's site to get your head around shooting wildlife.
I've got a keen eye for your subject matter now it's just a matter of figuring out how to master your current image capture tool. Please keep in mind that Post Processing is where you should only enhance... Never wise to use it for correcting a challenged capture.
Wishing you all the best on your wonderful journey Shooter...
Dec 19, 2021 12:02:08 #
Shooter41
Loc: Wichita, KS
Thomas902 wrote:
Shooter it's never a great idea to try to "sa... (show quote)
Dear Thomas902...
I have loved your displayed work on UHH. Especially the ballet dancer. I will use your advice. Thank you for being such a "Sweetheart." Shooter41
Jan 11, 2022 13:33:26 #
Not an expert but I love to shoot egret.. so I shoot at least two steps under exposed. Then in adobe bridge I adjust highlights. Whites and shadows. Then go to curves in bridge and fine adjust highlights. Then if needed in Photoshop I further retune with exposures. Brightness. Have less luck with shadows/highlights in Photoshop. Usually fixes background and subject to produce a nice looking bird.
Jan 28, 2022 17:15:05 #
Shooter41 wrote:
I like my shot of the male Mallard taken when he w... (show quote)
First, did you check the histogram to see if it indicated that any of the white was blown out? This is a crucial first step. Taking shots that are more to the right of the histogram, the highlight side, works fine with a RAW file (usually up to one or two stops depending on the camera), but can be much more of a problem with a JPEG file. White tends to blow out much quicker with a JPEG file. In whatever program you work in, assuming the white was not blown out, take down the whites using the histogram as an indicator, do the same with the blacks. This will give you the basic file you will work with to continue processing. If any color channel is not blown out, there are three color changes, then you might have a good chance of maintaining the white portion of the duck. You may need to take the Whites down even more than the histogram indicates. In LrC I can run the icon over the image and see the numbers, which would also tell me if something is blown out completely. After these steps use the Shadows and Highlight tools as needed. Then correct exposure if you still need to brighten or darken the image. After these steps you can use additional tools, such as a bit of clarity or texture or a small shot of vibrance, this all depends on the overall image and your goal with the image. I would never want to convert a TIFF file to a JPEG file unless it was only for posting a copy of the TIFF file: I would always see the TIFF file as the original. Also, if cropping the shot for any reason be sure to leave more room in the direction that the bird is traveling so that it does not "run off the page."
Feb 8, 2022 07:37:51 #
Hi shooter41
I’m a little late these days. In photoshop duplicate your image,
Add new layer, edit fill 50% gray, change blend mode to soft light, opacity 32, flow 8, now Paint with white to brighten and black to darken.just take your time.
Turn the layer on and off to see your results.hope this helps
I’m a little late these days. In photoshop duplicate your image,
Add new layer, edit fill 50% gray, change blend mode to soft light, opacity 32, flow 8, now Paint with white to brighten and black to darken.just take your time.
Turn the layer on and off to see your results.hope this helps
Feb 13, 2022 23:14:51 #
Mar 7, 2022 11:53:14 #
photoshopmikey wrote:
Hi shooter41
I’m a little late these days. In photoshop duplicate your image,
Add new layer, edit fill 50% gray, change blend mode to soft light, opacity 32, flow 8, now Paint with white to brighten and black to darken.just take your time.
Turn the layer on and off to see your results.hope this helps
I’m a little late these days. In photoshop duplicate your image,
Add new layer, edit fill 50% gray, change blend mode to soft light, opacity 32, flow 8, now Paint with white to brighten and black to darken.just take your time.
Turn the layer on and off to see your results.hope this helps
Just tried this on a problematic image of mine - nice results! Thanks for the tip!

Mar 9, 2022 12:09:02 #

Shooter41 wrote:
I like my shot of the male Mallard taken when he w... (show quote)
Software answer:
https://www.uglyhedgehog.com/t-690287-1.html
If you want to reply, then register here. Registration is free and your account is created instantly, so you can post right away.