Polar Alignment a different way...
Feb 18, 2021 01:13:38 #
This is most likely only news to me, but I found out I can do my Polar Alignment just using my Guide Scope and guide camera. My guide camera is a newer ASI 290 MM Mini, and is doing a bang up job of fine guiding.
But in a discussion elsewhere, it was said you can do your PA with your guide camera.
So I tried it tonight, and by Jove! Once I got Sharpcap using the 290 at a 2 second exposure, and dialed in my focus in the guide scope, I was shocked at how easy the PA was to do.
(I've been doing my PA with my Main Telescope since I got my camera to work with Sharpcap.)
Because the images were coming in twice as fast, adjusting the Alt and Az showed faster reaction to the fine adjustments necessary to do near perfect Polar Alignment.
Now Sharpcap Pro calls anything under 00.00.20 an excellent PA. But me being me, I continue to strive for at least single digits in those readings. Well, tonight I had Az:00.00.02, and Alt:00.00.00. And watched the figures bob a little due to ripples in the atmosphere, much like being underwater looking up through surface ripples. But I consider that as near as I could manage to getting a perfect Polar Alignment.
After that, the axis of the mount being aligned to the North Celestial Pole, I was off to do my Modeling (Alignment) which teaches the mount controller where it is in relation to anchor stars in the sky.
With my AVX I could only do 6 stars. 2 + 4 Nexstar calls it. I always wanted more stars.
Now I can. Now I can do as many as I want to on the East and Westward skies. I lost count but built well over 12 into my Model.
Rene, who wrote the software for the Gemini II controller, recommends at least 10 stars. I was glad when I learned that, it meant what I was thinking rang true. More is better.
What that does, for me, is when I tell Stellarium to slew to an object if it doesn't bullseye the object outright, it brings it to within nudging distance.
Finally, I'm close to what I hoped for 6 years ago, when I began setting my DSLR on a tripod and shooting picturds of the Moon. And believe me, if anybody took a lot of picturds getting here it was me.
I think I enjoy the mechanics of this as much as the challenge of Astrophotography.
It's like the endless tinker, and continuous learning pool.
Feb 19, 2021 08:30:33 #

Your post, especially the opening paragraph, was exciting to me because I had NO IDEA of what you were talking about or even what these terms meant! New things to learn! I went off to google and wikipedia and astrophotography retailers, and now I have some inkling and insight into an aspect of astrophotography that I hope to get involved with some day.
I know you were posting for more advanced users, but this newbie thanks you for this insight.
I know you were posting for more advanced users, but this newbie thanks you for this insight.
Feb 19, 2021 09:23:32 #
ClarkJohnson wrote:
Your post, especially the opening paragraph, was exciting to me because I had NO IDEA of what you were talking about or even what these terms meant! New things to learn! I went off to google and wikipedia and astrophotography retailers, and now I have some inkling and insight into an aspect of astrophotography that I hope to get involved with some day.
I know you were posting for more advanced users, but this newbie thanks you for this insight.
I know you were posting for more advanced users, but this newbie thanks you for this insight.
Be careful what you wish for. You will quickly learn the definition of a black hole that you will never escape. 🔭
Feb 19, 2021 16:19:54 #
ClarkJohnson wrote:
Your post, especially the opening paragraph, was exciting to me because I had NO IDEA of what you were talking about or even what these terms meant! New things to learn! I went off to google and wikipedia and astrophotography retailers, and now I have some inkling and insight into an aspect of astrophotography that I hope to get involved with some day.
I know you were posting for more advanced users, but this newbie thanks you for this insight.
I know you were posting for more advanced users, but this newbie thanks you for this insight.
You are Welcome, Clark!
I hope you do one day find the lure to your liking. But like Alberio sez, it can be a Black Hole that has you drawn into a financial ruin investing thousands to achieve a little bit more results.
Polar Alignment is the first step when setting up a Mount, so that the main axis, called the RA axis, is aligned with the North Celestial Pole.
It is a starting point to get the mount and telescope aligned to the Universe we want to take images from. It needs to as accurate as we can set it so we don't introduce errors into the efforts of taking multiple images over the course of the rest of the night. And that when we tell the mount to take our telescopes to a specific point in the Universe we can see from our specific location, it aims true and doesn't leave us looking at the wrong place.
Which is very easy of a mistake to make, then you are scratching your head wondering what you are staring at from your camera's Field Of View (FOV)
I've been using my Main Telescope for this, and my Imaging Camera mounted to that telescope. But there is another, more primary telescope we use for guiding, Called a Guide Scope and Guide Camera. (in my case, that is what I use)
This is set up to be Coplaner to the main telescope. (Glance at this, and come back) Basically it means the two telescopes are pointed the same direction.
What I'm doing now is to use this guide scope to set the Polar Alignment, instead of my Main Telescope.
The advantage is that the Guide Scope and Camera can do this evaluation faster, because it has a wider Field of View. So it uses a method called Plate Solving, where it compares the image taken, to known images of the stars. Then the computation tells me what I need to adjust for the best accuracy I can get.
Once that basic is done, then the Mounts control needs to build a Model (AKA: Alignment) which teaches it where the stars are so it can take the Telescope and aim it accurately.
Once all these things are done, and the better they are done. It allows me to sit back after telling the telescope to go to a certain object, starting the guiding, taking an initial image to check if any last minute adjustments are needed, and letting the system run, collecting and stacking images for as long as I want it to, or the rotation of the Earth makes the object set out of my view, towards the West.
I seem to manage to learn something new every night. Which is a good thing, because it refines my results.
The better the equipment, the more can be learned. I started off with what should have been OK, but wasn't. So it was very bumpy and hard to learn with. Eventually the bad got replaced with good and better. Just keep throwing money into the Black Hole.
And keep learning from my Friends here.


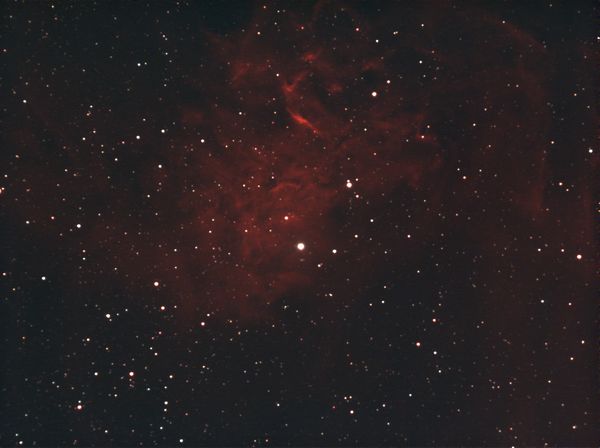
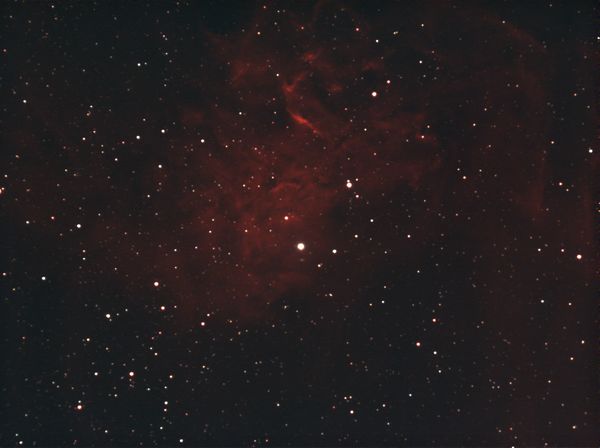
Last night, even in spite of a late start, I got onto a Nebula called the Flaming Star Nebula. Not new to me, I've imaged and posted it before. But it was in a very favorable position at the moment, very near the Zenith in the sky.
But my mount was positioned to where it could not have imaged very long before hitting the limit of travel.
So I tried something new for me. I did what is called Syncronised my mount to the object, then initiated what is called a Meridian Flip, where the telescope and mount does a 180° flip and comes back to the object from that angle.
New to me, because it finally did work.

It flipped my telescope around so it could image the rest of the night. Or as long as I wanted to before calling it a night.
So the Flaming Star Nebula allowed me to image it for 18,000 seconds, or 5 straight hours, doing 300 second exposures, or 5 minutes each. Which seems to be a nice round figure for my equipment to collect images, and my Infinity camera to stack them. I save at points along the way, and I don't have to even stop the ongoing procedure to save a point in the process. So I tend to grab an image in increments. Last night was 10's, or 50 minute points.
Why? Why want such long images?
Glad you asked (Or I'm going to post this explanation even if nobody cares.
 )
)I'm on a vane of long exposure imaging. The reason is, the longer an object is steadily imaged, I believe the finer the detail comes into my program making the image in an As-Taken picture. So less processing is needed, and the end result amounts to what I might see out of a window in a space ship.
The light is altered by a filter I use to help block my neighbors obnoxious light pollution. I have a couple of these, but I'm using my newest one all along now, which is a dual band filter. It allows only two wave lengths of light to pass through, to my cameras matrix. And I use a One Shot Color camera, which in comparison is most like a Color DSLR matrix in performance. It has a Bayer, which as I understand it is an R,G,G,B configuration.

I just want as close to what is seen as possible in my pictures. Much like we are use to from our DSLR's.
After getting my new Mount a year ago, I discovered ways Scott Losmandy engineered into his line of mounts the ability to image from East, to West, without doing a meridian flip. So I've been doing my best to exploit that. Using this unique tool to my advantage.
When I was there to pick up my new mount, I had some time to chat with Scott and gather a few kernels of his knowledge. He is also an affectionato of long exposure astrophotography, but I believe he is from the film days.
Regardless of that, he understands the demands of Deep Space Astrophotography, and what the mount must do for anything put on it to attain as fine an image as possible for a given session.
OK, now that I have bored you to tears, grab onto one of these images and have a go at processing or playing with it for yourself.
I believe I need to come up with a focusing adjustment to get the most out of these stacks of images. Because they do tend to get softer as the night wears on, and the temperature lowers.
It appears to me the shorter one is sharper, and the longest one gets fuzzy.
But hey, they're free to download and play with. Because that's the way I think the Internet should be,
Helpful, and Informative. Not a platform for commercials and profiteers.
Have fun! Hope you actually got something from this ramble.

These are all tif file formats, in 16 bit images, straight out of the camera. Any adjustments to them have been done by the Automatic section of my camera's program.

Flaming Star Nebula 300s 10 3000s
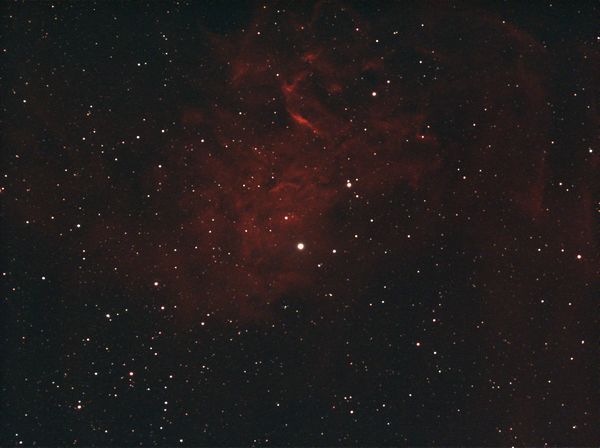
(Download)
Flaming Star Nebula 300s 20 6000s
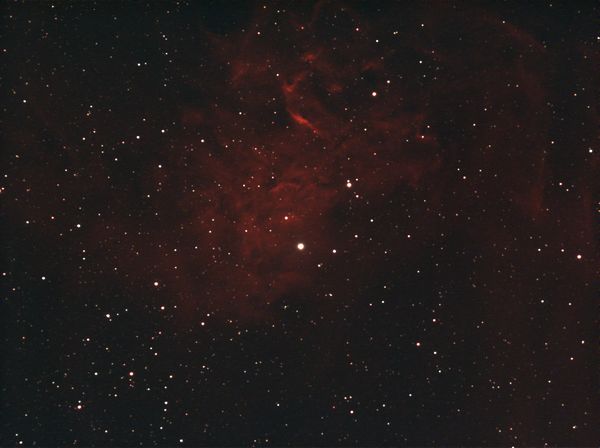
(Download)
Flaming Star Nebula 300s 30 9000s

(Download)
Flaming Star Nebula 300s 40 12000s

(Download)
Flaming Star Nebula 300s 50 15000s
(Download)
Flaming Star Nebula 300s 60 18000s
(Download)
Feb 19, 2021 19:05:39 #
Good explanation about Polar Alignment. However, it should be noted that the guide scope and the main scope should be aligned BEFORE Polar alignment simply due to the inherent misalignment when placing the guide scope onto the main tube. This is a good way AAFTER guide scope/main scope alignment.
But I cheat! I have an Ioptron CEM 40 equipped with its own guide camera attached to the RA axis. I just use the az/alt mount adjustments and I can get the alignment within a few seconds of alignment. as we use to say in the Navy, "Close enough for government work". BTW, what post processing software do you use? I am dipping my foot into Pixinsight to help me with my processing. I also use ASI suite for quicky image stacking. Keep up the good work! I know what it is like in this hobby. Some people told be it is a passion, to me it is a compulsion!!! RFB
But I cheat! I have an Ioptron CEM 40 equipped with its own guide camera attached to the RA axis. I just use the az/alt mount adjustments and I can get the alignment within a few seconds of alignment. as we use to say in the Navy, "Close enough for government work". BTW, what post processing software do you use? I am dipping my foot into Pixinsight to help me with my processing. I also use ASI suite for quicky image stacking. Keep up the good work! I know what it is like in this hobby. Some people told be it is a passion, to me it is a compulsion!!! RFB
Feb 20, 2021 13:38:46 #
Railfan_Bill wrote:
Good explanation about Polar Alignment. However, ... (show quote)
Hi Bill,
Yep. That's why I brought up the Coplanar part in paragraph 3. Both telescopes need to be looking at the same sky.
When doing a Model (alignment) I use both my Guide Scope picture, and my Main Telescope's picture.
I always have the cross hairs super imposed on the pictures.
My alignment is based in the main Telescope. But I will use the Guide telescope as a "course aim" view.
Much the same as using a finder scope to get a visual telescope aimed at an object.
So I have the views in the two telescopes as close to the same as possible. Or Coplanar.
That's a word I learned about here on UHH back when beginning with my DSLR. It basically means everything is aimed at the same point.
I wouldn't use my guide scope for fine alignment. It isn't as accurate as using my Main Telescope.
And my Main Telescope is what I want to be aimed correctly for imaging.
Feb 23, 2021 02:25:27 #
SonnyE wrote:
This is most likely only news to me, but I found o... (show quote)
Hi Sonny, great to hear that you have managed to get more toys playing together nicely.
If I understand your post correctly you are saying that you can now PA via guide scope & sharpcap?
If so, well done.
Sharpcap has to be one of the best polar alignment tools available & something I have been using ages :)
Guide scope & imaging scope alignment isn't to critical, as long as both are looking at the same piece of sky.
This can easily be checked before starting PA alignment.
unfortunately the weather here in Blighty is really unsettled so no imaging to talk of but clearer skies are predicted for the weekend.
Take care mate
Feb 23, 2021 13:05:45 #
That's an interesting read Sonny more is always better when talking about PA , I enjoyed the read.
Feb 24, 2021 12:40:02 #
Marc G wrote:
Hi Sonny, great to hear that you have managed to g... (show quote)
Yep. I decided I should try it. Expand my horizons.
A young friend and I were talking about it. I decided I should put my money on the barrelhead and see what it's about. I have a different guide camera (finally) ZWO ASI 290MM Mini, which has almost twice the definition of my SSAG camera had. And shows a lot more stars.
One thing that helps me out with PA via the guide scope is no fiddling with filters. Half the time I'd forget about having the wrong filter presented when using the main telescope, and not getting solves, until I woke up and remembered to turn the filter wheel.
So using the Guide Scope, it gives Sharpcap its own telescope and camera. So this old dog has a new trick to use.
I love using Sharpcap! It let's me fiddle the readings down to nearly all zero's. Which in the grand scheme of things may be irrelevant, but it makes me feel like I did my best with the program. It tickles my anal side with dialing in settings.
But Sharpcap has really upped my game when using Stellarium to slew the telescope to objects, often getting bullseye. Much more than ever before.
So I'd encourage trying doing PA via the guide scope, and doing the regular alignment with the telescope. At least it's working for me. And has sped up my getting to imaging.
Feb 24, 2021 15:02:53 #
stepping beyond wrote:
That's an interesting read Sonny more is always better when talking about PA , I enjoyed the read.
Rather long winded though... LMAO!
But it seems to be working faster using the Guide Scope and Camera for PA.
If you want to reply, then register here. Registration is free and your account is created instantly, so you can post right away.