We all have to walk before we run, but I'm not even near crawling!
Oct 5, 2012 16:07:28 #

Oct 5, 2012 16:55:55 #

Not a fraction, but a ratio. It expresses the size of the aperture opening in relation to the length of the lens.
wilsondl2 wrote:
quote=Pepsiman O"Well Examples, F2 is a ... (show quote)
Oct 5, 2012 17:52:34 #

sarge69 wrote:
I'm lazy so here's what I would have done.
Take the picture the second time BUT
Focus on the child and when it's done, don't press the button the rest of the way, tell the child to blow the bubbles and THEN press the rest of the way. She's in focus and bubble are within the DOF.
Sarge69
Take the picture the second time BUT
Focus on the child and when it's done, don't press the button the rest of the way, tell the child to blow the bubbles and THEN press the rest of the way. She's in focus and bubble are within the DOF.
Sarge69
Good tip Sarge.....!, thanks
:thumbup:
Oct 5, 2012 17:58:31 #

dickparkans wrote:
quote=Tea8 To me it seems like the DOF just isn't... (show quote)
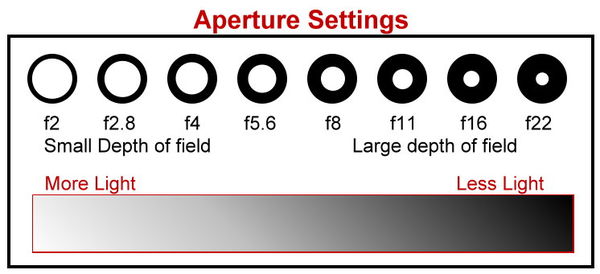
I agree with almost everybody who has explained f stops. However, any newbie may be totally confused. To add to the confusion I created a graphic which may help somebody. (I confess that I got the idea for the image from another website.)
Apertures Made Clear (I hope)
Oct 5, 2012 18:14:04 #

SheenaghGebhard wrote:
I'm sorry to ask such a dumb question, but after t... (show quote)
Your camera focused on the bubbles instead of her face. You could point your camera down at her belly to focus, hold the shutter button down halfway until you lifted back up to her face and then push the shutter button the rest of the way down. That may have caused a bit of overexposure but the focus would have been correct. Some cameras also have face recognition and may have found her face behind the bubbles and focused on it instead. I've never tried a bubble scenario with face recognition but it's a possibility.
Oct 5, 2012 18:16:00 #
Wabbit
Loc: Arizona Desert
marcomarks wrote:
quote=SheenaghGebhard I'm sorry to ask such a dum... (show quote)
Hey Doc ..... this is where manual focus works .....
Oct 5, 2012 18:19:31 #

dickparkans wrote:
quote=Tea8 To me it seems like the DOF just isn't... (show quote)
No toes stepped on at all. You are right I should have explained that better. When I said larger f-stop I meant larger number which would be a smaller opening and therefore greater depth of field. I get to talking about how I think about things and I forget a lot of people don't think like I do. I'm a lefty and I've always been told I think about things backwards. (Jokingly from my parents that is, not like bullied or anything about it.)
Oct 5, 2012 18:23:58 #
jenny wrote:
quote=Tea8 To me it seems like the DOF just isn't... (show quote)
Well I guess I got that covered then since I graduated #1 in my class, lol. I do get a little confused as to whether or not to use the term f-stop or aperture. At times used almost interchangeably. I need to go back and reread some of my NYIP course materials and other photography books.
Oct 5, 2012 19:01:04 #

Your photo is beautiful. I would crop it a bit, but it is a very good image, in my opinion. I, too, have a Canon 7D and it is an education, but I just love it! Keep shooting, keep the questions coming as this site is a wonderful source of learning and as stated earlier, there is no "dumb" or "silly" question! :thumbup: :thumbup: :thumbup:
Oct 5, 2012 20:36:13 #

http://camerasim.com/camera-simulator/
I had a go with this camera sim (posted by "Another View") I can see how this can help those who are possible confused with DOF etc or setting up a shot in manual mode. Its a great app to play around with and certainly worth looking at if you want learn about your DSLR settings without leaving your PC. You can set shutter speed, aperture,ISO, shutter and aperture priority and camera mode etc.
I had a go with this camera sim (posted by "Another View") I can see how this can help those who are possible confused with DOF etc or setting up a shot in manual mode. Its a great app to play around with and certainly worth looking at if you want learn about your DSLR settings without leaving your PC. You can set shutter speed, aperture,ISO, shutter and aperture priority and camera mode etc.
Oct 5, 2012 21:57:30 #
Joe Lynn
Loc: Bend, Oregon
SheenaghGebhard:
I quite like your photo. As you see in one of the responses you received that shows the lens barrels, as the aperture number gets larger the hole in the lens gets smaller. The smaller the hole the greater you {DOF}Depth of Field,area in front of your camera is in focus. Check out Darren Rouse's Digital Photography School, http://www.digital-photography-school.com. He has loads of free photography information on his website. The attached photos didn't make it.
The following is from his website:
What The F-Stop?! Photography Explained!
Tuesday, 09 January 2007
Article Index
What The F-Stop?! Photography Explained!
Page 1 of 6
Introduction: A preface and general thesis on the photography world and its inhabitants.
Many people that venture into photography are overwhelmed with the daunting task of learning a whole new language. Quite frankly, studying photography demands that you learn a whole new language. This new language, weird as it may sound, describes things and processes that most humans experience hundreds of times each and every day. It just happens that most people don't pay any attention to the workings of their eyes. Most people haven't the slightest idea how their eyes work, but this is not a rant on the shortfalls of the American education system. This is a primer on the basics of photography for beginners.
Before proceeding to the meat and potatoes of this document I would like to quickly point out that, in my own opinion, most photographers aren't very helpful. Some are downright jerks. There is something about being a photographer that inflates egos, and swells heads. I digress because I want to point out this behaviour to encourage newcomers to recognize it and perhaps prevent them from making the same mistakes themselves. No matter how many published photos you make, no matter how many magazine covers your work graces, you had to start somewhere.
With that said, I want to stress another important point. Be your own teacher. There are two things that are certain in photography. You never know it all and practice makes perfect.
Well not exactly onto the good stuff just yet. I had to come back to add this part because I really feel strongly about it. This primer, while aimed at people brand new to the world of photography, is an excellent refresher for the guys that have been shooting for a while already. If you have been shooting for a while, chances are that you have picked up some very valuable information and techniques. It never hurts though, to take a moment every now and then and refresh your brain on what these terms mean. So new photogs and old alike will benefit from browsing this text at least once. Now, without further delay, I present to you, the good stuff.
What Is A Camera: Most people skip this step. DON'T!
Before you begin learning all the terminology and jargon associated with photography it is important that you know what a camera is. Almost every beginner's manual leaves this out, but I think it's important that you understand what it is you are holding.
Cameras are light-tight (lightproof) boxes. Cameras use a light-sensitive medium (film or optical sensor) for collecting information, so it is extremely important that the camera itself be light-tight. Using a combination of mirrors, lenses, and shutters the light entering the box can be controlled. This is as simple as it gets. When you want to store information (take your picture) you allow light to enter the box and shine on your light-sensitive medium. This is a very basic concept that you will need to understand and should have no problem grasping. For the purpose of this primer we will use the human eye and a window as metaphors for the camera. Both of these objects revolve around light and have mechanisms for controlling the amount of light that passes through them.
Digital cameras come in different flavors. For the purpose of this article we will stick to comparing and contrasting the two major types you will most often see. Pictures from these two types of cameras will be almost identical in size and quality (when comparing two cameras of equal megapixel rating). Just because they share some similarities doesn't mean they don't have their fair share of differences too.
What The F-Stop?! Photography Explained!
Tuesday, 09 January 2007
The Terms: A List of definitions to photography terms you should know.
RAW Vs. JPG: The Endless Battle
RAW and JPG are two file types. When you take a picture, your camera needs to write that information to a file, how and what it writes to the file is dependant on what mode your camera is set at or capable to be set at.
If you poke around almost any photography forum you will find hundreds of posts dedicated to this debate. Everyone has their own opinion and most do poor jobs of supporting their opinion. I will of course weigh in on this, and this will be my personal opinion. If you decide I am wrong or your needs require something different by all means do what works.
The file format your digital camera produces can vary. If you own a cute little point-and-shoot, chances are very very good that your camera will only produce JPG images. If you own a Digital SLR your camera will usually give you an option, JPG, RAW, TIFF (Sometimes).
JPG: Pronounced "JAY-PEG". JPG is a digital image format that uses compression algorithms to intelligently reduce the size of your image while keeping its overall look and quality high. Using JPG actually reduces the amount of information stored in your pictures, this makes it a "lossy compression method". This term "lossy" just means that information is literally lost when using this method. The compression algorithms in use here utilize the fact that human eyes aren't extremely sensitive to slight variations of colors. By examining two adjacent colors in an image, it can decide if a human eye could distinguish between the two colors, if not, it makes the colors the same. This reduces the amount of original colors and makes the file smaller. Additionally when using JPG, the white balance and exposure compensation settings in use when the picture is taken are permanently applied to each image. This reduces time afterwards setting these things manually for each image. But it also means if you screwed up when taking the picture, you are pretty much stuck with the results. JPG is a universal format and is readable by every image editing software available.
RAW: This file format stores all the data your digital sensor captures in the file. It doesn't use compression like JPG does. For this reason the file sizes are a lot larger with this format. This can slow the camera down as it writes huge files to your memory card. This also limits the total number of shots you can fit on a memory card. RAW files do not permanently apply the white balance or exposure compensation values in use at the time the photograph was taken. This leaves some wiggle room afterwards to fix anything or apply a custom white balance to each image individually. This makes post-processing time take a lot longer. RAW files are encoded differently by different manufacturers. This means not just any image editing software can read any RAW file. This is limiting and frustrating to many photographers.
TIFF: This is another uncompressed format to store images in. TIFF files operate similarly to RAW files. Unlike RAW files though, TIFF is a universal standard and isn't manufacturer specific.
Now that you know a little about the formats, I will weigh in on which one I prefer.
I have found very little use, personally, for anything other than JPG. I shoot exclusively in JPG for a number of reasons. They are small, universally readable, and have great quality. RAW files can be two or three times the JPG file size which requires a lot of storage space to archive. Additionally I like knowing that any image editing software I own now or tomorrow will be able to read my JPG images. Undoubtedly I prefer shooting JPG. There are valid reasons to use RAW in some situations though. With that cleared up, you can look at the facts and make your own mind up if you prefer JPG or RAW.
EXIF Data: Exchangeable Image File Format
Digital cameras, in addition to the actual picture data, record several other things in every photo you take. Built into the file, and viewable with a special type of viewer, is the picture's EXIF data. Almost every digital camera writes the settings used to create the photograph to a hidden section of the image. The values for aperture, shutter speed, type of camera, time/date, focal length, type and brand of lens, etc are all written to every digital image. Programs such as Photoshop can display this information for you. This is handy because you can revisit any picture at any time and see exactly what settings were used to capture that image.
Focal Length: My Lens is Bigger Than Yours!
Focal length is simply the distance, always measured in millimeters (mm), between the center of the lens on your camera and the focal point of that lens. The focal point is, for the sake of this article, going to be defined as the medium the lens focuses the light coming into the camera onto. Using a very simple camera setup the focal point would be the digital sensor or the film medium in the camera. More on this at a later time.
Aperture: Your eye and your camera are cousins.
Notice the small aperture in the lens on the left, all the light must pass through that tiny hole in the center. The lens on the right however, has a wide open aperture and can allow considerably more light to pass through the lens.
Before we delve into the weeds with this topic I want to get some textbook definitions out in the open. An aperture is literally a hole that allows light to enter (something). More specifically, as this relates to photography, aperture is a stop. A stop is simply anything that is used to control or prevent light from entering (something). So now it should be clear that when we start talking about aperture that we are talking about controlling how much light is entering our camera.
Your eyes and your camera have more in common than you may think. Aperture functions exactly like the iris of your eye. Your iris is able to adjust its diameter larger or smaller to allow more or less light into your eye. A wide aperture will allow more light than a small aperture. So the aperture setting on your camera can tell you the exact diameter of the aperture in millimeters. This is a very easy concept and is only slightly complicated by the fact that the numbering system used to denote how large the aperture is, is backwards. In most cases, large things are associated with large numbers and small things with smaller numbers. With aperture this is backwards because the numbering system is actually a ratio. This ratio is called the f-stop and will be written as f/# (where # is a number within a range shown below).
What the f-stop is an f-stop?
I must apologize for the complexity of this section. I have tried extremely hard to simplify the concepts and workings of aperture, but there are some elementary math concepts that come into play here. FRACTION ALERT!
Since we as photographers have the ability to change the aperture our camera is using, we need to have a number system for denoting what our aperture is set at. The number system that has been designated for this purpose is a set of fractions (ratios). The numerator (top number) in this fraction is the focal length of the lens. (This number will change depending on which lens you are using. For zoom lenses, this number will change as you change the zoom settings of the lens. So if you are experimenting with this setting, pay particular attention to what focal length you have your lens set for.) The denominator (bottom number) in this fraction is a power of the square-root of two. Why this is, is not important at the moment. There is actually a standard scale that uses the following numbers in order (1, 1.4, 2, 2.8, 4, 5.6, 8, 11, 16, 22). Please note that not all lenses are able to utilize this entire range from 1 to 22, but a lot of lenses cover most of this range. For example you might have a lens that uses the range from 2.8 to 22.
You will see the f-stop denoted as f/16 for example. This means that the aperture for this setting is equal to the focal length of the lens (always in millimeters and denoted as f) divided by 16. A real world example: using a 50mm lens with an f-stop setting of f/2 would tell us that the diameter of the aperture is 25mm. This is simply because 50mm/2 = 25mm. So the diameter of the hole that is allowing light into the camera is 25mm. If we were to use the same 50mm lens with an f-stop setting of f/4, our aperture diameter would be 50mm/4 = 12.5mm. You can see when we increased the denominator, or the f-stop setting on our camera, the diameter of the aperture hole became smaller. This concept uses the arithmetic principle of larger denominators make smaller fractions (when the numerator is kept the same). So, as long as you are using the same lens, if you progress from f/1 towards f/22 in the f-stop settings the aperture diameter will get progressively smaller and allow less light in.
There is a neat relationship between the numbers of the f-stop scale. This is very cool because the numbers themselves appear to be random and unconnected. Moving from one number to the next number will either halve or double the amount of light entering the camera. Moving from left to right from one number to the next will cause half as much light to enter through the aperture. So changing your aperture from f/2 to f/2.8 will immediately only allow half as much light in. Consequently, moving from an aperture of f/8 to f/5.6 will allow twice as much light into the camera. This is a hard concept for most to understand because moving from f/2 to f/2.8 produces the same effect as moving from f/11 to f/16. And to make it even weirder, moving between these numbers that seem to have no pattern, causes a halving or doubling effect. This is one of those times when you have to suck it up and learn how it works even though there is no discernible pattern and a seeming lack of logic behind how this system works. Commit this to memory immediately!
Trick: If you can simply memorize 1 and 1.4 as the first two numbers in the F/stop series you can easily write out the rest of the series. Every other number is simply 2 times the number two before it. So if you start with 1 and 1.4, the third number would be (1 * 2) = 2. The fourth number would be (1.4 * 2) = 2.8 and so on.
Also, here is what the F/ numbers represent: F/ 1.0 is the diameter of the lens opening. A circle of that size will go from the front element of your lens to the film plane. At F/ 22, it will take 22 of that size circle to go from the front lens element to the film plane. So, F/ 8.0 would take 8 the size of the lens hole to get to the film plane. That what F/ Stop numbers mean. I hope this helps.
Depth of Field (DOF): A By-product of Aperture.
Depth of field (DOF) is a by-product of the aperture (or f-stop) setting. Changing this directly influences how deep or shallow the DOF is. When you set your camera with a wide f-stop, remember this is a small number like f/2, the DOF becomes very shallow. It is this effect that creates areas of pictures that are in sharp focus while others are blurry. Depth of field is simply how much of your image is in focus. You can adjust this by opening or closing your aperture setting. A smaller aperture, a large number like f/22, will greatly increase the depth of field. This means more of your image or subject will be in focus.
Depth of field is a very nice effect to use for portraits, to make the subject's face in focus while blurring out the background. This draws attention to your subject. Depth of field is often used in this manner or to separate foreground and background in an image.
Exposure:
Finally, an easy term. Exposure is simply the amount of light that is allowed to reach the light sensitive medium (film or digital sensor). Whether you are using film (if you are just beginning in this field, visit the Smithsonian or consult the nearest encyclopedia to learn about film) or a digital camera there is a "correct" exposure for each photograph. Exposure is intrinsically linked to aperture, shutter speed, and ISO. You can learn more about these terms later in this document.
ISO Rating:
Photographic film comes in different speeds for different applications. A film's speed is another way of describing how sensitive to light it is. That is to say how fast is the film affected by light? Film's light sensitivity (a.k.a speed) is rated on a scale developed by the ISO (International Standards Organization). This light sensitivity or speed scale is called the ISO level of the film. Digital cameras imitate this with an ISO setting of their own, although it must be noted that the digital and film version of this scale are not exactly the same.
Shutter Speed:
The shutter is best characterized by the distinctive click, snap, or whizz sound each camera makes when you take a picture. The shutter in a camera is a mechanical stop. (Remember that a stop is anything that is intentionally used to prevent or alter the amount of light that enters something.) When you press the shutter release button, better known as taking a photo, you are releasing the shutter and allowing light to enter the camera. The amount of time the shutter is open and allowing light to enter the camera and expose the film is called the shutter speed. This is where the relationship between exposure, aperture, ISO level, and shutter speed comes into play. We will examine how these terms all come together in another section.
Oct 5, 2012 22:30:10 #
Wabbit
Loc: Arizona Desert
Joe Lynn wrote:
SheenaghGebhard: br I quite like your photo. As yo... (show quote)
Eh Doc ..... that's easy for you to say .....
Oct 6, 2012 01:47:05 #

It gets a little stranger still. Aperture is measured in f-stops (F1, 1.4, 2, 2.8, 4, 5.6, 8, 11, 16, 22, 32, 44, 64). If you look at those numbers something interesting becomes apparent, each full stop is a change of the sqrt(2) = 1.4142. That is because light falls on an area such that changing the aperture by sqrt(2) equates to reducing photon density on the (film/sensor) plane by 2. In a similiar way, moving the plane sqrt(2) further away from the aperture reduces the photon density by a factor of 2 (or one f-stop). This is an important consideration for large format cameras where the camera movements allow the film plane to move a great deal. The aperture of a lens on a large format camera is "normalised" for the focal distance which is how far the aperture is from the film plane. (e.g. a 300 mm lens is in focus when the film plane is 300 mm from the aperture, and any change in distance from that requires adjusting exposure to compensate for that change.
So there is probably more than you ever wanted to know about the subject ... unless you plan to shoot 4x5 or 8x10.
So there is probably more than you ever wanted to know about the subject ... unless you plan to shoot 4x5 or 8x10.
Oct 6, 2012 02:17:20 #
Shakey wrote:
quote=dickparkans quote=Tea8 To me it seems like... (show quote)
To Shakey
From rts2568
Thank you Shakey,
Now that is a perfect example of the sort of positive thinking about the constractive help that UHHers will mostly appreciate and be able to learn from.
Take note everyone else.
Thank you Shakey,
rts2568
Oct 6, 2012 03:56:26 #
rts2568 wrote:
quote=Shakey quote=dickparkans quote=Tea8 To me... (show quote)
Thank you, rts2568, your compliment is much appreciated.
If you want to reply, then register here. Registration is free and your account is created instantly, so you can post right away.