Started with one idea and finished with another.
Jan 6, 2021 12:18:15 #
I started this one as a minimalistic photo for a local club. Suggesting the members look around the homes for something to shoot as minimalistic. Not too interesting for the UHH so I went a few steps further and finished with the second image.
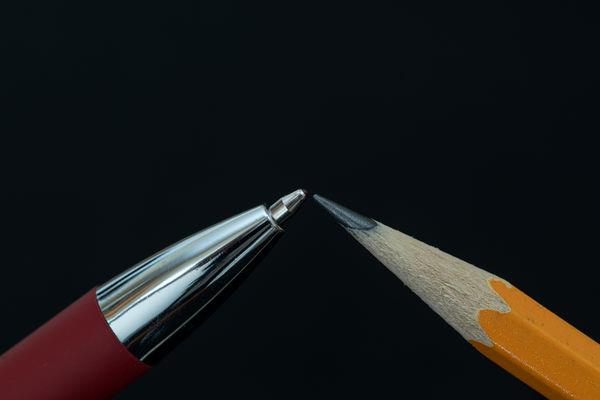
First image.
Started with the pen & pencil pointing at one another using a small soldering holder devise. The background was some felt I purchased a Walmart. The image was shot using filtered window light only. Shot with a 105 macro lens, .03 sec, f/16, iso 250, on a tripod with wireless trigger, could have used a timer, for the long shutter speed need to keep everything still.
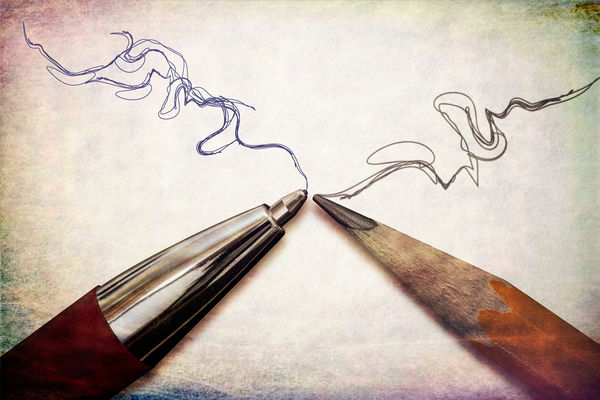
Second image.
1) Background layer
2) Made a copy image layer of the background.
3) Added a white layer between the Background image and the background copy
4) Made a mask for the pen and pencil on the Background Copy layer. When completed you have a white background.
5) Added squiggly lines using a png image I purchased on line. Positioned it for the pencil tip. set the layer to 75% opacity.
6) Added another squiggly line image for the pen. Positioned it toward the pen tip. this image is black so
7) Added a color layer of solid blue. Command click on my pen's squiggly line image then back to blue layer and added a mask. This made the line blue.
8) Didn't like the clean white background so added a paper texture image layer just above the solid white background. This will now be in the layer 3 position.
9) Went to the top layer and then hit command+Option on mac (Alt on PC)+ Shift+E to make a composite of all the layers.
10) Opened up Topaz and added a stylized filter to get the rougher look.
11) Saved and you see the final image
Not saying this image is outstanding by any means just letting photoshop users see steps use to get different results.
First image.
Started with the pen & pencil pointing at one another using a small soldering holder devise. The background was some felt I purchased a Walmart. The image was shot using filtered window light only. Shot with a 105 macro lens, .03 sec, f/16, iso 250, on a tripod with wireless trigger, could have used a timer, for the long shutter speed need to keep everything still.
Second image.
1) Background layer
2) Made a copy image layer of the background.
3) Added a white layer between the Background image and the background copy
4) Made a mask for the pen and pencil on the Background Copy layer. When completed you have a white background.
5) Added squiggly lines using a png image I purchased on line. Positioned it for the pencil tip. set the layer to 75% opacity.
6) Added another squiggly line image for the pen. Positioned it toward the pen tip. this image is black so
7) Added a color layer of solid blue. Command click on my pen's squiggly line image then back to blue layer and added a mask. This made the line blue.
8) Didn't like the clean white background so added a paper texture image layer just above the solid white background. This will now be in the layer 3 position.
9) Went to the top layer and then hit command+Option on mac (Alt on PC)+ Shift+E to make a composite of all the layers.
10) Opened up Topaz and added a stylized filter to get the rougher look.
11) Saved and you see the final image
Not saying this image is outstanding by any means just letting photoshop users see steps use to get different results.
Jan 6, 2021 12:39:55 #

Very cool work, Jim.
--Bob
--Bob
Jim-Pops wrote:
I started this one as a minimalistic photo for a l... (show quote)
Jan 6, 2021 12:47:06 #

Thank you for sharing the process, Jim. We never know what might inspire others!
.
.
Jan 6, 2021 12:58:45 #

Jan 6, 2021 13:01:17 #
"Not saying this image is outstanding by any means just letting photoshop users see steps use to get different results."
I don't often disagree with you Jim but in this case: If the image is not outstanding it's pretty darn close. I just learned how to do pencil sketches in LR now I'm going to have to try this one.
I don't often disagree with you Jim but in this case: If the image is not outstanding it's pretty darn close. I just learned how to do pencil sketches in LR now I'm going to have to try this one.
Jan 6, 2021 13:06:23 #
Jan 6, 2021 13:20:20 #
Jan 6, 2021 16:44:09 #
couch coyote
Loc: northern Illinois
You took a technical challenge and elevated it to something very appealing and artistic. Great job!!
Jan 6, 2021 18:58:07 #
Appreciate all your nice comments for my image. Quite surprised how many have favored the images.
Thank you,
Jim
Thank you,
Jim
Jan 6, 2021 21:03:25 #

Amazing what an amount of work it takes to put together a simple and neat work like this.
Jan 7, 2021 06:24:12 #

Love the concept. Only thing I would change, sharpen the pencil to match the width of the drawn pencil line or make your own with the actual pencil.
Jan 7, 2021 07:17:19 #
Jan 7, 2021 07:53:49 #

Jan 7, 2021 08:32:27 #

See what happens when you have too much time on your hands.🤔 Thanks for the step by step set up to get your final results. A good exercise for all of us to try. Another mini tutorial here in the PP section.
Jan 7, 2021 13:26:31 #
lnl
Loc: SWFL
Neat image and interesting composition. It amazes me the talent people like you show us UHHers.
If you want to reply, then register here. Registration is free and your account is created instantly, so you can post right away.