Create an Action and Colorize a Black & White Photo
Oct 27, 2020 22:54:09 #
Steve DeMott
Loc: St. Louis, Missouri (Oakville area)
Have you ever done the same action in Photoshop to different images or maybe one image? For tasks you perform frequently, you can easily record Actions to help you work more efficiently.
I tried to write this so a novice using Photoshop can easily follow along. For you old pros, maybe you’ll find something useful also.
What is an Action? It’s a series of steps to perform on an image. Let’s say you have an image that needs sharpening. First you duplicate image, select filter>other>highpass, Set the radius, click OK, Change the blend mode to overlay, your done. 9 mouse clicks and 1 keystrokes takes about 15 seconds. Multiply that by 25 images or more. How about making one keystroke say F2 to accomplish the same set of actions.
We are going to use an old B&W image to create different layers for colorizing black & white photos. This image was scanned from a glass negative from early 1900 and used it in a composite. The man looked like he would be a great salesman in 1910. You can use any old B&W photo or create a B&W photo from a color Photo. You can also use a color photo with this process to change colors or create an image of your liking.
Image mode must be 8 bit and RGB
Here are the basic steps for creating a Colorizing Group
{Command} Stop
Message: “This action creates a new Colorizing Group”
{Command} Make Group
{Command} Make Layer (This will be the layer to apply color. I’ll refer to it as the “paint layer”)
{Command} Set current layer
To: Layer
Mode: overlay
{Command} Make adjustment layer
Using: adjustment layer
Type: hue/saturation
Preset Kind: default
Without colorize
{Command} Create clipping mask current layer
Now that we have the steps let’s make an Action.
Tip: Always make a duplicate of the original image.
Open the Actions panel and select “New Action”… or press the 2nd icon (Square with a plus sign) at the bottom of the Actions panel. In the New Action dialog box – Give the action a name: “Colorize Group”, Set: Default Actions, Function Key: Create a short cut key (this is where you create a keyboard shortcut), Color: Select a color if you want.
Click “Record”
Use the mouse & keyboard to record the Action.
Make Group – Select “Layer > New > Group…” This will create a blank/empty group folder called “Group 1 (we’ll rename later), Color: Optional, Mode: Pass Through, Opacity: 100%. Click OK
Highlight/Select Group just created
Select “Layer > New > Layer” or “Shift + Ctrl + N”. Creates a new layer in Group and brings up dialog box. Change name if desired, Color: None, Mode: Overlay, Opacity: 100%. Click OK
Select “Layer > New Adjustment Layer > Hue/Saturation”. Creates a new Hue/Sat layer in Group and brings up dialog box. Change Name if desired, Color: None, Mode: Normal, Opacity: 100%. Click OK.
In the Hue/Saturation property panel. Preset: Default, Click the fifth icon on the bottom to “Clip to layer”
Select “Layer > New Adjustment Layer > Levels”. Creates a new levels layer in Group and brings up dialog box. Change Name if desired, Color: None, Mode: Normal, Opacity: 100%. Click OK.
In the Levels property panel. Preset: Default, Click the fifth icon on the bottom to “Clip to layer”
Press “Esc” or at the bottom of the actions panel click on the small square just right of the round red record icon.
That’s it
Make a test run. Open an image or create a blank image. Open the Actions dialog, select the Colorize action, and click the run icon. If everything works right you should have the following starting from the top:
Downward arrow next to a folder icon labeled Group 1,
Levels icon with mask labeled Level 1
Hue/Saturation icon with mask labeled Hue/Saturation 1
Layer called level 1
Image called background
Always select the last group created; otherwise you’ll create a group with-in a group. It can be pretty messy and confusing after a couple of times.
Note: This workflow is how I work. In Photoshop there are several ways of doing things that all lead to the same outcome. This might not be the best way, but it works for me.
How do we use this?
1. Don’t paint on the background image. Each color or item to be colored will have its own group.
2. Let’s start with the left woman skirt. Rename group 1 “left woman skirt”
3. Select a color that will be used for painting. Select “Window>Swatches” and select a color. I used a solid blue. H:240;S100;B100
4. Select layer 1 and rename it to “H:240;S100;B100”. This name tells me that I used the HSB Sliders, (Hue, Saturation, Brightness) which equals a solid blue. (This can change)
5. Select Brush Tool. “B”
Paint the area needing color.
Tips
Stay within the lines. Use the Erase tool “E” to clean up over painted areas.
Use the zoom tool “Z + mouse click zooms in – Z + Alt + mouse click zooms out”
Use the brush Size ( “[“decreases brush, “]” increases brush) and Hardness to create the effect needed.
6. After Painting Select the Hue/Saturation properties. Hue will change the color. Use Saturation & Brightness sliders to create the effect and look desired. If I change the HSB setting I annotate that by renaming the Hue/Saturation layer
7. Select the Level 1 layer and make adjustments to your liking.
Highlight “group 1 or “left woman skirt””. Open Actions, select the action we just created and press play or press the shortcut key if you made one.
Repeat steps 2 though 7. “Left woman blouse”
Sorry if this was a little long.
For those with Photoshop Elements, PSE supports & runs Actions, you can't create Actions. But you can run PS Actions if created in PS
Have a Happy Halloween, stay safe and see ya next week.
Steve
One more thing, Any Q's please ask.
This is what I started with
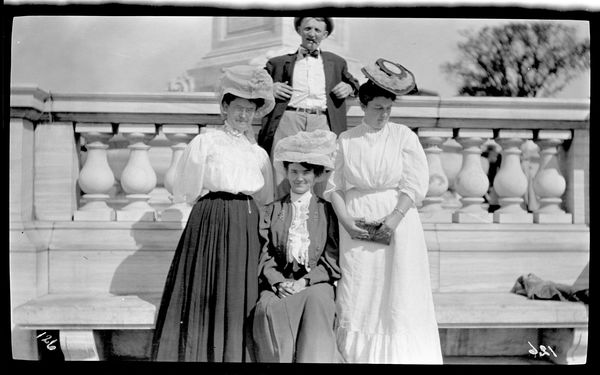
(Download)
Final image
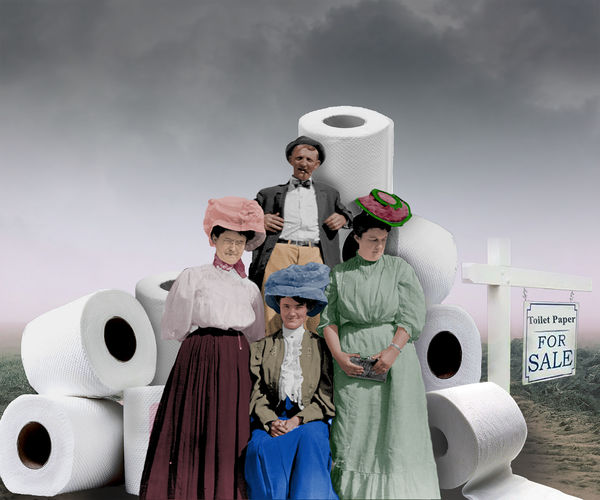
(Download)
screen shot with most the layers for coloring
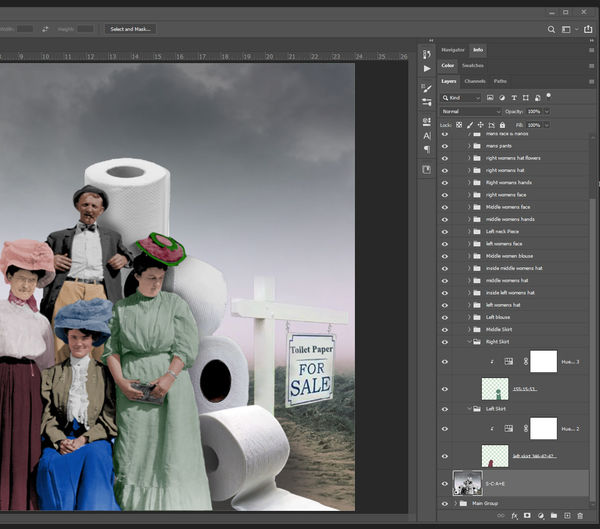
(Download)
Oct 28, 2020 07:03:16 #
I am just trying to learn PS, this is way over my head, however very interesting.
Thanks for sharing.
Joe W.
Thanks for sharing.
Joe W.
Oct 28, 2020 07:54:04 #

JW from PA wrote:
I am just trying to learn PS, this is way over my head, however very interesting.
Thanks for sharing.
Joe W.
Thanks for sharing.
Joe W.
Joe, do not learn PS, get a simple edit even PSE if you like the words Photoshop and spend money on Plugins. Mine are mainly Topaz but I have some JIXIPIX which are less costly. On-1 is another plugin company.
"way over my head" like many things work out a cooking receipt and proceed the same way each time to make a good soup. The directions that are given here can be separated into blocks and each block is a step toward the end result. Viewed as a whole then ... yep... "way over my head"
You are given the starting photo... so start
---------------------
Layers were over my head until I saw a woman who did scrapbook crafts. On her youtube video she told the ladies how to do it in simple words and steps... my comment was "oh! is that all there is to it!!"; I now use layers... picture that [sorry, i love puns]
Oct 28, 2020 09:08:30 #
Thanks for your reply, I use LR CC and PS comes with it in the subscription so that's why I am playing around with it. I mostly use LR for my editing. If I had a copy of LR 6 I would stop my subscription and just use it and PSE. I just do this as a hobby as I am retired and Photography always interested me, I just never had time to learn it when I was working and raising a family.
Thanks again,
Joe W.
Thanks again,
Joe W.
Oct 28, 2020 09:30:46 #

Steve, many thanks for your time and efforts with this topic!
I added it to the tutorial list here.
Interesting to read that Elements apparently had the capability to create an action before ver. 15. Would you be willing to attach the file itself? I was able to install an action that FStop12 created last year. Fascinating to watch it run
I added it to the tutorial list here.
Interesting to read that Elements apparently had the capability to create an action before ver. 15. Would you be willing to attach the file itself? I was able to install an action that FStop12 created last year. Fascinating to watch it run
Oct 28, 2020 10:23:09 #
Steve DeMott
Loc: St. Louis, Missouri (Oakville area)
Linda From Maine asked if I would download the photoshop *.atn file.
Download file, Right click on file and select open. This should install the action into PS. Not sure about PSE.
Linda can inform us if it works.
You know you've hit the pinnacle on UHH when you receive your own acronym.
Thanks & have fun
Steve
Download file, Right click on file and select open. This should install the action into PS. Not sure about PSE.
Linda can inform us if it works.
You know you've hit the pinnacle on UHH when you receive your own acronym.
Thanks & have fun
Steve
Oct 28, 2020 11:44:00 #
Steve DeMott wrote:
Thanks so much, Steve!Linda From Maine asked if I would download the photoshop *.atn file.
Download file, Right click on file and select open. This should install the action into PS. Not sure about PSE.
Linda can inform us if it works.
You know you've hit the pinnacle on UHH when you receive your own acronym.
Thanks & have fun
Steve
Download file, Right click on file and select open. This should install the action into PS. Not sure about PSE.
Linda can inform us if it works.
You know you've hit the pinnacle on UHH when you receive your own acronym.
Thanks & have fun
Steve
They don't load automatically to PSE, but are easy to add. See 47greyfox's instructions further down this page.
Oct 28, 2020 13:14:41 #
Great job and an excellent tutorial.
On a fun note, my cousin's wife is a 'Doomsday Prepper' and she has accumulated over 500-rolls of toilet paper. This is in addition to the commercial grade freeze-dry machine, professional surgery and dental supplies, solar power plant and a filtration and sanitizing station to purify the water in their inground swimming pool for their long term water needs.
All they are missing is the bomb shelter to keep it all in however I would not be surprised to see one there in the near future.
Oct 28, 2020 14:09:03 #
This example is in PSE 2019.
1. Select "Expert" mode from the top.
2. Lower right hand corner, select the down arrow next to "More"
3. From the pop-up, select the "Actions" tab
4. A window will open, select the "Actions" tab if it already isn't.
5. To the right of the tab is the standard "hamburger", click and select "Load Actions"
6. A Load pop-up will open where you select the "filename.atn" file
7. Select it and click on "Load" in the lower right of where the "File name:" window is.
PSE will load the ATN file and that's it.
Ditto thanks to Steve for sharing!!
Oct 28, 2020 14:38:07 #
47greyfox wrote:
Around the same time you were writing this, I was discovering that yep, that's how to do it 😊 Thanks!Another way to load actions into PSE. This example... (show quote)
I'm going to delete my earlier "how to" so there is no confusion.
Oct 28, 2020 14:40:29 #
Steve, when I ran play on your action, it immediately created the layers without giving me an opportunity to input my own selections/choices. I've only used an action once before, so I am probably just mis-understanding how to use this one.
BTW, I never commented on your timely and delightful image! LOVE IT 😀😀
.
BTW, I never commented on your timely and delightful image! LOVE IT 😀😀
.
Oct 28, 2020 15:56:17 #
Linda From Maine wrote:
Steve, when I ran play on your action, it immediately created the layers without giving me an opportunity to input my own selections/choices. I've only used an action once before, so I am probably just mis-understanding how to use this one.
BTW, I never commented on your timely and delightful image! LOVE IT 😀😀
.
BTW, I never commented on your timely and delightful image! LOVE IT 😀😀
.
Same here, Linda. Plus, are clipping masks supported in PSE?
Oct 28, 2020 16:41:52 #
47greyfox wrote:
Yes, I have used them minimally, and for playful pp - but they are fun! Same here, Linda. Plus, are clipping masks supported in PSE?
.
Oct 28, 2020 20:38:55 #
Steve DeMott
Loc: St. Louis, Missouri (Oakville area)
Linda From Maine wrote:
Steve, when I ran play on your action, it immediately created the layers without giving me an opportunity to input my own selections/choices. I've only used an action once before, so I am probably just mis-understanding how to use this one.
BTW, I never commented on your timely and delightful image! LOVE IT 😀😀
.
BTW, I never commented on your timely and delightful image! LOVE IT 😀😀
.
LFM; not sure what you mean by "opportunity to input my own selections/choices". You must have an image already loaded. All this does is create a group with a paintable layer and 2 adjustment layers. I'm not sure how this action works with PSE. PM me if this doesn't work and we'll see how to work this out.
Oct 28, 2020 20:46:58 #
Steve DeMott
Loc: St. Louis, Missouri (Oakville area)
sippyjug104 wrote:
Great job and an excellent tutorial. br br On a f... (show quote)
Hope they didn't forget the salt & pepper. If you don't have an underground shelter, what's the point. Once the s___ hits the fan toilet paper NOT going to be a big concern.
If you want to reply, then register here. Registration is free and your account is created instantly, so you can post right away.