Sky Replacement using Luminar 4 and PS for Examples
Oct 27, 2020 17:28:21 #

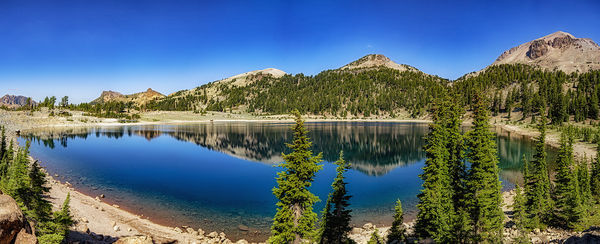
1. shows the original stitched pano image--183 mb size. The lake is lake Helen in Lassen Volcanic national park. Normal PP but no saturation. Lest one thinks its over saturated this is the way it came from the camera.
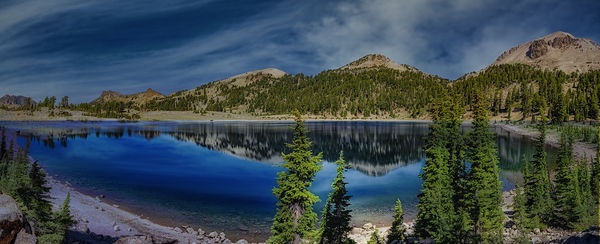
2. image 2 shows the addition of a sky--my sky--using Luminar 4 and then trying to bring the cloud reflections down into the lake. In hindsight I should have lightened this final image.
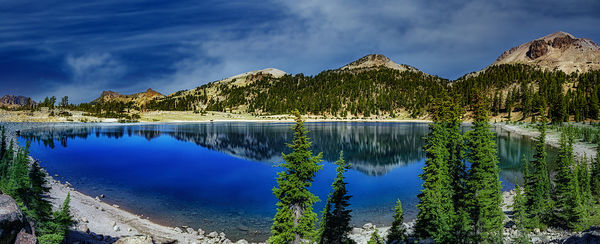
3. image 3 is a sky replacement using the new PS tool. Again, using the same sky as in the Luminar image--a sky I captured myself, not a preset sky. I then tried to copy the sky and move it into the lake for cloud reflections.
Is it perfect. Probably not as some will point out. But it does give a comparison of the two methods. One item of note. Due to the size of the original pano stitched image, processing in Luminar took a long time. Both methods took about the same amount of time to complete, except for the long processing time in Luminar. I thought it was easier in Luminar to bring the sky reflection into the lake.
If no reflections are needed in water I'd probably use the new PS tool.
2. image 2 shows the addition of a sky--my sky--using Luminar 4 and then trying to bring the cloud reflections down into the lake. In hindsight I should have lightened this final image.
3. image 3 is a sky replacement using the new PS tool. Again, using the same sky as in the Luminar image--a sky I captured myself, not a preset sky. I then tried to copy the sky and move it into the lake for cloud reflections.
Is it perfect. Probably not as some will point out. But it does give a comparison of the two methods. One item of note. Due to the size of the original pano stitched image, processing in Luminar took a long time. Both methods took about the same amount of time to complete, except for the long processing time in Luminar. I thought it was easier in Luminar to bring the sky reflection into the lake.
If no reflections are needed in water I'd probably use the new PS tool.
Original Lake Helen image
(Download)
Luminar sky replacement
(Download)
Photoshop sky replacement
(Download)
Oct 27, 2020 17:42:13 #

Oct 27, 2020 17:43:17 #
With little else to go on, Luminar is it. But I think there’s more to it. The pix hint at differences in the actual work performed by the operator.
Oct 27, 2020 18:01:21 #

Both very nicely done. Did the Luminar algorithm copy the sky onto the water reflection or did you perform another operation to copy it on the water.
Oct 27, 2020 18:55:52 #

joehel2 wrote:
Both very nicely done. Did the Luminar algorithm copy the sky onto the water reflection or did you perform another operation to copy it on the water.

Oct 27, 2020 19:20:28 #
joehel2 wrote:
Both very nicely done. Did the Luminar algorithm copy the sky onto the water reflection or did you perform another operation to copy it on the water.
Wondering myself about that. Gave me the impression that different work was done to each composite.
Oct 27, 2020 19:37:31 #
richardjkirby601
Loc: Northern VA
Just got Luminar 4 and the sky replacement is easy and the gradient feature is super easy. I will guess that Luminar AI will continue to pressure Photoshop both on price and features.
And just to throw in, I like good pictures, I am not a historical photographer so a little easy help to make pictures look great is welcome and appreciated help.
And just to throw in, I like good pictures, I am not a historical photographer so a little easy help to make pictures look great is welcome and appreciated help.
Oct 27, 2020 20:43:26 #
joehel2 wrote:
Both very nicely done. Did the Luminar algorithm copy the sky onto the water reflection or did you perform another operation to copy it on the water.
No, it didn't. I added a new layer, imported the same sky, reversed it, lowered it, lowered opacity and set the blend mode to overlay. To do this you have to use your own sky. It will not work using a Luminar preset sky.
Oct 27, 2020 23:45:26 #
I think that you need to flip the reflection in the water left to right. Then the reflection will match the sky. You have almost got it where it needs to be, congratulations! Please stay well and keep on posting the good work.
Oct 28, 2020 05:45:25 #

On the lower mountains about 1/4 of the way in from left it seems to me the Luminar offering has handled the edge better. Can't afford to keep swapping and changing (and trying to learn) so I'm waiting for PSP 2022.
I'll bet they're working overtime to get this sorted.
I'll bet they're working overtime to get this sorted.
Oct 28, 2020 06:00:25 #

Pleasant pics - but in neither #2 or #3 does the refection look genuine. However, I much prefer the PS sky replacement in #3. How about turning your library pic through 180 degrees before replacement? 
Oct 28, 2020 07:38:46 #
ZtaKED
Loc: Lakes Region, New Hampshire & NE Florida
ImageCreator wrote:
1. shows the original stitched pano image--183 mb ... (show quote)
First, nice work. Second, how much time did you actually spend on each example? Those of us with the attention span of a gerbil would be interested.
Oct 28, 2020 10:24:15 #
ImageCreator wrote:
No, it didn't. I added a new layer, imported the same sky, reversed it, lowered it, lowered opacity and set the blend mode to overlay. To do this you have to use your own sky. It will not work using a Luminar preset sky.
Thanks for replying.
Oct 28, 2020 10:56:40 #
User ID wrote:
Wondering myself about that. Gave me the impression that different work was done to each composite.
I tried to apply the same work to each image.
Oct 28, 2020 11:00:23 #
ZtaKED wrote:
First, nice work. Second, how much time did you actually spend on each example? Those of us with the attention span of a gerbil would be interested.
I'd estimate each image took about 15 minutes. The initial replacement is easy and quite, either in Luminar or PS. Its adding the reflection that eats up most of the time. If there's no water to add a reflection then the process can take just a few mouse clicks.
If you want to reply, then register here. Registration is free and your account is created instantly, so you can post right away.