The Pitfalls of Long Lenses and the Inexperienced Photographer
Jul 11, 2020 23:49:40 #

I want to preface this post. It is primarily intended for an inexperienced long lens or macro user.
Over the past year, I have read and even commented on a few posts where people have expressed dissatisfaction with newly purchased telephoto lenses. I understand the plight because I have been there myself. I am an amateur photographer who is constantly learning from those much better than I am; however, to the inexperienced long lens user, I feel that the school teacher in me might have some insight to offer. I assure you that your new Tamron or Sigma 150-600mm lens or even your 100mm macro is a good lens capable of producing superb images. When I first bought versions of these two lenses, I thought I had wasted money. I was very displeased initially; however, the problem was me. It was never the lens. I might just be that you are overlooking a few key elements in using these lens.
I came to some realizations when recently trying to help two friends that are both far better photographers than I am navigate the pitfalls of recently purchased lenses.
A 35mm lens tends to be very forgiving in many respects. You generally get sharp crisp pictures when using them even if making some basic mistakes. There is a reason that the lenses installed in smart phones have short focal lengths often much shorter than 35mm. On the other hand, the longer the focal length of the lens, the more unforgiving it becomes.
There are two components of using a long lens that I would like to present: depth of field (DOF), and motion blur. I will discuss them in that order.
Depth of Field:
Initially when I started using my longer lenses and especially my Canon EF 100mm L Macro at close distances, I was beyond displeased with the results. Parts of my pictures were always out of focus. I don’t mean the backgrounds either (bokeh). I mean the subjects themselves. I thought I was doing everything correctly. What I had not considered to the extent that I should have was depth of field. I was always aware of it and actually familiar with it especially with my then current prime and zoom lenses, but I was way off when it came to the 150-600mm and even more so the 100mm macro. At the time I purchased both lenses, I was shooting with a Canon T6s crop frame body, which actually compounded the problems.
My favorite DOF chart is the one in the Photo Pills App. It allows you to enter the camera model. You then enter your lenses’ focal length, the F setting (aperture), and the distance from the subject. One night after I purchased the app and started playing around with it, I made some inexperienced photographer discoveries. I was shooting with settings that produced very narrow or shallow depths of field. No wonder the elk’s eye and face were focused while his hind end was out of focus! Yes, the light came on! By this time, I also had my first full frame camera. I then started alternating the camera models in the app from my full frame camera to my crop frame model and discovered that with all other factors the same, the depth of field was narrower on the crop frame body.
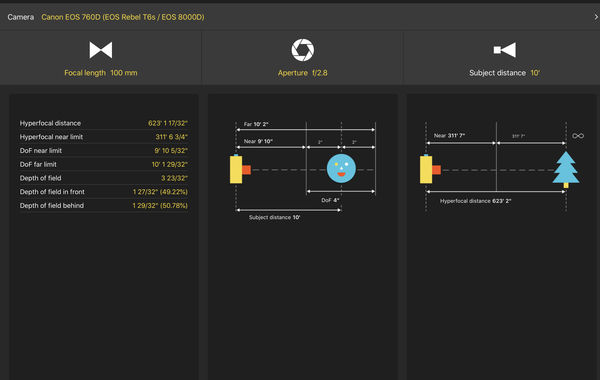
The first two pictures posted below illustrate the difference of DOF with a 100mm lens between the Canon 5DMKIV full frame and the T6s crop frame. Notice that the full range of the DOF with the full frame is six (6) inches as compared to four (4) inches on the crop frame. The lens and settings remained consistent at 100mm / f2.8 / 10 feet.
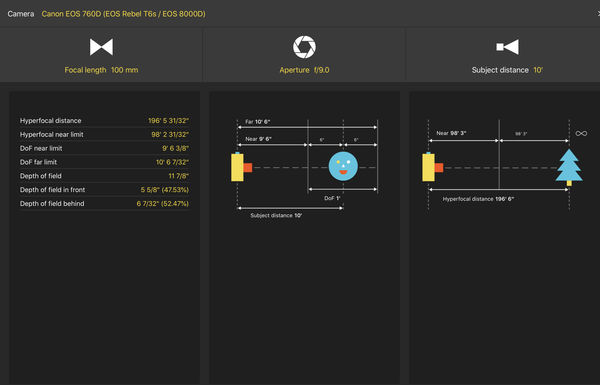
On the third and fourth pictures posted below, I have changed only the aperture setting to F9 still using a 100mm lens at a distance of 10 feet. As you will see, the DOF widened significantly; however, the DOF on the full frame (1’7”) remains substantially wider than the crop frame ( 1’0”).
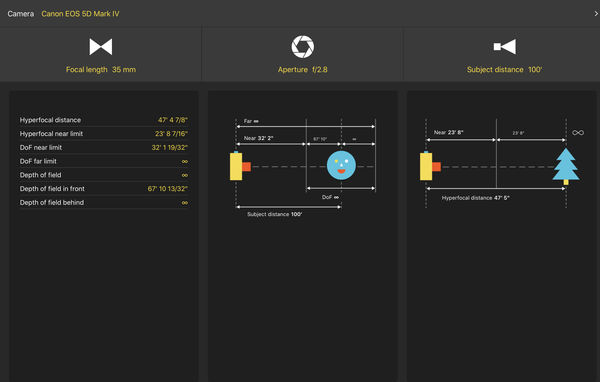
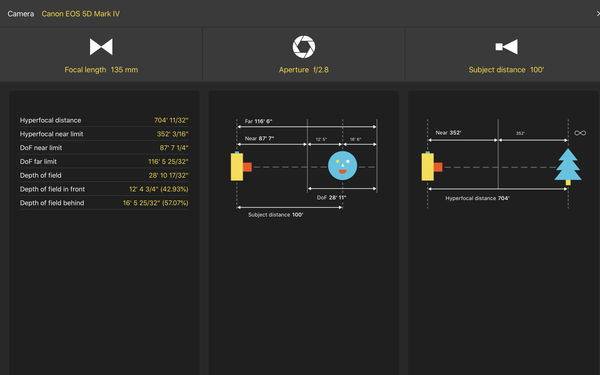
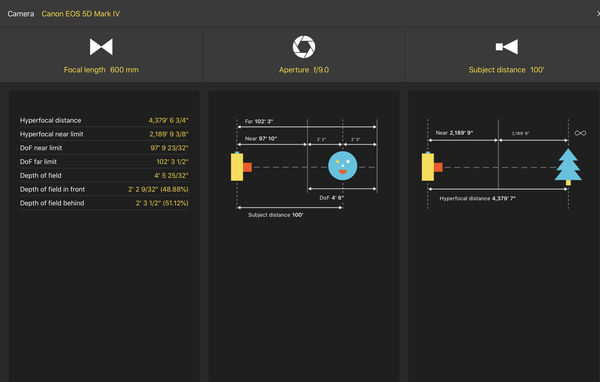
The next three pictures (fifth-seventh) posted below illustrate the DOF differences at f2.8 and a distance of 100 feet using a 35mm focal length, a 135mm focal length, and a 600mm focal length. As you can see the DOF varies significantly. 35mm = infinity / 135mm = 28’11” / 600mm = 1’5”. (Of course, not many long lenses will go to F2.8. You are generally looking at best at F4 and higher as you zoom to longer focal lengths. I maintained F2.8 merely for comparison purposes.)
Based upon this information, shooting a large object such as a large animal is going to possibly have focal issues (unless your intention is to only have a small part of the object in perfect focus) if you don’t fully consider DOF variables.
The final picture below illustrates the 600mm lens still at 100 feet, but with an aperture at F9. The change in that single variable now produces a DOF of 4’6”. At this setting, a larger object will be better focused from front to rear.
These same principles apply to using a macro lens at close distances. (F2.8 is often achievable with many macro lenses in the 60mm to 100mm focal lengths.)
What I learned was that when using a long lens or even a shorter lens such as a 100mm macro at a closer distance is that DOF becomes a crucial factor in obtaining a satisfactory image. I learned that sometimes I must raise the ISO and close down the aperture (higher number) in order to widen the DOF to a width where the entire subject is in focus front to back. I finally came to the realization that I can crank up the ISO and up the aperture number and still obtain a good quality image. I also learned that I needed to spend some time studying DOF charts specifically for the lens I own and use. I also keep my smart phone and the Photo Pills app handy when shooting with my long and macro lens.
Shutter Speed:
I always thought the shutter speed variable was obvious, but I later realized it was obvious to me because two friends from our local camera store (Cameragraphics of Auburn, AL) John Oliver and John Rhodenizer explained to me early on in my DSLR endeavors that you tend to get sharper images with faster shutter speeds. When I bought my Sigma 150-600mm, I quickly learned that it is “crucial” to have a faster shutter speed when using a longer focal length to avoid motion blur in my photos. I suspect that many inexperienced long lens users especially when shooting hand held mistake motion blur for focus issues. Motion blur occurs when you the photographer moves the camera minutely during the shot. To the inexperienced photographer, it can appear as an out of focus image. Even small movements are magnified exponentially at longer focal lengths.
Motion blur is easily avoided by using a faster shutter speed. Also enable IS (Image Stabilization - called numerous things depending on the lens manufacturer) to help reduce motion blur. However, stabilization modes don’t actually stabilize an object. They help stabilize your movement while holding the camera when shooting handheld. Some newer camera models even have in camera image stabilization modes.
I have often heard that that you should always use a shutter speed that at least matches the focal length of your lens. (Example: at least 1/100 for a 100mm lens or 1/600 for a 600mm lens.) Personally, as a lens exceeds 300mm, I double that number if possible. Admittedly, shutter speeds can be limited due to ISO constraints, light conditions, etc. I do find that in general by using as fast a shutter speed as possible, motion blur is generally eliminated and avoided.
I am sure that this post is elementary for most photographers on this site. As well, I suspect some of the seasoned professionals will pick it apart and tear it to threads; however, I passed this same information and explanations along to two very good photographers that I highly respect. I simply made the personal discoveries first. I do think they were both more satisfied with their photos when using their longer lenses and macro lenses after trying my suggestions.
As I mentioned, I am a teacher. Specifically, I am a music teacher. I have learned that photography is much like playing an instrument. It first requires understanding, and second, practice practice practice. For those of you venturing into telephoto or close distance macro photography, I strongly encourage you to study the DOF charts for your lenses of choice especially ones you are not as familiar with as some you use regularly. Learn to apply both the principles of DOF and shutter speeds to your shooting. Explore different settings and find what works for you when using your equipment.
Over the past year, I have read and even commented on a few posts where people have expressed dissatisfaction with newly purchased telephoto lenses. I understand the plight because I have been there myself. I am an amateur photographer who is constantly learning from those much better than I am; however, to the inexperienced long lens user, I feel that the school teacher in me might have some insight to offer. I assure you that your new Tamron or Sigma 150-600mm lens or even your 100mm macro is a good lens capable of producing superb images. When I first bought versions of these two lenses, I thought I had wasted money. I was very displeased initially; however, the problem was me. It was never the lens. I might just be that you are overlooking a few key elements in using these lens.
I came to some realizations when recently trying to help two friends that are both far better photographers than I am navigate the pitfalls of recently purchased lenses.
A 35mm lens tends to be very forgiving in many respects. You generally get sharp crisp pictures when using them even if making some basic mistakes. There is a reason that the lenses installed in smart phones have short focal lengths often much shorter than 35mm. On the other hand, the longer the focal length of the lens, the more unforgiving it becomes.
There are two components of using a long lens that I would like to present: depth of field (DOF), and motion blur. I will discuss them in that order.
Depth of Field:
Initially when I started using my longer lenses and especially my Canon EF 100mm L Macro at close distances, I was beyond displeased with the results. Parts of my pictures were always out of focus. I don’t mean the backgrounds either (bokeh). I mean the subjects themselves. I thought I was doing everything correctly. What I had not considered to the extent that I should have was depth of field. I was always aware of it and actually familiar with it especially with my then current prime and zoom lenses, but I was way off when it came to the 150-600mm and even more so the 100mm macro. At the time I purchased both lenses, I was shooting with a Canon T6s crop frame body, which actually compounded the problems.
My favorite DOF chart is the one in the Photo Pills App. It allows you to enter the camera model. You then enter your lenses’ focal length, the F setting (aperture), and the distance from the subject. One night after I purchased the app and started playing around with it, I made some inexperienced photographer discoveries. I was shooting with settings that produced very narrow or shallow depths of field. No wonder the elk’s eye and face were focused while his hind end was out of focus! Yes, the light came on! By this time, I also had my first full frame camera. I then started alternating the camera models in the app from my full frame camera to my crop frame model and discovered that with all other factors the same, the depth of field was narrower on the crop frame body.
The first two pictures posted below illustrate the difference of DOF with a 100mm lens between the Canon 5DMKIV full frame and the T6s crop frame. Notice that the full range of the DOF with the full frame is six (6) inches as compared to four (4) inches on the crop frame. The lens and settings remained consistent at 100mm / f2.8 / 10 feet.
On the third and fourth pictures posted below, I have changed only the aperture setting to F9 still using a 100mm lens at a distance of 10 feet. As you will see, the DOF widened significantly; however, the DOF on the full frame (1’7”) remains substantially wider than the crop frame ( 1’0”).
The next three pictures (fifth-seventh) posted below illustrate the DOF differences at f2.8 and a distance of 100 feet using a 35mm focal length, a 135mm focal length, and a 600mm focal length. As you can see the DOF varies significantly. 35mm = infinity / 135mm = 28’11” / 600mm = 1’5”. (Of course, not many long lenses will go to F2.8. You are generally looking at best at F4 and higher as you zoom to longer focal lengths. I maintained F2.8 merely for comparison purposes.)
Based upon this information, shooting a large object such as a large animal is going to possibly have focal issues (unless your intention is to only have a small part of the object in perfect focus) if you don’t fully consider DOF variables.
The final picture below illustrates the 600mm lens still at 100 feet, but with an aperture at F9. The change in that single variable now produces a DOF of 4’6”. At this setting, a larger object will be better focused from front to rear.
These same principles apply to using a macro lens at close distances. (F2.8 is often achievable with many macro lenses in the 60mm to 100mm focal lengths.)
What I learned was that when using a long lens or even a shorter lens such as a 100mm macro at a closer distance is that DOF becomes a crucial factor in obtaining a satisfactory image. I learned that sometimes I must raise the ISO and close down the aperture (higher number) in order to widen the DOF to a width where the entire subject is in focus front to back. I finally came to the realization that I can crank up the ISO and up the aperture number and still obtain a good quality image. I also learned that I needed to spend some time studying DOF charts specifically for the lens I own and use. I also keep my smart phone and the Photo Pills app handy when shooting with my long and macro lens.
Shutter Speed:
I always thought the shutter speed variable was obvious, but I later realized it was obvious to me because two friends from our local camera store (Cameragraphics of Auburn, AL) John Oliver and John Rhodenizer explained to me early on in my DSLR endeavors that you tend to get sharper images with faster shutter speeds. When I bought my Sigma 150-600mm, I quickly learned that it is “crucial” to have a faster shutter speed when using a longer focal length to avoid motion blur in my photos. I suspect that many inexperienced long lens users especially when shooting hand held mistake motion blur for focus issues. Motion blur occurs when you the photographer moves the camera minutely during the shot. To the inexperienced photographer, it can appear as an out of focus image. Even small movements are magnified exponentially at longer focal lengths.
Motion blur is easily avoided by using a faster shutter speed. Also enable IS (Image Stabilization - called numerous things depending on the lens manufacturer) to help reduce motion blur. However, stabilization modes don’t actually stabilize an object. They help stabilize your movement while holding the camera when shooting handheld. Some newer camera models even have in camera image stabilization modes.
I have often heard that that you should always use a shutter speed that at least matches the focal length of your lens. (Example: at least 1/100 for a 100mm lens or 1/600 for a 600mm lens.) Personally, as a lens exceeds 300mm, I double that number if possible. Admittedly, shutter speeds can be limited due to ISO constraints, light conditions, etc. I do find that in general by using as fast a shutter speed as possible, motion blur is generally eliminated and avoided.
I am sure that this post is elementary for most photographers on this site. As well, I suspect some of the seasoned professionals will pick it apart and tear it to threads; however, I passed this same information and explanations along to two very good photographers that I highly respect. I simply made the personal discoveries first. I do think they were both more satisfied with their photos when using their longer lenses and macro lenses after trying my suggestions.
As I mentioned, I am a teacher. Specifically, I am a music teacher. I have learned that photography is much like playing an instrument. It first requires understanding, and second, practice practice practice. For those of you venturing into telephoto or close distance macro photography, I strongly encourage you to study the DOF charts for your lenses of choice especially ones you are not as familiar with as some you use regularly. Learn to apply both the principles of DOF and shutter speeds to your shooting. Explore different settings and find what works for you when using your equipment.


Jul 12, 2020 01:31:26 #
Interesting information, but you have to consider the subject distance. To fill the frame with a full frame camera you have to be much closer to the subject than the distance needed to fill the frame with the same subject on a crop camera. In this sense crop cameras have more depth of field than full frame cameras.
Check out the depth of field equivalent calculator about halfway down here https://www.cambridgeincolour.com/tutorials/digital-camera-sensor-size.htm
A full frame camera with a 100mm lens at f2.8 would have the same dof as a 1.5 crop camera with a 66mm lens at f1.8. If you filled the frame with the subject equally..
Jul 12, 2020 05:24:48 #

Jul 12, 2020 05:42:28 #
tcthome
Loc: NJ
A comment about Photo Pills. Best $10 I have ever spent. If anybody has something better in this price range besides a bottle of water when out in the desert , I would like to here about it.
Jul 12, 2020 06:47:59 #

Jul 12, 2020 07:16:42 #

Jul 12, 2020 07:48:56 #
A long post, but filled with information. Use what you want or that from which you might receive benefit.
I have been shooting since I was in my early 20’s. Well over 40 years is a long time to be taking pictures or doing anything else, for that matter. I have had many telephoto lenses along the way. I never had trouble using one until I purchased the Nikon 500 pf lens. I had great difficulty getting sharp images and was initially very disappointed with the product. Over a period of time I found the problem to be me. As do most long lenses, the 500 required a variety of technique to optimize performance. I became very aware of shuttering too fast. I started to hold my breath when shuttering. Bracing myself and/or the lens made a huge difference, trying to use higher shutter speeds also helped. Voila, better and more sharp pictures started to become prevalent.
The point is, we all know, but take for granted these techniques, often ignoring them. The previous contributor made some excellent points. Always remember and actually use the basics we all learned way back when we started.
Jul 12, 2020 07:56:56 #
Nice article. Your title could be adapted to a fill-in-the-blanks.
"The Pitfalls of ____ and the inexperienced _____." : )
"The Pitfalls of ____ and the inexperienced _____." : )
Jul 12, 2020 08:08:33 #

I learned a long time ago that the best way to get sharper images with a long lens is to use a good tripod rated for the weight of the lens and body.
Jul 12, 2020 08:33:10 #
Jul 12, 2020 09:06:16 #

Excellent post that surely will serve to help others to understand the principles behind using a long lens. We all have known that depth of field is something to keep into consideration with many macro and landcape shots.
A large group of photographers prefer to use their mid range telephoto (90-135 mm.) wide open for portraits looking for that special bokeh that I admit makes a beautiful impression. A large proportion of those portraits have areas out of focus and the remedy offer is that if the eyes are in focus the rest is not that important. I respectfully disagree. I like to close the lens at least one lens aperture from its wide opening to obtin not only a better rendition of the skin but also a better depth of field. I do not shoot portraits very often. For landscapes it is a no brainer, small lens apertures like f11-16 offer an excellent depth of field specially when using wide angles.
Teles amplify the image and any hand movement, as slight as it could be will magnify the blur. A tripod is an excellent solution or as has been suggested the shutter speed should be high enough and I like the duplication of the usual recommendation of 1/ISO. With macro, unless selective focus is being used a small lens aperture is ideal to improve depth of field at those magnifications. We know that VR will not stabilize an image but will improve hand held images of non moving subjects.
I want to repeat it again. This is an excellent post and I am sure many of us will thank you for your efforts to educate others.
Jul 12, 2020 09:32:11 #
Bird Dawg
Loc: Georgia
Thanks for the good information. I know it will help me to get sharper images.
Jul 12, 2020 09:37:25 #

The single most important thing (in my opinion ) that any new photographer MUST learn is knowing how to see in pictures. "hey,that would make a good picture"
Jul 12, 2020 09:39:25 #

abc1234 wrote:
I learned a long time ago that the best way to get sharper images with a long lens is to use a good tripod rated for the weight of the lens and body.
Tripod stability has nothing to do with load capacity. Good tripod rated for focal length is probably what you mean - one with nice thick legs and a large apex (where the legs come together) - to resist vibration. Typically, such tripods are 5x to 10x the load capacity.
Jul 12, 2020 10:07:39 #
Not trying to be ornery but motion blur is not affected in any way by image stabilization. I think it is camera shake you are getting at here....
"Motion blur is easily avoided by using a faster shutter speed. Also enable IS (Image Stabilization - called numerous things depending on the lens manufacturer) to help reduce motion blur. However, stabilization modes don’t actually stabilize an object. They help stabilize your movement while holding the camera when shooting handheld. Some newer camera models even have in camera image stabilization modes."
"Motion blur is easily avoided by using a faster shutter speed. Also enable IS (Image Stabilization - called numerous things depending on the lens manufacturer) to help reduce motion blur. However, stabilization modes don’t actually stabilize an object. They help stabilize your movement while holding the camera when shooting handheld. Some newer camera models even have in camera image stabilization modes."
If you want to reply, then register here. Registration is free and your account is created instantly, so you can post right away.