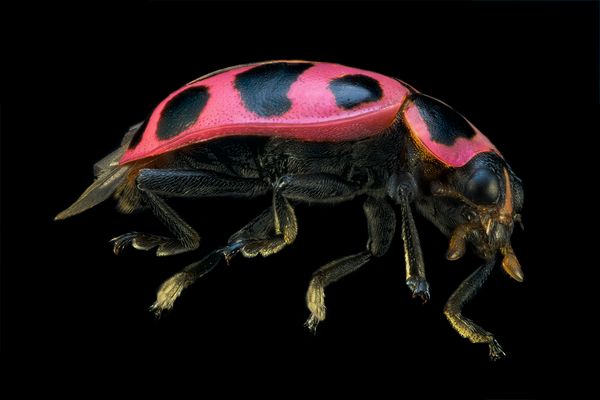
Pink Black Spotted Beetle
May 22, 2020 23:41:05 #
The sun came out this morning and I was able to take a short walk with the camera in hand. I came across a tiny bright pink beetle with black spots which I brought back for a focus stacking session. This image was staged at 4X power magnification.
May 23, 2020 07:48:38 #
May 23, 2020 08:29:11 #
May 23, 2020 09:45:36 #
May 23, 2020 09:46:02 #
fjwallace wrote:
Nice image! I like the lighting on this one!
Thanks, sometimes some work out better than others.
May 23, 2020 14:07:57 #
May 23, 2020 17:24:50 #
Blenheim Orange wrote:
Nice work. Handsome critter.
Mike
Mike
Thanks, Mike. Mother Nature typically uses vivid colors as a warning although I suspect that she was just showing off when she painted the 12-spotted pink ladybug beetle.
May 23, 2020 17:31:10 #
May 23, 2020 17:37:03 #
Chuckwal wrote:
Sippy
wow your stacking is excellent
chuck
wow
 your stacking is excellent
chuck
Thanks, Chuck. I appreciate the feedback.
May 23, 2020 17:38:56 #
Sippy
your work is excellent what is your set up to do the stacking
chuck
your work is excellent what is your set up to do the stacking
chuck
May 23, 2020 18:40:04 #
Chuckwal wrote:
Sippy
your work is excellent what is your set up to do the stacking
chuck
your work is excellent what is your set up to do the stacking
chuck
Chuck, here's all it takes:
First, any camera can be used so nothing special is required although a changeable lens type is preferrable.
Second, a lens that has a very shallow depth of field is prefered (like a typical macro lens for example) for think of it like putting thin slices of bread together to make a loaf.
Third, we have to choose a method of advancing the focus for each shot taken and using a macro focus rail is the simplest and perhaps the least expensive method. I started with a manually screw turn operated focus rail.
Forth, decide whether you want move the camera in increments toward the subject or whether you want to move the subject toward the camera. In essence, one of them stays in place and the other moves toward it little by little each time a shot is taken.
Setup:
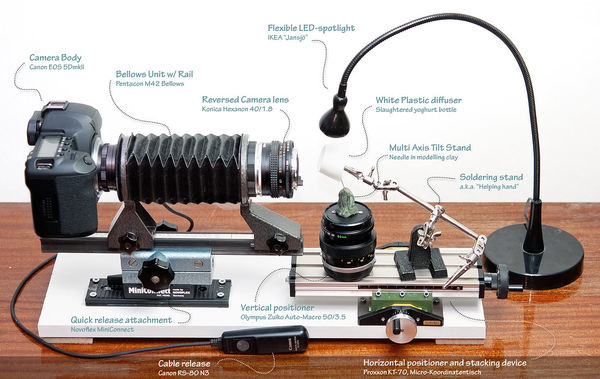
I recommend a tabletop setup for steadiness it goodness. Mine was simply a piece of 3/4-inch plywood 30-inches long and 12-inches wide that I mounted my focus rail on. I've attached a photo of a simple tabletop setup that I have shared in the past. It is not mine although it illustrates the essence of how simple it can be.
In this photo you will see that the camera is mounted in a fixed position. He chose a bellows and a reverse mounted prime lens to achieve magnification. Shoot in the Mirror Up mode and use a shutter release so that you do not touch the camera. No vibration is goodness.
His choice of a manual focus rail is a drill press slide table that moves in the X and Y axis. I have one exactly like it and they can be had for $39 which is a real bargain to do the job. It is screw driven and it can be turned in very, very fine advancements and it has plenty of distance to travel.
He uses an old zoom lens as a way to raise and lower the subject for the line of sight for the camera. I use a $14 laboratory scissor jack set on top of my slide table to for the Z axis up and down.
The IKEA LED light is the gold standard of lighting for macro photography and you will see more of them used than any other light. You could use a flash although batteries poop out and the recycle time is a hindrance if you have other things to do when you are shooting large number of images in your stack. Lighting diffusion can be anything that softens out the light. Plastic cups and paper towels work great for me.
The Shots:
Use Live View or tether your camera to a PC. Let's assume that you will move the subject toward the fixed in position camera (the opposite will hold true if the camera moves forward instead of the subject). Move the subject to a point to where only the closest point of the subject is in sharp focus like the tip of an antenna. Everything else will be a blur. Stop..and touch nothing now. Take a shot. Advance the subject ever so slightly toward the camera. Stop...and touch nothing now. Take a shot. Repeat, repeat, repeat, repeat until you have reached the furthest part of the subject in sharp focus.
You have now completed your first focus stacking photo session. Now for the processing of the images.
Load all of the images taken in the session into a program that is capable of performing focus stacking such as Photoshop, Affinity Photo, Zerene Stacker, Helicon Focus, etc. Because there are several of these programs you can watch a YouTube tutorial on how to use the specific program.
Lastly....enjoy.
May 23, 2020 19:14:18 #
May 23, 2020 23:13:11 #
Chuckwal wrote:
Thanks so much like you're set up practical and efficient
chuck
chuck
Chuck, like shown in the picture, there are bellows that also act as a rail. They have two knobs. One extends and retracts the bellows which changes the amount of magnification. The other knob moves the camera and bellows forward or back.
This type is quite handy for it serves two purposes which are magnification adjustment and focus adjustment. For a quite basic yet productive setup that is all you would need. Set the subject in front of the camera. Turn on your Live View. Move the subject toward or away until just the closest tip of it comes into sharp focus and all else is a blur.
Now, take a shot. Advance the bellows knob that moves it all forward just a little bit. A bit more of the subject could become sharp. Take a shot. Repeat, repeat, repeat until you have reached the farthest point on the subject bringing it into sharp focus.
The trick is that you want more of an "open" aperture for the most shallow depth of field. This creates more sharp slices to be stacked. This is unlike taking a single photo where you want a deep depth of field. Typically the lens is set at the second aperture from full open. Much higher magnifications are done with full open lenses.
May 25, 2020 01:04:08 #
May 25, 2020 10:57:47 #
If you want to reply, then register here. Registration is free and your account is created instantly, so you can post right away.


