Help with color
May 22, 2020 08:37:04 #
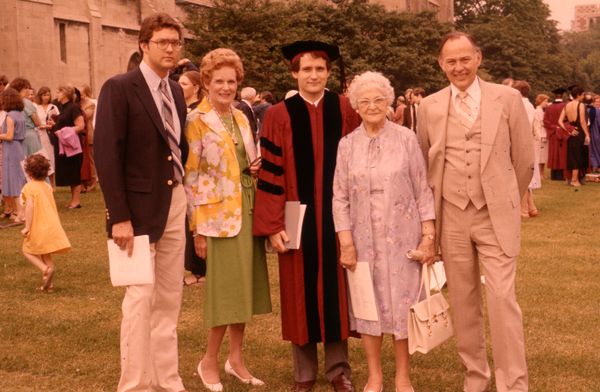
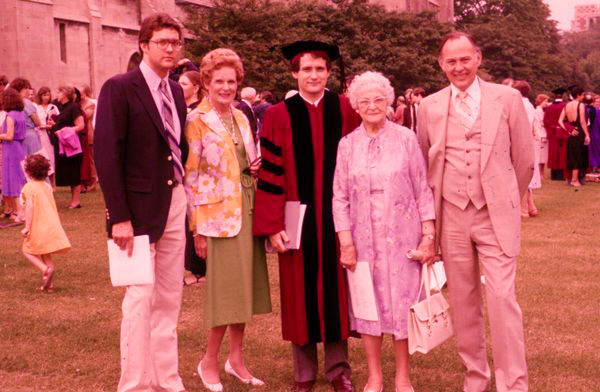
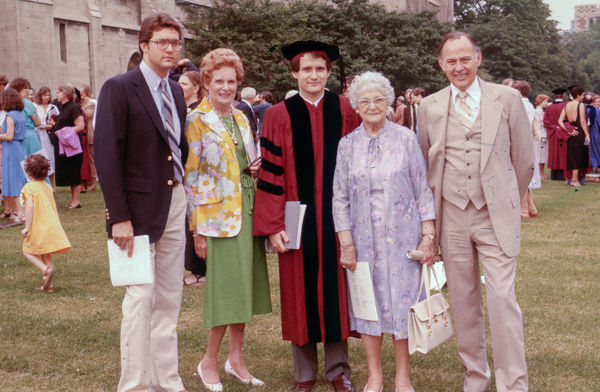
Scanning & digitizing severa hundred 35mm slides. Most are good but 12 (1 roll) are tinted like this. I cannot seem to correct this problem. I'm not an expert. I've tried photoshop & Luminar 4 with no success. Please help!
Thanks, Bob
Thanks, Bob
May 22, 2020 08:54:42 #
StanMac
Loc: Tennessee
Which scanner are you using? My Epson V500 scanner has a color restoration setting that does a very good job of correcting color shifts in prints and slides due to aging. Yours may have a similar feature.
Stan
Stan
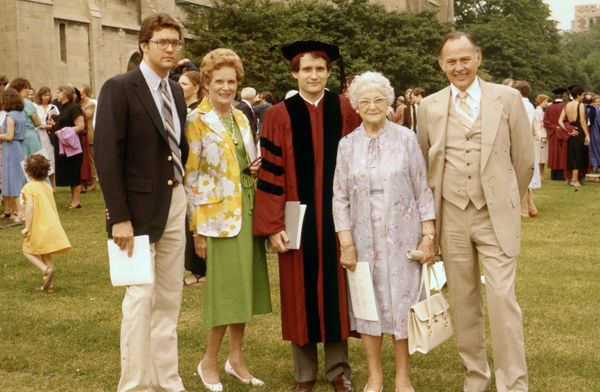
May 22, 2020 08:55:09 #
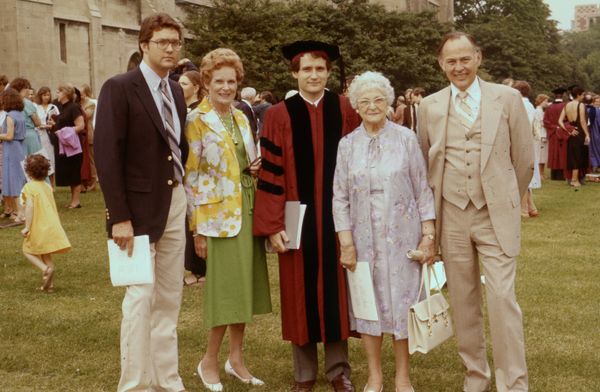
Just did a white balance adjustment in an app on my ipad called Snapseed. Hope this looks better Robert. 
May 22, 2020 09:13:05 #
Robertven wrote:
Scanning & digitizing severa hundred 35mm slides. Most are good but 12 (1 roll) are tinted like this. I cannot seem to correct this problem. I'm not an expert. I've tried photoshop & Luminar 4 with no success. Please help!
Thanks, Bob
Thanks, Bob
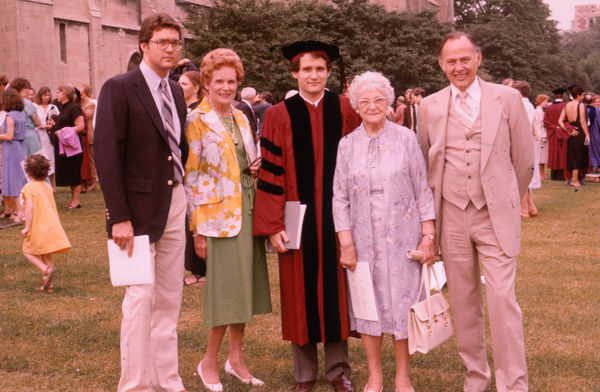
I put it, into Lightroom and in the develop module I just adjusted the "tint" slider to the right about half way... and got this. There are a few other things I might have then done... but just the tint slider helped a lot.
There is room to do better. But this is a good start.
Barry
May 22, 2020 09:29:38 #
StanMac wrote:
Which scanner are you using? My Epson V500 scanner has a color restoration setting that does a very good job of correcting color shifts in prints and slides due to aging. Yours may have a similar feature.
Stan
Stan
I'm using a Epson Perfection V700 Scanner. It has a color restoration setting but obviously it doesn't work very well on this problem.
Thank you Stan
May 22, 2020 09:31:08 #
Sylvias wrote:
Just did a white balance adjustment in an app on my ipad called Snapseed. Hope this looks better Robert.
This looks much better! Thank you Sylvias.
May 22, 2020 09:46:09 #
Robertven wrote:
This looks much better! Thank you Sylvias.
You're welcome.
May 22, 2020 10:39:09 #

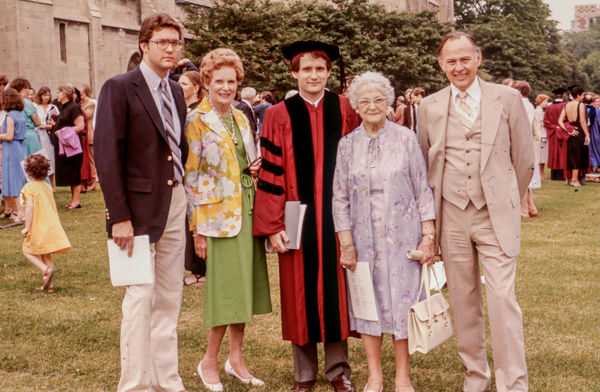
Robert, I opened your pic in PS Elements' version of ACR. Changing the pre-set white balance option to "auto" produced #1 below. The sliders show temp is -50 and the tint is -25 (as related to the photo you posted here). Try that and see if yours produces similar.
#2 is the "auto color correction" one-click in PS Elements workspace.
#3 is a pre-set in Nik Color Efex called white balance neutralizer/strong warmth removal.
To my eye, on my uncalibrated monitor, #1 is by far the best.
#2 is the "auto color correction" one-click in PS Elements workspace.
#3 is a pre-set in Nik Color Efex called white balance neutralizer/strong warmth removal.
To my eye, on my uncalibrated monitor, #1 is by far the best.

May 22, 2020 10:53:01 #
Sylvias wrote:
Snapseed is a very handy app! It is compatible, for the most part, with newer Chromebooks too.Just did a white balance adjustment in an app on my ipad called Snapseed. Hope this looks better Robert.
May 22, 2020 11:00:43 #

Robertven wrote:
Scanning & digitizing severa hundred 35mm slides. Most are good but 12 (1 roll) are tinted like this. I cannot seem to correct this problem. I'm not an expert. I've tried photoshop & Luminar 4 with no success. Please help!
Thanks, Bob
Thanks, Bob
Although fixing color balance in a JPEG doesn't always work well, your first resort should be to look in the image for something gray or white. Some of the apparently white bits are blown out in the red channel they won't work.
Here I clicked on the gray(?) diploma binder with the eyedropper (most PP programs have one) in PS Elements first but the program in the grandmother's hand turned out to be a better choice (back print on white paper).

May 22, 2020 13:07:31 #
kenievans
Loc: Dallas
I opened up the jpg in Photoshop then used the Camera Raw Filter. I applied the auto settings then used the White Balance tool to pick the splash of white behind the older woman's purse. I'm still not happy with the grass and tree colors but the skin tones and hair color look more natural. I hope this helps.
May 22, 2020 15:28:59 #
The way the color balance works in some editors (e.g. LR) is that you pick out something that you assume to be white. You then pick a pixel in the middle of that thing and look at the R, G, and B channels. In the LR develop panel you have an eyedropper. That will give you an expanded view of the area around the pixels under the tip of the eyedropper. At the bottom of the window it shows you the luminance of the 3 channels under the eyedropper tip. Clicking on it adjusts the temperature and tint so that all three luminance values are the same so that pixel comes out a neutral grey.
If you don't have LR, but you can find the luminance values of the 3 channels in whatever software you're using, you can play with the temperature and tint to make all the channels equal luminance. Depends on how your chosen software works, but that's basically what you want to accomplish.
Of course you have to find something in the photo that's white, or assumed to be white. If nothing else is available, the white of someone's eye will usually work. People used to wear white shirts, but nowadays, many of them are colored, or maybe off-white.
May 22, 2020 16:18:05 #
StanMac
Loc: Tennessee
Here's my efforts:
Opened in Elements 2018, did Enhance/Auto Color Correct first. This left the image a bit too green so I did Enhance/Adjust Color/Adjust Hue/Saturation and took the Hue back -4.
Edit: I went back and adjusted the mid-range tones up a bit to lighten the image a smidge and it looked better still. Should've done that on what I posted.
Stan

May 22, 2020 17:42:22 #
Here's what I did for your picture Robert. Took about 8 minutes. If all are the same it would take about 4 min per slide to correct the others if they are coming out the same.
Open in Photoshop
When it opens it should display the CRA screen. I let the program change the white balance using Auto button. I increased the Texture and Clarity about 3 points.
Opened
Added a curves layer. Hit the auto button on this layer.
Next made a composite layer. You could just flatten images instead.
Opened in Camera Raw moved the Highlight slider to the left increasing detail.
Now for good measure made another duplicate layer and opened the High Pass filter set it to 2.8 and set the layer to Hard Light
Reduced the size so I could upload to 14 inch on the largest side
Exported jpg
I think this edit got more detail and color out of the Grandmothers dress.
If mine I would use the Spot Healing brush to remove a large number of black spots.
May 23, 2020 06:16:01 #

Sylvias wrote:
Just did a white balance adjustment in an app on my ipad called Snapseed. Hope this looks better Robert.
Excellent Sylvia - looks much better.
If you want to reply, then register here. Registration is free and your account is created instantly, so you can post right away.