Radial Gradient Tutorial For Photoshop CC
May 5, 2020 11:56:20 #
kenievans
Loc: Dallas
I am posting this tutorial in response to another thread.
There are several different ways to apply a radial gradient to your image. This tutorial focuses on applying the gradient with a new layer and an adjustment layer. For me, these methods allow for more control and versatility as well as being non-destructive to you original image. It is also a great way to add directional light to a flat image. Just remember to add your shadows but that is another tutorial. I have included screen shots but your version of PS might be different from mine so your menus may not look quite the same. I am also assuming you already have some experience with layers and blend modes.
New Layer
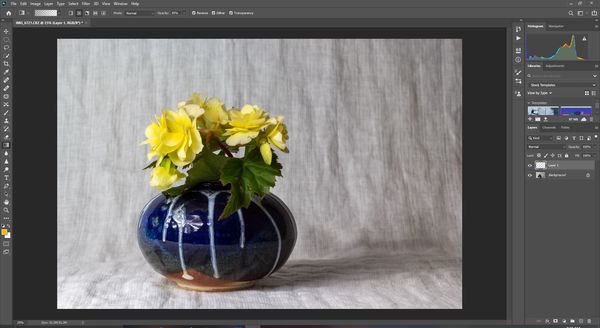
Image 1. Add a new layer to you image then select the gradient Icon in the menu on the left hand side of the screen. Next select the Radial icon at the top left of the screen. You can also change the style or color of the gradient by double clicking on the grid in the upper left hand corner and we will go into that later.
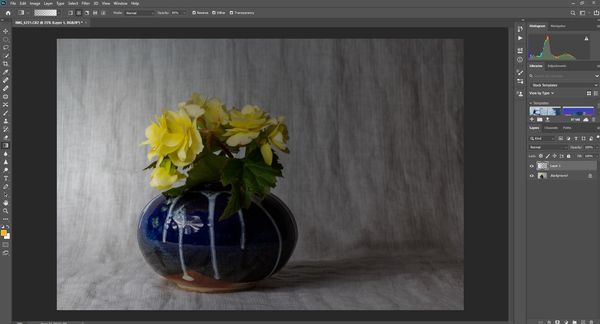
Image 2. The center of the radial starts where you start your cursor. For this image I placed my cursor in the middle of my photo on the far left side then clicked and drug it to the middle of the photo. This created a side light coming from the left.
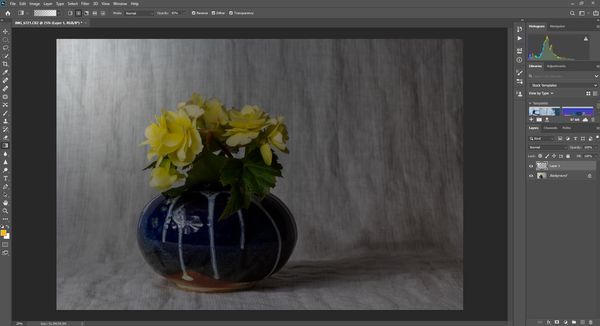
Image 3. In this image I started my cursor in the upper left hand corner and drug it to the middle of the flowers. Now the light is coming from that corner. You can also click and drag from the right as well. Play with were you start and end dragging the cursor to see how the different directions and length of the drag effect the image. You will have to undo each one to do another one but it is worth the time to get the best look and match the light direction on the subject in your image.
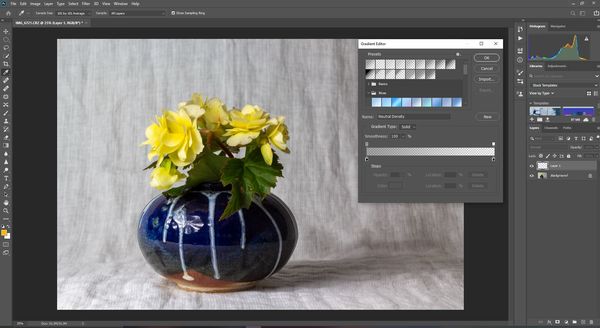
Image 4. To change the style or color of the gradient double click on the grid in the upper left hand corner. Do this before you apply the gradient to your image. You will get a pop up menu called the Gradient Editor. It gives you a lot of options to apply to the gradient. Some of those options will look like you are applying a solid rather than a transparent layer over your image. This is where you would change the blend mode of the gradient layer to usually Overlay or Softlight.
Image 5. I have applied a blue gradient layer starting in the middle left of the image and dragging it to just the other side of the vase. I like the color it added to the background but it lightened up the flowers too much.
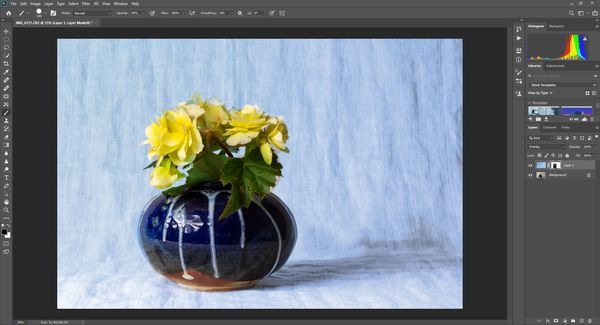
Image 6. I added a mask to the gradient layer then used a black brush to remove the gradient from the flowers and the vase. You can control how much you remove by increasing or reducing the opacity of the brush.
Applying a Gradient Adjustment Layer
This method is very easy to apply but does not give you the same amount of control as the previous method.
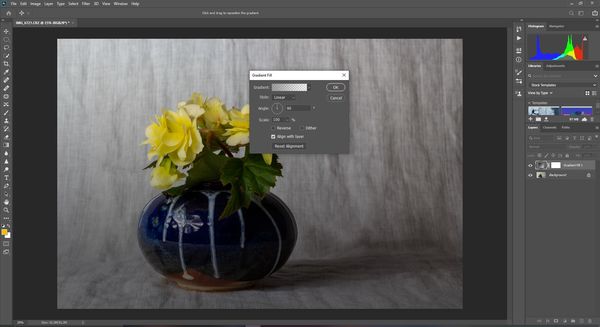
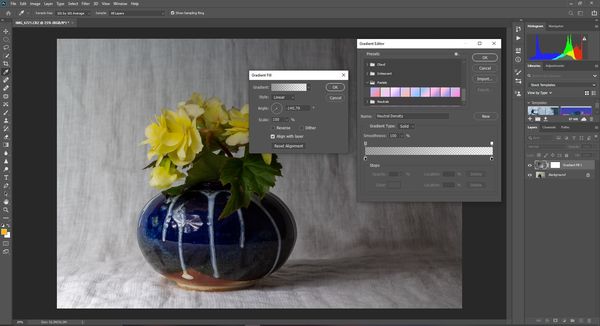
Image 7. From your adjustment layer option in the bottom left hand corner and choose Gradient. You will get a popup menu called Gradient Fill. You can change the style from linear to radial or other options.
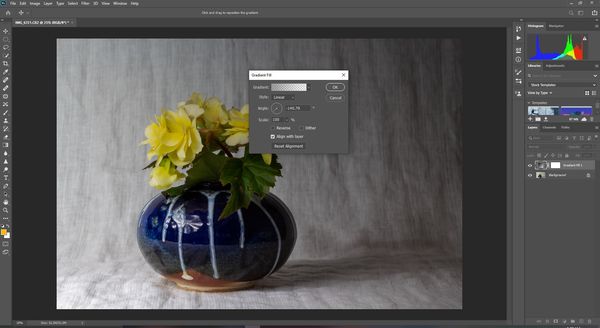
Image 8. You can change the direction of the gradient by changing the angle.
Image 9. You can change the type and color of the gradient by double clicking on the gradient at the top of the pop up. You will get the same choices as you did with the previous method. Remember to change your blend mode of the adjustment layer if you cannot see your image behind it. The adjustment layer automatically applies a mask to your layer if you need to use your brush to remove it from anything in the image or however you want to adjust the gradient.
There are several different ways to apply a radial gradient to your image. This tutorial focuses on applying the gradient with a new layer and an adjustment layer. For me, these methods allow for more control and versatility as well as being non-destructive to you original image. It is also a great way to add directional light to a flat image. Just remember to add your shadows but that is another tutorial. I have included screen shots but your version of PS might be different from mine so your menus may not look quite the same. I am also assuming you already have some experience with layers and blend modes.
New Layer
Image 1. Add a new layer to you image then select the gradient Icon in the menu on the left hand side of the screen. Next select the Radial icon at the top left of the screen. You can also change the style or color of the gradient by double clicking on the grid in the upper left hand corner and we will go into that later.
Image 2. The center of the radial starts where you start your cursor. For this image I placed my cursor in the middle of my photo on the far left side then clicked and drug it to the middle of the photo. This created a side light coming from the left.
Image 3. In this image I started my cursor in the upper left hand corner and drug it to the middle of the flowers. Now the light is coming from that corner. You can also click and drag from the right as well. Play with were you start and end dragging the cursor to see how the different directions and length of the drag effect the image. You will have to undo each one to do another one but it is worth the time to get the best look and match the light direction on the subject in your image.
Image 4. To change the style or color of the gradient double click on the grid in the upper left hand corner. Do this before you apply the gradient to your image. You will get a pop up menu called the Gradient Editor. It gives you a lot of options to apply to the gradient. Some of those options will look like you are applying a solid rather than a transparent layer over your image. This is where you would change the blend mode of the gradient layer to usually Overlay or Softlight.
Image 5. I have applied a blue gradient layer starting in the middle left of the image and dragging it to just the other side of the vase. I like the color it added to the background but it lightened up the flowers too much.
Image 6. I added a mask to the gradient layer then used a black brush to remove the gradient from the flowers and the vase. You can control how much you remove by increasing or reducing the opacity of the brush.
Applying a Gradient Adjustment Layer
This method is very easy to apply but does not give you the same amount of control as the previous method.
Image 7. From your adjustment layer option in the bottom left hand corner and choose Gradient. You will get a popup menu called Gradient Fill. You can change the style from linear to radial or other options.
Image 8. You can change the direction of the gradient by changing the angle.
Image 9. You can change the type and color of the gradient by double clicking on the gradient at the top of the pop up. You will get the same choices as you did with the previous method. Remember to change your blend mode of the adjustment layer if you cannot see your image behind it. The adjustment layer automatically applies a mask to your layer if you need to use your brush to remove it from anything in the image or however you want to adjust the gradient.
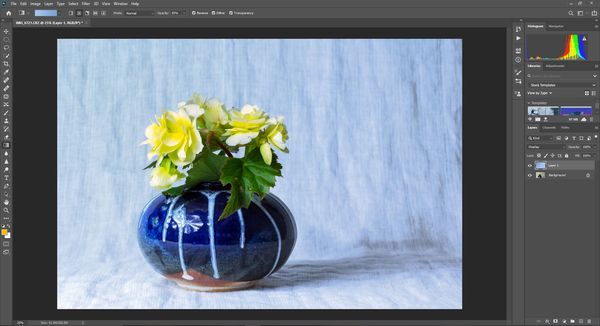
Original with new layer
(Download)
Image 2
(Download)
Image 3
(Download)
Image 4
(Download)
Image 5
(Download)
Image 6
(Download)
Image 7
(Download)
Image 8
(Download)
Image 9
(Download)
May 5, 2020 12:48:05 #

Many thanks for your time and efforts, Keni! I've added a link to the tutorials section here. The section is within the guidelines doc, stickied at top of PP Forum first page, for those who want to check out other entries later on.
May 5, 2020 21:08:34 #

If you want to reply, then register here. Registration is free and your account is created instantly, so you can post right away.