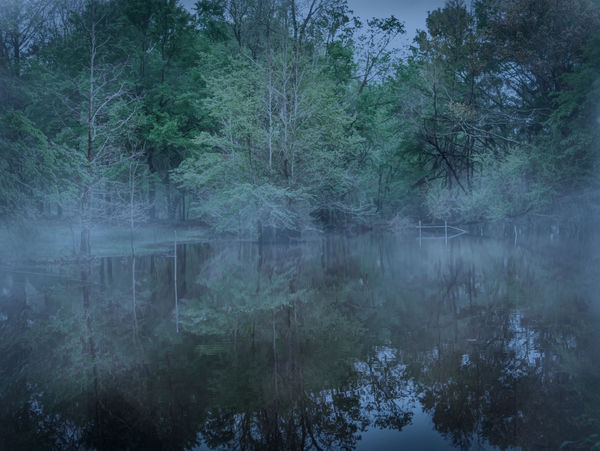
Beaver Pond
Mar 31, 2020 11:46:27 #
Mar 31, 2020 11:59:24 #

Mar 31, 2020 13:29:38 #
Mar 31, 2020 14:49:19 #
Mar 31, 2020 14:50:02 #
kenievans
Loc: Dallas
mcmama wrote:
I really like the mood of this. Nicely done.
Thanks! I am working on my fog skills in PS.
Mar 31, 2020 15:38:00 #

Mar 31, 2020 16:00:05 #
Apr 1, 2020 05:46:54 #
Apr 1, 2020 07:43:59 #

It looks very good on a backlit screen and small, but in the download, the diagonals become conspicuous. I guess there are photos processed for viewing on a screen, and photos processed for printing. Very different animals.
Apr 1, 2020 08:01:52 #

On close inspection I see one of the sharp lines Mark mentioned. Overall, I think it's an excellent subject and lighting for your treatment, looking quite natural. Do you have any specific tips to share for folks wishing to try adding fog? Or a favorite video?
Apr 1, 2020 13:21:40 #
kenievans
Loc: Dallas
fergmark wrote:
It looks very good on a backlit screen and small, but in the download, the diagonals become conspicuous. I guess there are photos processed for viewing on a screen, and photos processed for printing. Very different animals.
I couldn't see the lines on my screen until you mentioned them and I have a 27" screen.

It just goes to show how hard it can be to analyze your own work as a beginner. Did I talk my self out of seeing them because I wanted it to work or did I just not look at it subjectively enough? Fog and I don't have a good history together.

Apr 1, 2020 14:03:45 #


Apr 1, 2020 14:04:29 #
Really nice Keni. I downloaded some fog brushes a month of so ago. I figured what could be so hard adding a few wisps of fog here and there? Everything 
All hints, tips and links would be welcome.
All hints, tips and links would be welcome.
Apr 1, 2020 14:12:53 #
kenievans
Loc: Dallas
Linda From Maine wrote:
On close inspection I see one of the sharp lines Mark mentioned. Overall, I think it's an excellent subject and lighting for your treatment, looking quite natural. Do you have any specific tips to share for folks wishing to try adding fog? Or a favorite video?
Linda I used a couple of different fog brushes that I downloaded for free from Brusheezy for PS. Using brushes to create it on a separate layer allows me to control the opacity and color of the fog as I apply it as well as the opacity of the layer. Fog is not always white. I can change the direction or orientation of the brushes in the Brush Preset Picker. I can also erase or remove it from specific locations without effecting my original image.
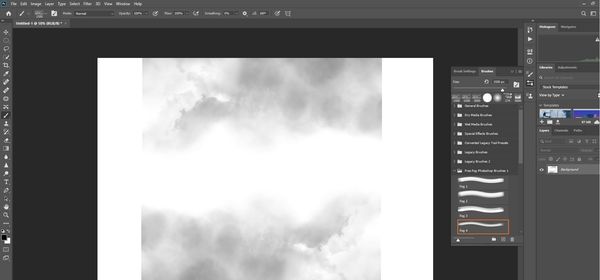
In this particular image I wanted to try and match the brush to the shoreline but I didn't want fog on all the water in the foreground. In real life the closer you are to fog the lease dense it is so from the viewers point of view there would be less fog at the bottom of the photo. The fog brush I was using applies the fog in a slight gradient. Using it straight out of the box would have made the fog thicker at the bottom of the photo and too thin on the shoreline. I flipped the brush 180 degrees using the Brush Preset Picker and applied my fog. I could then erase the thicker fog from the trees. I have included a screen shot of the fog applied in black to a white layer. I applied it first to the bottom of the page then flipped the brush 180 degrees and applied it to the top of the page. I did it at 100% opacity so you could see how it has a slight gradient at the edge.
I hope someone finds this information helpful.
Keni
One last note, there are other types of fog brushes that are similar to cloud brushes. They can be applied in localized areas without the straight lines like the one I used. I need more practice with those types of brushes but both types can be sized to your needs.
Apr 1, 2020 14:29:16 #
If you want to reply, then register here. Registration is free and your account is created instantly, so you can post right away.