Landscape Processing
Feb 6, 2020 16:29:28 #
kenievans
Loc: Dallas
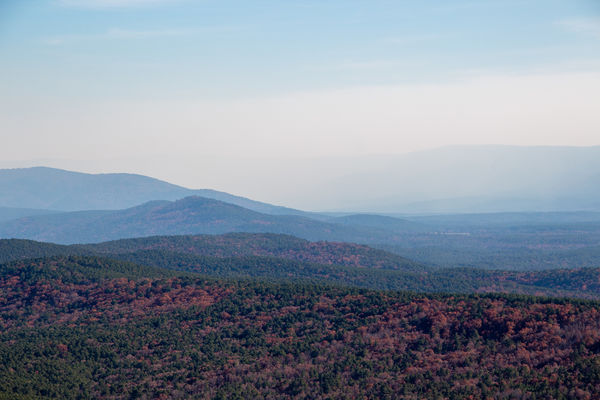
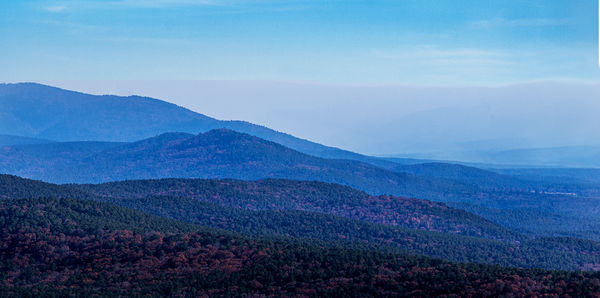
The original photo was taken at around 2:00 pm. It was a beautiful sunny November day with temps in the 50s. I don't know what caused the fog/smoke but it wasn't up at our higher elevation. I decided I could take advantage of haze and make it more of a softer foggy morning shot. I also wanted to bring out the layers and rolling shape of the hills. Was I successful?
I included the original so please feel free to play with it, post it and tell me how you did it.
Thanks
Keni
I included the original so please feel free to play with it, post it and tell me how you did it.
Thanks
Keni
Feb 6, 2020 22:07:59 #
I like very much how you emphasized the layers of hills with the blues - wonderful feeling of depth.
Feb 7, 2020 07:29:35 #
Feb 7, 2020 07:39:34 #

I know some folks like to reduce haze and smoke as much as possible but for me it helps with depth, as Piet said, and overall interest. I think you did a great job for your stated goal!
I like Wanda's suggestion of less sky, but I would hate to lose the top layer of blue. What popped into my head was when you helped me remove some of the "middle" of a sky of mine I had also done that with a fog-filled valley of featureless fog. Something to consider, as might be removing the red in the hills for a colder feel.
But those are simply alternatives, not improvements IMO.
I like Wanda's suggestion of less sky, but I would hate to lose the top layer of blue. What popped into my head was when you helped me remove some of the "middle" of a sky of mine
I had also done that with a fog-filled valley of featureless fog. Something to consider, as might be removing the red in the hills for a colder feel.But those are simply alternatives, not improvements IMO.
Feb 7, 2020 12:21:38 #
Linda From Maine wrote:
I like Wanda's suggestion of less sky, but I would hate to lose the top layer of blue. What popped into my head was when you helped me remove some of the "middle" of a sky of mine
I, too, think less sky would assist the composition, and taking it from the relatively featureless "middle" is a great idea! Since you mentioned you had done this before, any tips on how to do it with this image? I'd appreciate it!

Feb 7, 2020 12:41:01 #
kenievans
Loc: Dallas
pfrancke wrote:
I like very much how you emphasized the layers of hills with the blues - wonderful feeling of depth.
Thanks Piet! I always appreciate your comments.
Feb 7, 2020 12:43:58 #
kenievans
Loc: Dallas
Wanda Krack wrote:
Great job. Crop the top and you have an awesome picture!
Thanks Wanda. I looked at cropping the top some and it would put the photo more in line with the rule of thirds but I really like the blue sky at the top. Definitely something to consider if I were to use it in a competition.
Feb 7, 2020 12:57:21 #
kenievans
Loc: Dallas
Linda From Maine wrote:
I know some folks like to reduce haze and smoke as... (show quote)
Linda thank you as always for the great suggestions. I pushed the "reds" to that color from orange. I didn't think about taking it out altogether. You have such and eye for detail!
Feb 7, 2020 13:03:58 #
kenievans
Loc: Dallas
tommystrat wrote:
I, too, think less sky would assist the composition, and taking it from the relatively featureless "middle" is a great idea! Since you mentioned you had done this before, any tips on how to do it with this image? I'd appreciate it!
Tommy it's been awhile since I did it. I will have to go back and look it up. I will post it then.
Feb 7, 2020 13:07:20 #
kenievans wrote:
I remembered my foggy valley work from longer ago Tommy it's been awhile since I did it. I will have to go back and look it up. I will post it then.

Create a duplicate layer. Use selection tool and select a rectangle amount, click delete. That leaves empty canvas in the middle. Select upper portion of pic and drag it down to fill the white. Crop off the top part that is remaining.
Obviously there will be cloning and healing required to make it look seamless. But the basic premise is pretty simple.
Let us know if you performed other tricks!
Feb 7, 2020 13:10:20 #
kenievans
Loc: Dallas
Linda From Maine wrote:
I remembered my foggy valley work from longer ago
Use selection tool and select a rectangle amount, click delete. That leaves white canvas in the middle. Select upper portion of pic and drag it down to fill the white. Obviously there will be cloning and healing required to make it look seamless. But the basic premise is pretty simple.
Let us know if you performed other tricks!
I thought it was something like that but my memory is just not what it used to be. Thanks Linda!
I didn't do any other tricks on this current photo. Just adjusting the temp of the photo and pushing and burning the shadows in the foggy areas to give more depth. Painting with light.
Feb 7, 2020 13:15:38 #
kenievans wrote:
I'm thinking there are some tips to be gleaned from the information Fstop12 gave us last year. I couldn't find a separate topic, but here was my follow-up share topic: https://www.uglyhedgehog.com/t-587748-1.htmlI thought it was something like that but my memory is just not what it used to be. Thanks Linda!
.
Feb 7, 2020 13:37:10 #
kenievans
Loc: Dallas
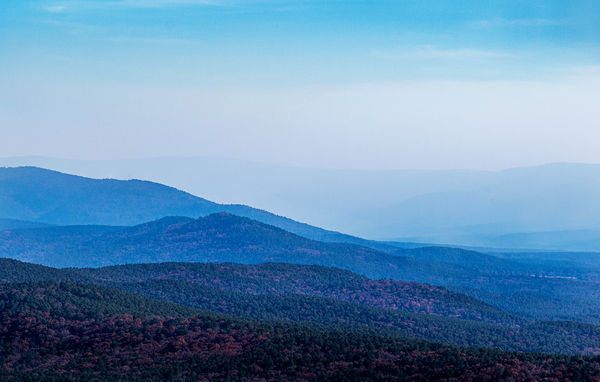
Here it is with the middle part taken out and what my PS layers looked like.
I used the Rectangular Marquee Tool to select the area I wanted to delete then hit the delete key.
I then used it to select the top part of the sky that I wanted to move down.
I did a control C to copy the area then used my mouse to drag it down to the deleted area.
I hit control V to paste it.
Photoshop created the new layer when I pasted it.
I did a little cloning and smudging to clean up the now merged area.
I think I still might need to do a little color work. I didn't realize how purple the far mountains were until the blue sky was right next to it.

Feb 7, 2020 13:39:55 #
kenievans wrote:
The distant fog/haze/smoke is now darker than originally posted. Check them out side by side.Here it is with the middle part taken out and what... (show quote)
Thanks so much for the demo. Do you like with less sky, or more?
Feb 7, 2020 13:46:11 #
kenievans
Loc: Dallas
Linda From Maine wrote:
The distant fog/haze/smoke is now darker than originally posted. Check them out side by side.
Thanks so much for the demo. Do you like with less sky, or more?
Thanks so much for the demo. Do you like with less sky, or more?
You are very welcome. I think I still prefer it with more sky.
If you want to reply, then register here. Registration is free and your account is created instantly, so you can post right away.