Exposure Help
Nov 29, 2019 14:51:13 #
Hamltnblue
Loc: Springfield PA
Hello
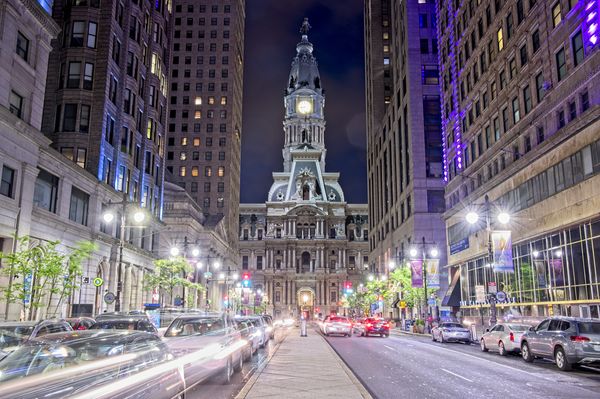
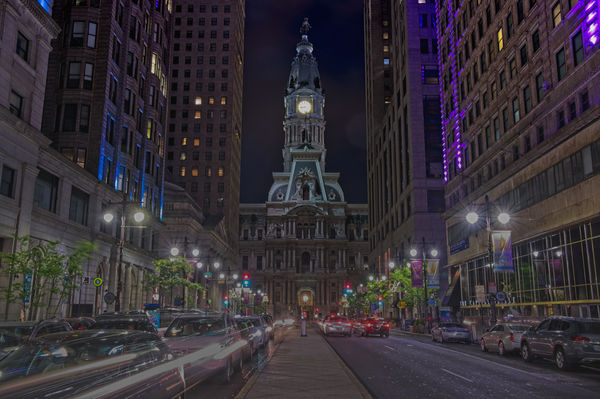
Tonight I will be returning to the location of this photo.
Is there a method to expose the lower portion to obtain a more even look, or is is something that can be handled in post?
I don't have a graduated filter available.
Thanks
Jim
Tonight I will be returning to the location of this photo.
Is there a method to expose the lower portion to obtain a more even look, or is is something that can be handled in post?
I don't have a graduated filter available.
Thanks
Jim
Nov 29, 2019 14:54:05 #

Post processing is relatively easy. If you shoot raw it is even easier.
ND filters are iffy in my opinion as the transition is relatively sharp.
Quite honestly, I do not see why you would change this....
If you use PS CC (Windows instructions for key short cuts)
Use Shitf-Ctrl-Alt-2 twice to create a RGB luminosity selection (the x2 adds to the selection)
Create a level layer - A mask corresponding to your selection will be created.
Adjust the mid tone
Use the level layer opacity slider to complete your edit if needed.
No big deal.
Nov 29, 2019 14:57:01 #
Nice! I'll be heading to Philly tomorrow. Mt daughter is taking me to the number one restaurant in Philly tomorrow night, Zahav. I like your view down Broad Street. I think it would be easy to handle in post. there's definitley a difference in the area just below the streetlights, but I might take the entire thing down a stop, maybe a half stop.
Nov 29, 2019 15:10:24 #
Hamltnblue wrote:
Hello
Tonight I will be returning to the location of this photo.
Is there a method to expose the lower portion to obtain a more even look, or is is something that can be handled in post?
I don't have a graduated filter available.
Thanks
Jim
Tonight I will be returning to the location of this photo.
Is there a method to expose the lower portion to obtain a more even look, or is is something that can be handled in post?
I don't have a graduated filter available.
Thanks
Jim
--------------
Take two shots so you have a good exposure of both halves and then blend them in post.
Nov 29, 2019 15:15:52 #
Nov 29, 2019 15:32:10 #
Tripod or handheld?
Ahoot an exposite compemsated group of 3 images?
Something like
Shooting in raw
One properly expoaed
One 1 stop under exposed
One 1 stop ovet exposes.
Then feed them into LR and under Photo tab select Merge
Then select HDR
LG will produce a single hrd image uaing the bwst of the 3
Ahoot an exposite compemsated group of 3 images?
Something like
Shooting in raw
One properly expoaed
One 1 stop under exposed
One 1 stop ovet exposes.
Then feed them into LR and under Photo tab select Merge
Then select HDR
LG will produce a single hrd image uaing the bwst of the 3
Nov 29, 2019 16:12:29 #
WDCash wrote:
Tripod or handheld?
Ahoot an exposite compemsated group of 3 images?
Something like
Shooting in raw
One properly expoaed
One 1 stop under exposed
One 1 stop ovet exposes.
Then feed them into LR and under Photo tab select Merge
Then select HDR
LG will produce a single hrd image uaing the bwst of the 3
Ahoot an exposite compemsated group of 3 images?
Something like
Shooting in raw
One properly expoaed
One 1 stop under exposed
One 1 stop ovet exposes.
Then feed them into LR and under Photo tab select Merge
Then select HDR
LG will produce a single hrd image uaing the bwst of the 3
The long exposure with the movement of the cars will make HDR problematic, you won't just have three different exposures, but three different images. and really HDR is when you want to extend the dynamic range, what you want to do is compress it. Easy enough to adjust the exposure in LR using masking.
Nov 29, 2019 16:18:43 #
If you wish I can post a sample of what you can do w/o implying this 'the solution', just a variation.
Nov 29, 2019 19:35:25 #
Another option is the graduated filter in lightroom or using the cwmera raw filter in photoshop, with the exposure slider. Use the mask to hide areas you don't want affected.
Nov 30, 2019 08:13:04 #

If you have to go with an exposure as shown it looks as though it would be easiest to select and work on the dark areas. You could darken the entire image quite a bit and then bring up the dark areas via the selection.
Shots like that usually respond well to generous amounts of contrast and sharpening.
Since you're happy to go with motion blur you could use exposure bracketing and switch off anti-ghosting for the merging. You could do that hand held but a tripod would be better.
Shots like that usually respond well to generous amounts of contrast and sharpening.
Since you're happy to go with motion blur you could use exposure bracketing and switch off anti-ghosting for the merging. You could do that hand held but a tripod would be better.
Nov 30, 2019 10:40:00 #
Nov 30, 2019 11:48:36 #

A graduated filter is of no help here but HDR photography is. The exposure could be tried for the bright areas and the shadows opened in post BUT the possibility of more noise is always present.
This image can be considerably improved depending on your taste. The foreground could be burned-in to taste. contrast lifted a bit and perspective improved.
This image can be considerably improved depending on your taste. The foreground could be burned-in to taste. contrast lifted a bit and perspective improved.
Nov 30, 2019 12:04:05 #
camerapapi wrote:
A graduated filter is of no help here but HDR photography is. The exposure could be tried for the bright areas and the shadows opened in post BUT the possibility of more noise is always present.
This image can be considerably improved depending on your taste. The foreground could be burned-in to taste. contrast lifted a bit and perspective improved.
This image can be considerably improved depending on your taste. The foreground could be burned-in to taste. contrast lifted a bit and perspective improved.
With motion HDR is not the answer and the foreground is the part he wants darker. It would be “dodged” rather than burned in.
Nov 30, 2019 12:11:52 #
Hamltnblue wrote:
Hello
Tonight I will be returning to the location of this photo.
Is there a method to expose the lower portion to obtain a more even look, or is is something that can be handled in post?
I don't have a graduated filter available.
Thanks
Jim
Tonight I will be returning to the location of this photo.
Is there a method to expose the lower portion to obtain a more even look, or is is something that can be handled in post?
I don't have a graduated filter available.
Thanks
Jim
Easily done in Lightroom using the Graduated Filter. Example attached. bwa
Nov 30, 2019 15:56:27 #
Hamltnblue
Loc: Springfield PA
Thanks again for the feedback.
The graduated filter looks like the way to go.
Haven't downloaded the pics from last night and this AM yet.
I leave the camera in the bag for a few hours during the winter to allow time for the temp to equalize..
The graduated filter looks like the way to go.
Haven't downloaded the pics from last night and this AM yet.
I leave the camera in the bag for a few hours during the winter to allow time for the temp to equalize..
If you want to reply, then register here. Registration is free and your account is created instantly, so you can post right away.