Wrestling with the Light in Duke Chapel
Nov 3, 2019 11:25:26 #

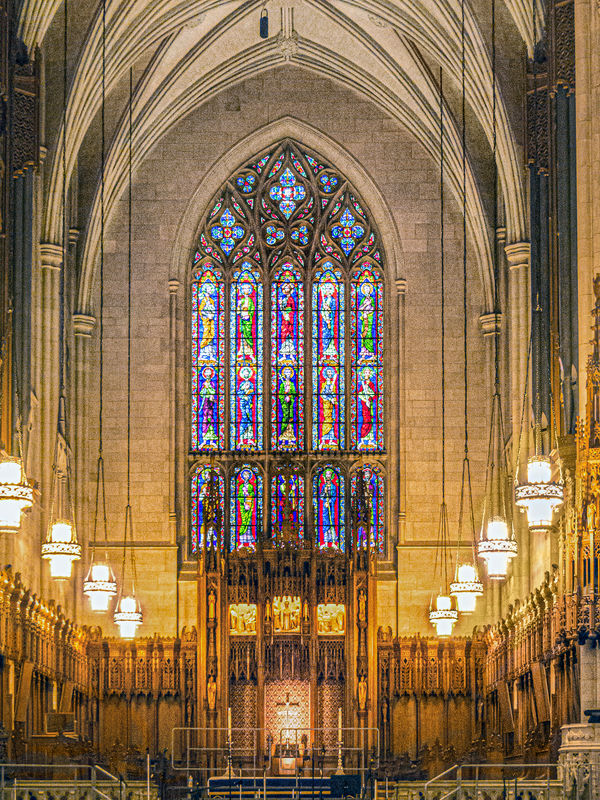
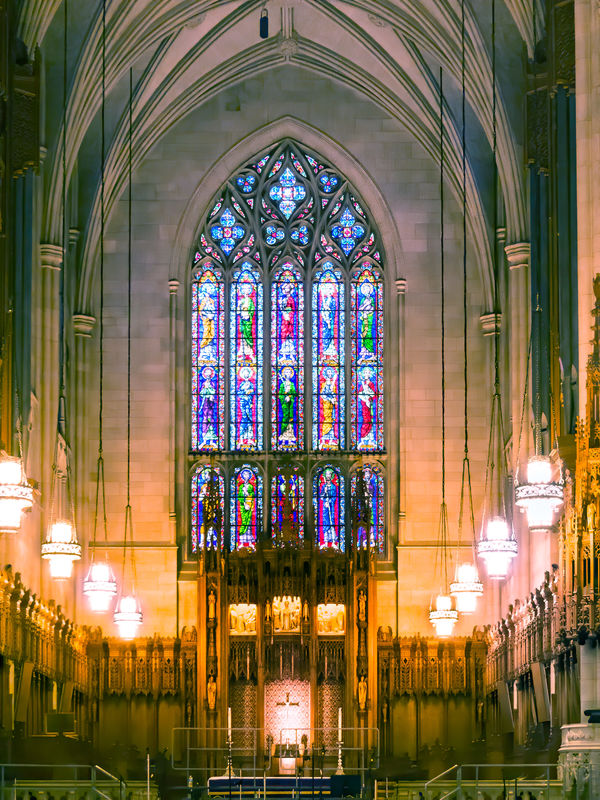
For those of you who like to accept a challenge. I have provided an Attached File of the Original DNG file for anyone who would like to experiment with Post Processing this image in the matter that you see fit. I have included my own attempt at the beginning of this project to show you what I came up with. I'd like to see yours.
Please view the download of the Edited file for best results.
`
Please view the download of the Edited file for best results.
`
The Narthex SOOC (.jpg file for comparison. RAW file attached below)
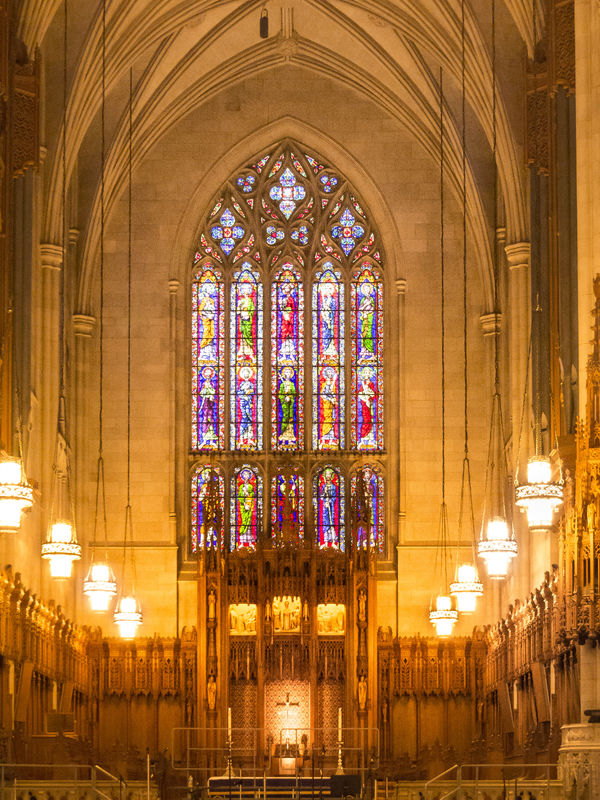
(Download)
Original DNG
Attached file:
(Download)
The Duke Narthex in Post Production
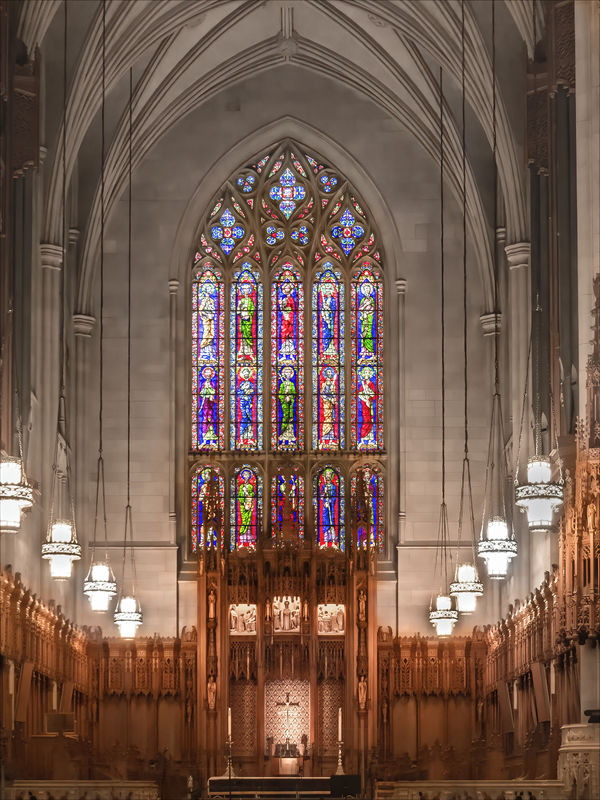
(Download)
Nov 3, 2019 11:49:39 #

I took both of your images into the PS Express app in my iPad and got similar results as your PP image, just not as much greying out as yours. PS Express is an app with a bunch of pre-set operations. I did the Enhance button, which in this case took out the yellow cast. Was the Chapel lighting be yellowish, in which case would bee more appealing.
Nov 3, 2019 11:59:46 #
John_F wrote:
I took both of your images into the PS Express app in my iPad and got similar results as your PP image, just not as much greying out as yours. PS Express is an app with a bunch of pre-set operations. I did the Enhance button, which in this case took out the yellow cast. Was the Chapel lighting be yellowish, in which case would bee more appealing.
John, the large, hanging lamps are powered by Tungsten lightbulbs which cast a golden glow on everything it touches. The arches and columns are made from limestone which is a light-grey in color.
Nov 3, 2019 12:01:14 #

Here's a few attachments:
a) an edited version from the DNG
b) a compare of the edited version to the original when I zeroed out the DNG values
c) the edited DNG.
I undid the HSL changes and particularly adjusted / fine-tuned the sharpening and noise reduction and the WB. I'd import the DNG and do a 1:1 compare looking at the details. You might selectively sync aspects of the re-edit and arrive at something still better.
The DNG is slightly different than the JPEG. After posting all these, I adjusted the DNG a bit removing some of the green tint after looking at your JPEG version. Your JPEG is very smooth from the NR. My version proposes less NR, but you can always move the sliders more to the right.
.
.
a) an edited version from the DNG
(Download)
b) new edit vs orig compare - details
(Download)
c) edited DNG
Attached file:
(Download)
Nov 3, 2019 12:06:15 #
CHG_CANON wrote:
Here's a few attachments:
a) an edited version from the DNG
b) a compare of the edited version to the original when I zeroed out the DNG values
c) the edited DNG.
I undid the HSL changes and particularly adjusted / fine-tuned the sharpening and noise reduction and the WB. I'd import the DNG and do a 1:1 compare looking at the details. You might selectively sync aspects of the re-edit and arrive at something still better.
.
.
I also removed some scaffolding from the front of the altar, pulpit and lectern.
Nov 3, 2019 12:09:34 #
Bob Yankle wrote:
I also removed some scaffolding from the front of the altar, pulpit and lectern.
I added a few more comments and swapped the DNG if you need to re-download. Your version on the shadow details and the wood color looks better too now as I swap back n forth.
Nov 3, 2019 12:14:35 #
Bob Yankle wrote:
For those of you who like to accept a challenge. I have provided an Attached File of the Original DNG file for anyone who would like to experiment with Post Processing this image in the matter that you see fit. I have included my own attempt at the beginning of this project to show you what I came up with. I'd like to see yours.
Please view the download of the Edited file for best results.
`
Please view the download of the Edited file for best results.
`
Here is a very simple adjustment; In PS, Image, Adjustments, Hue/Saturation, select "Yellow", saturation -89, lightness -13. The first 2 don't count!
Nov 3, 2019 12:33:00 #
Nov 3, 2019 22:25:35 #
Bob Yankle wrote:
For those of you who like to accept a challenge. I have provided an Attached File of the Original DNG file for anyone who would like to experiment with Post Processing this image in the matter that you see fit. I have included my own attempt at the beginning of this project to show you what I came up with. I'd like to see yours.
Please view the download of the Edited file for best results.
`
Please view the download of the Edited file for best results.
`

Nov 4, 2019 09:27:12 #
Photoshop camera raw adjustments - Color Efex Pro 4 filters ' Remove Color Cast and Dfine 2 - Burn tool - Paint Brush used .
Nov 4, 2019 14:32:47 #
Hi Bob,
All I did was reduce the heavy yellow color cast and did some noise reduction. I tried heavy NR, but lost too much detail for my taste. So I did it in two steps, light for most of the image and heavy in the darker areas around the alter.
Mike
All I did was reduce the heavy yellow color cast and did some noise reduction. I tried heavy NR, but lost too much detail for my taste. So I did it in two steps, light for most of the image and heavy in the darker areas around the alter.
Mike
If you want to reply, then register here. Registration is free and your account is created instantly, so you can post right away.