Learning portraiture - first attempts
Jul 8, 2019 00:37:39 #
arathorn357
Loc: Sydney, Australia
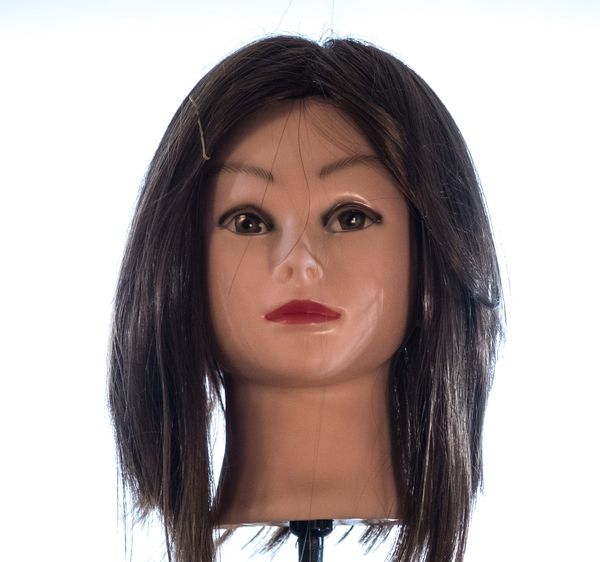
After watching *A LOT* of YouTube instructions, got these examples as my attempts at a high key and then low key portraits, using a hairdresser's model head to save a real person's retinas (her name is Patience by the way, for about 1,000 obvious failed reasons).
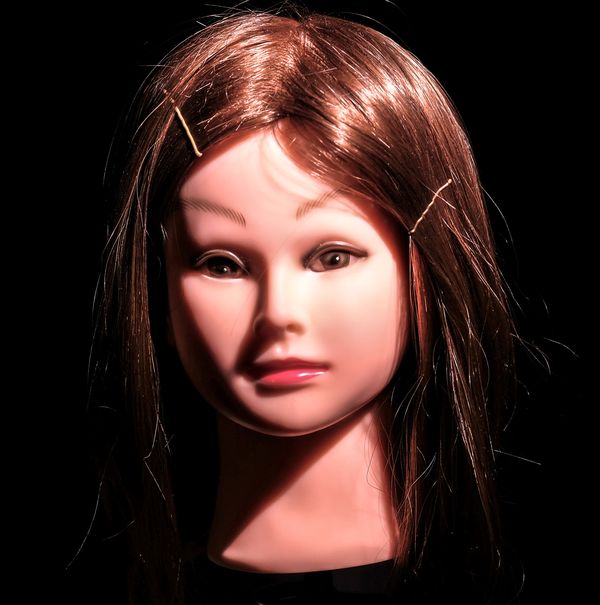
Used 2 Nissin speed lights on stands with my Fuji XT2 with a wireless controller - on the low key I used HSS at 1/2000 to create the black background (and yep I should get some black velvet ...)
Ignoring the terrible hair (I also have a lot to learn about hairdressing) is it time to move on to real people (or "talent" as I think they are known as) ? Constructive criticism welcome.
Jul 8, 2019 19:10:53 #
arathorn357 you're certainly moving in the right direction...
Unsure how you setup your lights for the "high key" rendering...
That said, I can help with the low key scenario...
From the nose shadow it is obvious you positioned your Nissin Flash(s) high to camera right...
The offset from camera axis was actually approaching perpendicular.... almost to a Rembrandt configuration.
What could be done to improve?
Pretty easy... soften the illumination source to eliminate the harsh shadows...
An unmodified flash is less than ideal... and rarely yields pleasing results...
Guess the easiest way to advise here is to show you an analogous scenario using a single speedlight in HSS.
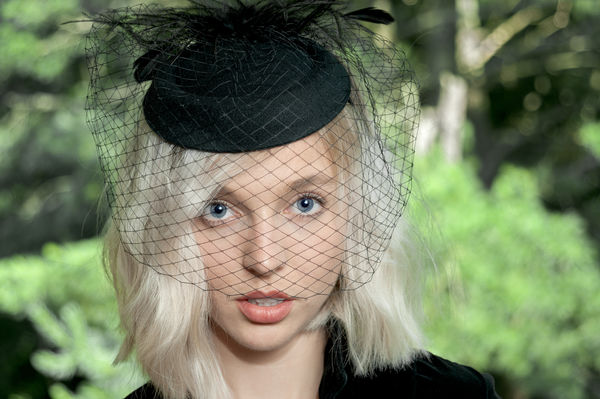
Below please find an image from a lighting test I did last week with my fav blonde manikin... lol
It was an epic failure because of excessive high contrasts in the background foliage… but is serves to illustrate.
In this illustration the Speedlight was actually mounted on a Nikon D700 however was rotated 160 degrees clockwise to camera right and aimed up at 45 degrees in order to bounce off a 20x30 inch piece of white foam core just behind camera... The foam core was mounted on a tripod clamp at six to eight feet and aimed at the talents face (slightly off axis nearly directly behind me to my right). Notice how soft the nose shadow is here... the source (20x30") is very close to the talent! My D700 reported its flash distance of 940mm (37 inches) to camera focal plane. Add maybe another 1/2 foot and that large source is way less than four feet away!
Bottom Line? Bring a large source in close to your subject to soften the shadows...
The attached image is actually at the native D700 resolution straight out of camera... Look closely and you can readily see the massive 20x30 catch light in this talent's pupil & iris... Yep, one single on camera mounted Speedlight (SB910)... Bounced flash is an iconic workhorse of wedding shooters and has been for decades... it simply works! Just remember the angle of incidence equals the angle of reflection... it's math, i.e. basic geometry...
Image Data:
Camera: Nikon D700 in Manual Mode
Exposure: HSS @ 1/400 second, f/5.3, ISO 200, Auto WB, FL 78mm
Speedlight: Nikon SB 910, iTTL (flash to subject distance reported back to the D700: 37")
Lens: A vintage AF 24-120mm f/3.4-5.6D Nikkor (circa 1996) yep, a 23 year old optic
Those “D” version lens are awesome! Reports actual subject distance directly to flash!
How cool is that!
Thanks! Hope this helps arathorn357…
Keep up the good work and I’m certain eventually it will all come together...
Enjoy the journey, k?
Unsure how you setup your lights for the "high key" rendering...
That said, I can help with the low key scenario...
From the nose shadow it is obvious you positioned your Nissin Flash(s) high to camera right...
The offset from camera axis was actually approaching perpendicular.... almost to a Rembrandt configuration.
What could be done to improve?
Pretty easy... soften the illumination source to eliminate the harsh shadows...
An unmodified flash is less than ideal... and rarely yields pleasing results...
Guess the easiest way to advise here is to show you an analogous scenario using a single speedlight in HSS.
Below please find an image from a lighting test I did last week with my fav blonde manikin... lol
It was an epic failure because of excessive high contrasts in the background foliage… but is serves to illustrate.
In this illustration the Speedlight was actually mounted on a Nikon D700 however was rotated 160 degrees clockwise to camera right and aimed up at 45 degrees in order to bounce off a 20x30 inch piece of white foam core just behind camera... The foam core was mounted on a tripod clamp at six to eight feet and aimed at the talents face (slightly off axis nearly directly behind me to my right). Notice how soft the nose shadow is here... the source (20x30") is very close to the talent! My D700 reported its flash distance of 940mm (37 inches) to camera focal plane. Add maybe another 1/2 foot and that large source is way less than four feet away!
Bottom Line? Bring a large source in close to your subject to soften the shadows...
The attached image is actually at the native D700 resolution straight out of camera... Look closely and you can readily see the massive 20x30 catch light in this talent's pupil & iris... Yep, one single on camera mounted Speedlight (SB910)... Bounced flash is an iconic workhorse of wedding shooters and has been for decades... it simply works! Just remember the angle of incidence equals the angle of reflection... it's math, i.e. basic geometry...
Image Data:
Camera: Nikon D700 in Manual Mode
Exposure: HSS @ 1/400 second, f/5.3, ISO 200, Auto WB, FL 78mm
Speedlight: Nikon SB 910, iTTL (flash to subject distance reported back to the D700: 37")
Lens: A vintage AF 24-120mm f/3.4-5.6D Nikkor (circa 1996) yep, a 23 year old optic
Those “D” version lens are awesome! Reports actual subject distance directly to flash!
How cool is that!
Thanks! Hope this helps arathorn357…
Keep up the good work and I’m certain eventually it will all come together...
Enjoy the journey, k?
Jul 8, 2019 20:57:02 #
arathorn357
Loc: Sydney, Australia
Really appreciate your thoughts Thomas.
I think a softbox or beauty dish might be the next item to try - also a large white reflector to bounce off. Getting the money shot in portraiture takes some time huh?
Thanks again for the encouragement.
I think a softbox or beauty dish might be the next item to try - also a large white reflector to bounce off. Getting the money shot in portraiture takes some time huh?
Thanks again for the encouragement.
Jul 8, 2019 22:09:17 #
Foam core is cheap... a better solution can also be a 30" or 40" collapsible white reflector (albeit you may need an assistant to hold it)... Yes there is revenue in portraiture... likely more than most any other genre... at least this has been my experience...
Remember just like playing a musical instrument... practice makes perfect... keep at it arathorn357, k?
Remember just like playing a musical instrument... practice makes perfect... keep at it arathorn357, k?
Jul 9, 2019 12:17:28 #

Jul 9, 2019 14:35:48 #
"...shoot through umbrella will soften the light..." Totally concur lloydl2, great suggestion...
Albeit they are very prone to tipping over in even the slightest breeze unless sandbagged...
Just as a spinnaker sail they catch the wind with a high degree of efficiency....
Thus having to tote 20lbs of sandbags on location can be and is often a major issue...
There is also the potential of serious eye injury since the ribbing is capped with sharp protruding points...
Because of the aforementioned they have fallen out of favor in my workflow...
lloydl2 experience is a brutal teacher and after hundreds and hundreds of location assignments folding i.e. collapsible soft-boxes are likely a wiser option in my humble estimation...
Want cheap? Foam Core is by far the best way to go... remember you're using a fresnel lens when you deploy a speedlight (or speedlite for Canon shooters)... EZ to dial in a wide illumination pattern when bouncing... Best Advice? Shadow a high end wedding shooter... they are masters of lighting with speedlights... They nail it with elegance and finesse... Word!
Jul 9, 2019 14:56:54 #
Jul 9, 2019 15:06:45 #
Arathorn. I rarely comment on the models, but yours seems stiff. Just kidding.
One thing that was constantly drummed in my head when I was apprenticing was that you always need to remember. Control your shutter speed to control the ambient light, so you can lighten or darken the background using shutter speed. To control how much light hits your subject from the "flash" (or studio strobes) use your aperture to control that. Don't keep dialing your strobes up and down to brighten or darken the subject. Brighten or darken one to control the contrast from the highlights to the shadows (ON THE SUBJECT) I always set my strobes (*or flash if I'm at a wedding) at 50% power, then adjust the one I want as my shadow side down. I only adjust up if I have to) Your batteries will last a ton longer, and recycle twice as fast. (and your flash tubes will last longer)
Listen to Thomas. Start softening by buying a sheet or 2 of foamcore from the dollar store, and jerry rig a stand to hold them where you want them, and bounce your flash off of them to soften a light.
In weddings, I've been known to ask someone with a white shirt to stand at a particular spot, so I can bounce a light off their shirt.
You can also use white walls, or whatever you find. If the walls are painted, be prepared to do color corrections, I prefer the method of using something actually white.
Umbrellas especially shoot throughs, are fine inside, but you will end up with a lot of light spill, bouncing around the room, possibly picking up color casts. When learning to shape light, that's not a big deal, but it is something to keep in mind.
Keep up the good work, and tell patience to relax a little. She seems so tense and inflexible. HAHA.
(I learned using manikins as well, just messing with you, my mentor wouldn't "turn me loose on real people until I knew what I was doing.... film used to cost money, and we couldn't see the results right away)
If you want to reply, then register here. Registration is free and your account is created instantly, so you can post right away.