Clipping Mask Demo
Jul 1, 2019 21:36:36 #
Guyserman
Loc: Benton, AR
This demo is much simpler than my leaf shutter work which used a complex design. It uses three shapes from Photoshop Elements 2018 (there are hundreds available) and one brush drawn shape and four images which will be masked with clipping masks. A clipping mask is used often in collages and aids in locating the images as well as masking portions of them.
A clipping mask and the image to be masked are placed on separate layers with the image above the mask. Only the image area immediately above the mask will show with the rest being hidden. Below I have first displayed the four snapshots (disregard the IQ).
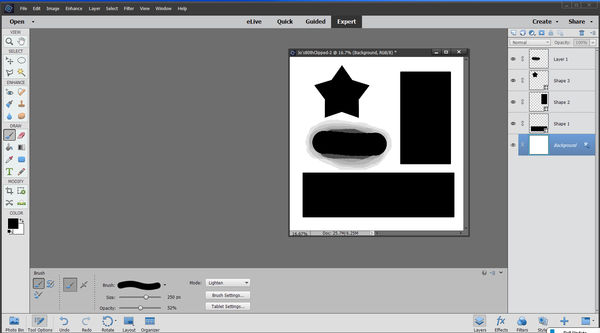
Screenshot-1
In screenshot-1 I have opened a blank file and used the shape tool to create three shapes arranged like I want the pictures to appear. The tool creates each shape on its own layer. (Like any layer the shape layer can later be moved/manipulated) I also added a blank layer and used the brush tool to brush in a shape. Believe it or not, this can sometimes be the most time consuming step.
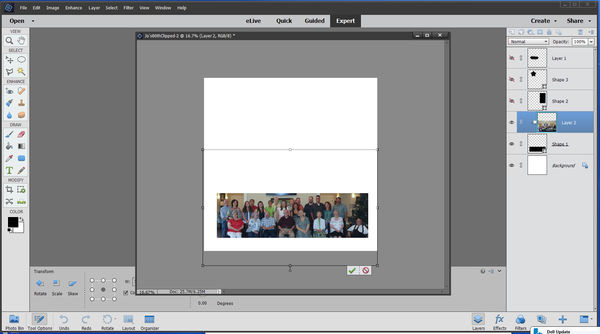
Screenshot-2
In screenshot-2 I have hidden the top three shape layers and dragged (drug?) the first image onto the collage locating its layer immediately above the first mask. There are two ways to clip it to the mask. One, with the image layer selected drop down the layers menu and click on "Create Clipping Mask." The second way is to position your pointer on the line between the image and the mask (it will turn into a hand pointer.) hold down the Alt key (windows) and when you see a small box with a down pointing arrow, do a left click. The image will all disappear except what is directly over the mask. The image handles will show and you can resize, re-position the image to have exactly what you want above the mask.
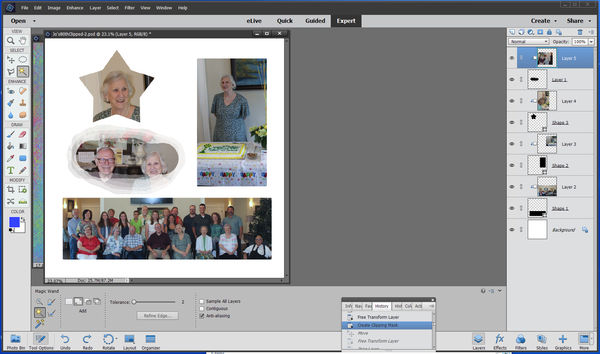
Screenshot-3
In screenshot-3 I have applied the above step to the other three masks. That's all there is to it. When you get the hang of it, it happens really fast.
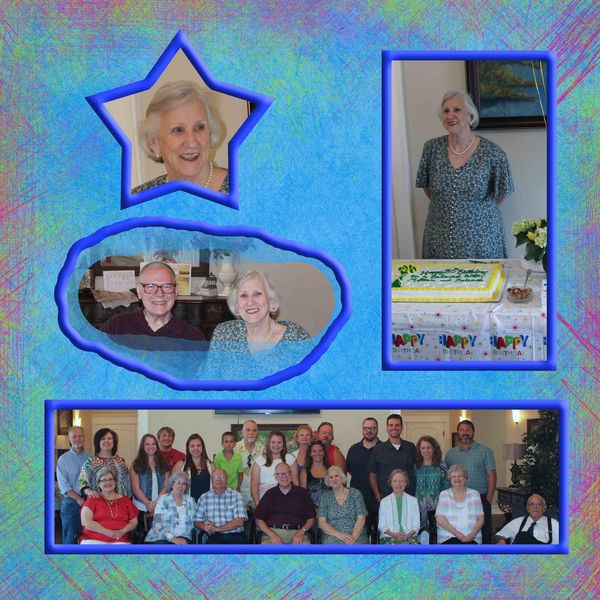
Just to dress it up a little I added a background and beveled strokes. If you have questions, PM me.
A clipping mask and the image to be masked are placed on separate layers with the image above the mask. Only the image area immediately above the mask will show with the rest being hidden. Below I have first displayed the four snapshots (disregard the IQ).
Screenshot-1
In screenshot-1 I have opened a blank file and used the shape tool to create three shapes arranged like I want the pictures to appear. The tool creates each shape on its own layer. (Like any layer the shape layer can later be moved/manipulated) I also added a blank layer and used the brush tool to brush in a shape. Believe it or not, this can sometimes be the most time consuming step.
Screenshot-2
In screenshot-2 I have hidden the top three shape layers and dragged (drug?) the first image onto the collage locating its layer immediately above the first mask. There are two ways to clip it to the mask. One, with the image layer selected drop down the layers menu and click on "Create Clipping Mask." The second way is to position your pointer on the line between the image and the mask (it will turn into a hand pointer.) hold down the Alt key (windows) and when you see a small box with a down pointing arrow, do a left click. The image will all disappear except what is directly over the mask. The image handles will show and you can resize, re-position the image to have exactly what you want above the mask.
Screenshot-3
In screenshot-3 I have applied the above step to the other three masks. That's all there is to it. When you get the hang of it, it happens really fast.
Just to dress it up a little I added a background and beveled strokes. If you have questions, PM me.
Jul 2, 2019 04:09:59 #

Very nice work. It probably took quite a bit of time and experimentation. Keep up the good work. Have a GREAT DAY.
Jul 2, 2019 06:46:38 #

Thanks so much! Seems straight forward, so I'll give it a try this morning. I don't know why I had a blockage re clipping masks other than it took me months to "get" the whole idea of layers, period 
Jul 2, 2019 11:20:37 #

Guyserman wrote:
This demo is much simpler than my leaf shutter wor... (show quote)
Could you explain the difference between a mask and a clipping mask. I think I understand but a simple definition of the two would help. I use masks a lot but not sure about clippinng masks.
Jul 2, 2019 14:40:23 #
Guyserman
Loc: Benton, AR
Cwilson341 wrote:
Could you explain the difference between a mask and a clipping mask. I think I understand but a simple definition of the two would help. I use masks a lot but not sure about clippinng masks.
I don't know how Adobe would describe it, but in my own words a clipping mask is simply a transparent layer with some opaque pixels. It does not function as a mask at all until the layer immediately above it is clipped to it. Then the any pixels in the "above" layer that are directly above the opaque pixels remain visible. All other pixels are hidden. Hope this helps.
Jul 2, 2019 16:29:31 #
Guyserman wrote:
I don't know how Adobe would describe it, but in my own words a clipping mask is simply a transparent layer with some opaque pixels. It does not function as a mask at all until the layer immediately above it is clipped to it. Then the any pixels in the "above" layer that are directly above the opaque pixels remain visible. All other pixels are hidden. Hope this helps.
Sort of helps. I need to try it to understand it better.
Jul 3, 2019 17:32:53 #
Member dannac provided a pdf with another example of clipping mask. Click the download link below to open or save to your computer. Danna, many thanks for your time and interest!
Jul 3, 2019 18:39:06 #
Guyserman
Loc: Benton, AR
Linda From Maine wrote:
Member dannac provided a pdf with another example of clipping mask. Click the download link below to open or save to your computer. Danna, many thanks for your time and interest!
This is an easy to follow example using a single clipping mask. However it does not mention that you can resize and reposition the layer being masked in order to get the composition exactly like you want it.
Jul 3, 2019 18:40:31 #
Guyserman wrote:
OK, thanks for that tip. This is still on my to-try list This is an easy to follow example using a single clipping mask. However it does not mention that you can resize and reposition the layer being masked in order to get the composition exactly like you want it.
If you want to reply, then register here. Registration is free and your account is created instantly, so you can post right away.