How to make sunset sun rays pop?
May 24, 2019 23:04:07 #
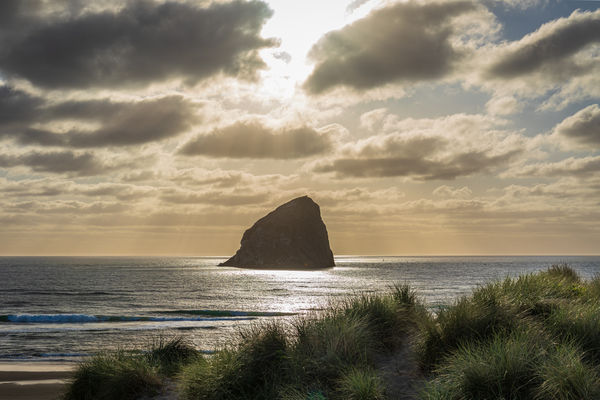
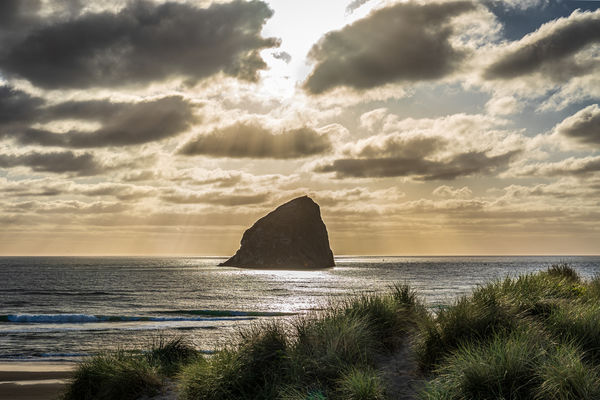
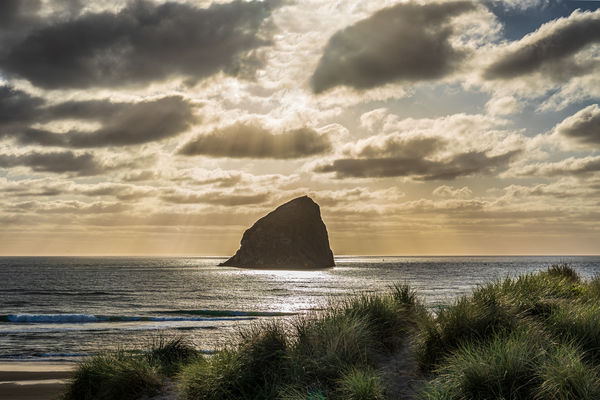
I always struggle processing sun rays shining through the clouds at sunset. Can anyone familiar primarily with Lightroom explain how to make those sun rays pop? I have attached a photo as an example. Thanks!
May 25, 2019 00:18:53 #
Lazy J wrote:
I always struggle processing sun rays shining through the clouds at sunset. Can anyone familiar primarily with Lightroom explain how to make those sun rays pop? I have attached a photo as an example. Thanks!
This is a link to a video by Matt Kloskowski that might be useful to make the light rays pop.
https://www.youtube.com/watch?v=3brfb3Ta3aA
Tim
May 25, 2019 07:45:36 #
That was a cool video, nice idea. Just to piggyback, assuming photoshop, since you already have crepuscular rays, you could make selections of your different existing light rays using the polygon selection tool, using add to selection each time to group them, set the feathering in select and mask, then open camera raw filter and it will apply what you change only to the selection. You could try things like exposure, saturation, maybe even texture and dehaze would be interesting.
Also just to see if it will work, try select/select color range and see if the fuzziness slider will pick up the white light only. If so it will output to a mask that can be modified.
Once selected, the effects filter gallery under filter has several, I forget the names, that apply a direction to the light. Have to switch to 8 bit to use the gallery.
May 25, 2019 07:58:50 #

TimB72 wrote:
This is a link to a video by Matt Kloskowski that might be useful to make the light rays pop.
https://www.youtube.com/watch?v=3brfb3Ta3aA
Tim
https://www.youtube.com/watch?v=3brfb3Ta3aA
Tim
Thanks
May 25, 2019 08:41:24 #

Hi Jon, is this the original exposure or did you lighten when processing? It's possible that starting with a darker exposure and selectively lightening the lower half will help keep the rays more visible. Then, with a gentle hand, you can manipulate the sky for contrast, details/clarity, mid-tones etc.
Can you post an unedited version? If you shoot in raw and the file isn't more than 20 MB (maybe 22 on a good day), it should upload. There won't be a thumbnail, just a link. Thanks much!
Can you post an unedited version? If you shoot in raw and the file isn't more than 20 MB (maybe 22 on a good day), it should upload. There won't be a thumbnail, just a link. Thanks much!
May 25, 2019 09:16:27 #
Linda From Maine wrote:
Hi Jon, is this the original exposure or did you lighten when processing? It's possible that starting with a darker exposure and selectively lightening the lower half will help keep the rays more visible. Then, with a gentle hand, you can manipulate the sky for contrast, details/clarity, mid-tones etc.
Can you post an unedited version? If you shoot in raw and the file isn't more than 20 MB (maybe 22 on a good day), it should upload. There won't be a thumbnail, just a link. Thanks much!
Can you post an unedited version? If you shoot in raw and the file isn't more than 20 MB (maybe 22 on a good day), it should upload. There won't be a thumbnail, just a link. Thanks much!
Linda,
I checked and all three of my multiple exposure shots from this particular set are all lighter than the provided processed image. However, I have provided another darker unedited image from another multiple exposure set. Thanks!
May 25, 2019 09:32:54 #
TimB72 wrote:
This is a link to a video by Matt Kloskowski that might be useful to make the light rays pop.
https://www.youtube.com/watch?v=3brfb3Ta3aA
Tim
https://www.youtube.com/watch?v=3brfb3Ta3aA
Tim
Interesting! Thank you, I will experiment with this option/trick.
May 25, 2019 09:37:08 #
May 25, 2019 09:57:24 #

A good deal of accentuating the sun's rays, crepuscular rays, is through exposure and processing. The exposure needs to be such as to capture the rays. The processing would most likely be burning and dodging. It's all rather simple, but understanding one's camera's capabilities is essential. Oh, and the thing that pops is corn.
--Bob
--Bob
May 25, 2019 10:41:44 #

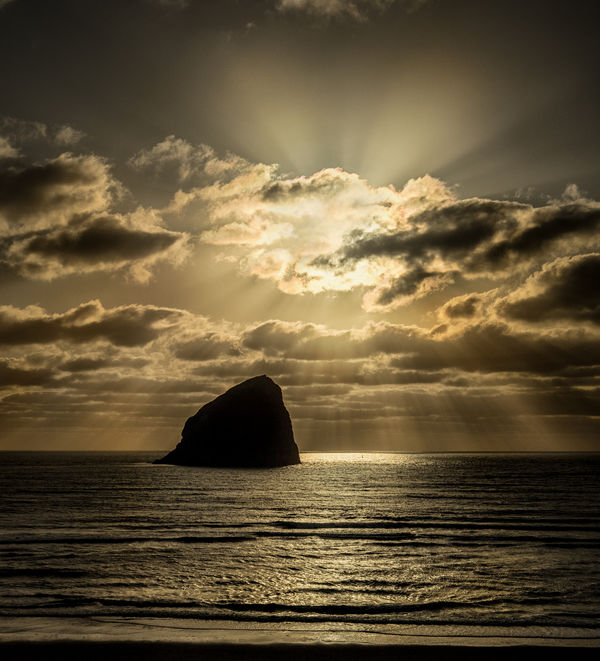
Clarity is the most effective tool for bringing out the rays, followed by contrast. The Whites/Highlights/Shadows/Blacks/Brightness sliders can help but it's very much dependent on the image. Typically, lifting Whites and Highlights while lowering Shadows and Blacks will help, but not always.
Bringing out the rays requires some intensive processing so it's better to select the sky for the most heavy-handed adjustments. I found one of the limiting factors with this image was the dark clouds going darker. If that was because of your own adjustments you would have to ease off with whatever caused that, or alternatively select the dark parts of the clouds and lighten/decontrast them. Or maybe it's a look that you're happy with.
I have found in the past that the HSL tool can be used to brighten the beams, but only if they have a specific colour that's different from the background. In this image the HSL tool couldn't be used to differentiate the beams from the background.
I found that even with a bit of pushing it was difficult to get the beams to stand out. As you can see I had very limited success. One consequence was that the blown part of the sky was made worse. It's not too hard to clone over the blown parts of cloudy skies. You could probably do a better job than my quick fix.
The shown edit is at the point where any more pushing results in much mitigating being needed. How long you're willing to carry on making increasing effort for diminishing returns is up to you.
.
May 25, 2019 10:47:26 #
As you've already read, initial exposure plays a large role in a shot like this. There is more discussion within this topic that you may enjoy.
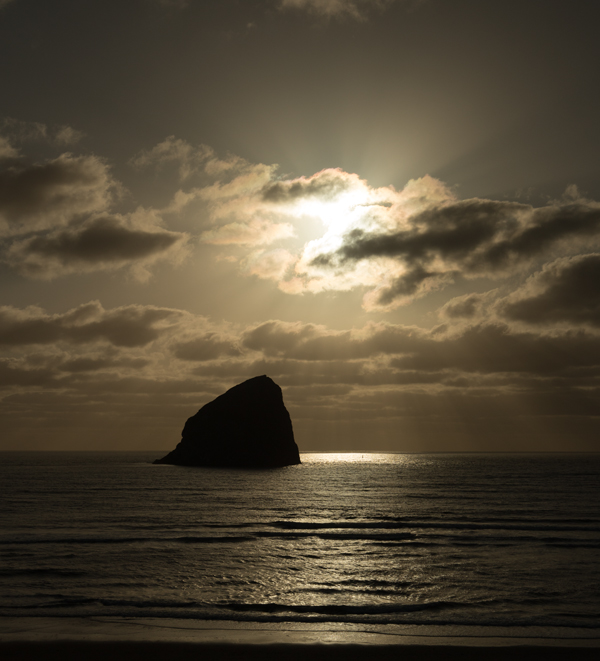
Also, as you have seen, everyone has their favorite software (edit: and R.G. posted while I was typing ) Mine is PS Elements with Nik Collection plug-in. Below is my edit from the raw you loaded. In my raw editor, I primarily adjusted highlights, clarity and vibrance. In the main editing section I brought out more detail with layers of Nik Viveza and Nik Color Efex detail extractor. I masked some of the effect from the edges to keep our eye within the frame.
I then cloned a few clouds over the very blown white sun area. This should be done at low opacity and build it up, if you wish. I'm still not 100% in love with my result. Finally, I did a bit of dodge and burn to further enhance contrasts.
Obviously, this is my vision only (other folks are much more proficient with pp than I, btw), and if you hate it and/or don't wish to go so deep into pp, that's fine too. I do think one value of these types of topics is to make the OP and others who are watching aware of the possibilities.
Thanks much!
Also, as you have seen, everyone has their favorite software (edit: and R.G. posted while I was typing
) Mine is PS Elements with Nik Collection plug-in. Below is my edit from the raw you loaded. In my raw editor, I primarily adjusted highlights, clarity and vibrance. In the main editing section I brought out more detail with layers of Nik Viveza and Nik Color Efex detail extractor. I masked some of the effect from the edges to keep our eye within the frame.I then cloned a few clouds over the very blown white sun area. This should be done at low opacity and build it up, if you wish. I'm still not 100% in love with my result. Finally, I did a bit of dodge and burn to further enhance contrasts.
Obviously, this is my vision only (other folks are much more proficient with pp than I, btw), and if you hate it and/or don't wish to go so deep into pp, that's fine too. I do think one value of these types of topics is to make the OP and others who are watching aware of the possibilities.
Thanks much!
May 25, 2019 11:13:56 #

May 25, 2019 12:09:12 #
TimB72 wrote:
This is a link to a video by Matt Kloskowski that might be useful to make the light rays pop.
https://www.youtube.com/watch?v=3brfb3Ta3aA
Tim
https://www.youtube.com/watch?v=3brfb3Ta3aA
Tim
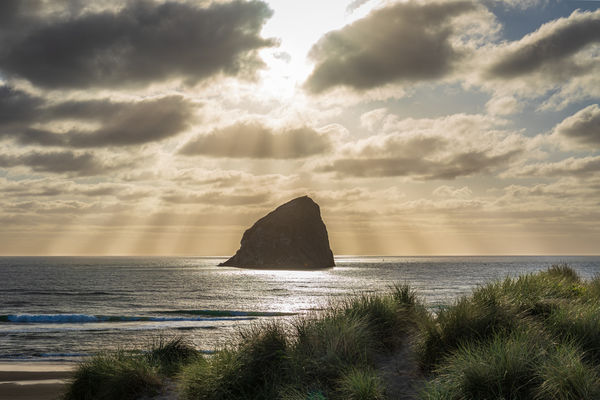
I played around with method you referenced with acceptable results. Perhaps a bit more uniform than what actually existed. I am sure this could be improved by varying the width of the rays.
Thank you all for your time and responses! Mucho appreciado!
May 25, 2019 13:27:42 #
Lazy J wrote:
I played around with method you referenced with acceptable results. Perhaps a bit more uniform than what actually existed. I am sure this could be improved by varying the width of the rays.
Thank you all for your time and responses! Mucho appreciado!
Thank you all for your time and responses! Mucho appreciado!
You're welcome, glad I could help.
May 25, 2019 13:59:32 #
Lazy J wrote:
Congrats, looks great! Thanks for posting to PP Forum; hope to see you again ... Perhaps a bit more uniform than what actually existed. I am sure this could be improved by varying the width of the rays...

If you want to reply, then register here. Registration is free and your account is created instantly, so you can post right away.