Photoshop trick for subtle color adjustments.
May 19, 2019 10:34:56 #
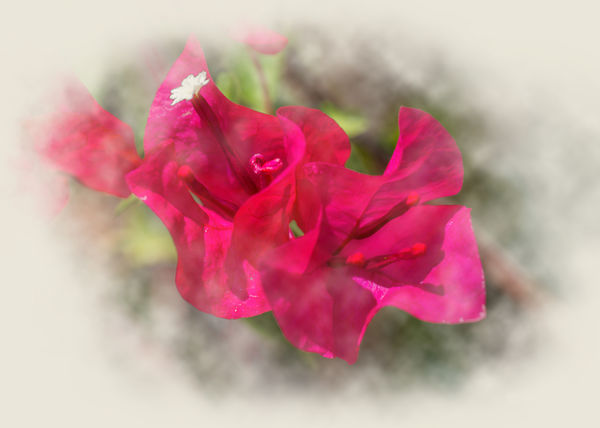
I saw this just once being used on a YouTube video. It's a different way to use the Black & White layer. I would like you to download this picture here to see how the adjustments work.
1) Download my flower
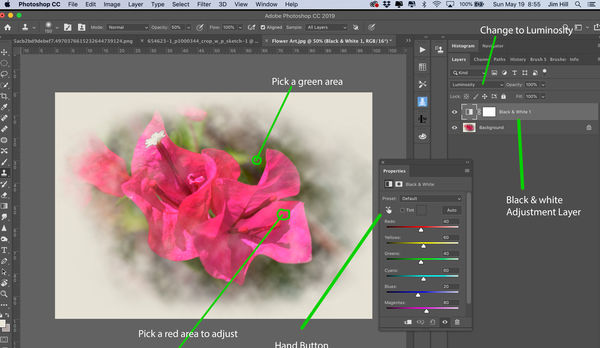
2) add a B&W adjustment layer, picture will turn to B&W
3) change the layer to Luminosity, Now picture is back to normal
4) You can move sliders at this time, but to be more precise adjustments can be made by selecting the hand button. Move your curser over the desired area to adjust click and hold then move it left or right. For this example first move it over the red in any part of the rose and try it out. The green might look like it now need an adjustment so position your cursor over the green and make an adjustment.
I find this adjustment layer to work quite well for the precise moves needed in a photograph. It works extremely well on skin tones. It changes color density without going outside of the color range.
Interested to see if you have ever used it before and if you like it.
Jim
1) Download my flower
2) add a B&W adjustment layer, picture will turn to B&W
3) change the layer to Luminosity, Now picture is back to normal
4) You can move sliders at this time, but to be more precise adjustments can be made by selecting the hand button. Move your curser over the desired area to adjust click and hold then move it left or right. For this example first move it over the red in any part of the rose and try it out. The green might look like it now need an adjustment so position your cursor over the green and make an adjustment.
I find this adjustment layer to work quite well for the precise moves needed in a photograph. It works extremely well on skin tones. It changes color density without going outside of the color range.
Interested to see if you have ever used it before and if you like it.
Jim
May 19, 2019 10:58:32 #

May 19, 2019 11:07:13 #
Jim-Pops wrote:
I saw this just once being used on a YouTube video... (show quote)
Thank you Jim! I've often used a B&W layer to globally adjust luminosity. (inverting the layer works well for shadows) This would be much more precise. Thank you.
May 19, 2019 12:41:34 #

Thanks for this interesting information, Jim. I've used a b&w layer to de-saturate color more globally (possibly in reduced opacity multiply blend mode; can't recall right off). I'm pretty sure PS Elements doesn't have the "hand" tool but will look into this luminosity business!
May 19, 2019 13:49:47 #
That is interesting. It makes me think also of the LAB mode, the L being luminosity. Still exploring it, but you switch to LAB and then open a curves adjustment layer, but you get either L luminosity or two two-color modes A and B.
May 19, 2019 14:58:08 #
Jim-Pops wrote:
I saw this just once being used on a YouTube video... (show quote)
Wow, I never thought of doing that. This is a good technique to practice and use. Thanks.
Erich
May 20, 2019 05:41:02 #

May 20, 2019 11:29:17 #

The most precise way to do this is to hit Ctrl + U to get up a Hue/Saturation dialog box (in PS). Change "Master" to any color range in the dropdown field. Now use the eyedropper on any color in your image. This will automatically select a color range, consisting of four points on a color scale at the bottom of the dialog box. The two inner points are the 100% limits--all hues in between them will be maximally affected by any adjustments you make. Outside are two small triangles. They represent the limit at which the hues are affected at all by adjustments, with a smooth gradient of adjustment intensity in between them.
In other words, the color range affected extends from one triangle to the other, gradually increasing in intensity until it is at 100% between the two inner marks.
You can slide all those marks independent of each other, to set the exact range and feathering you desire. Then you have sliders to set hue, saturation and lightness. You can also add or subtract colors with the + and - eyedroppers. For me this is the best of the many methods of adjusting colors in PS.
May 20, 2019 12:06:08 #

I guess an other arrow in my quiver. I will definitely have to give it a try. Thanks for the post.
May 20, 2019 15:54:28 #
Getting into the weeds a bit, clicking in the mask then going to select/color range and adjusting fuzziness, will create a mask to apply the adjustment only to the color selected.
May 20, 2019 18:30:02 #
kymarto wrote:
The original idea in this post is pretty cool but a bit involved. I like your idea of ctrl+U to do basically the same thing with fewer steps. Now i just have to remember to use it. There are so many great features in photoshop that it is hard to remember them all.The most precise way to do this is to hit Ctrl + U... (show quote)
May 23, 2019 06:43:39 #
If you want to reply, then register here. Registration is free and your account is created instantly, so you can post right away.