Removing Distractions
Apr 16, 2019 14:27:02 #
Hello everyone,
This is my first post, though I have been reading the UHH for a couple of years, and wanted to make my first question worthy of you all.
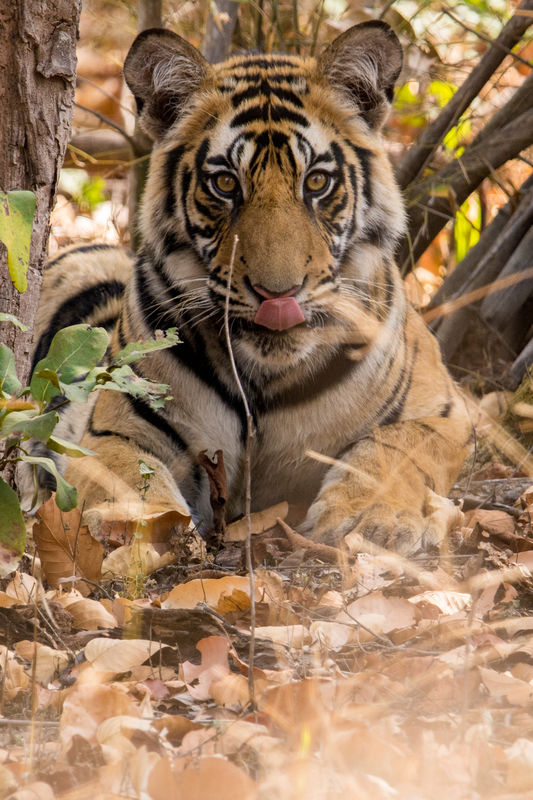
I have this picture of a Tiger that I photographed (Nikon 7200 with a Tamron 150-600) when I was in India. I would like to be able to remove the stick going up the middle of his face and maybe the second stick too. I have Lightroom 6.14, On1 2019.2 and Luminar 3, the last two as possible replacements for Lightroom since, at this time, I don't want to go to the subscription route.
So can this be done with the programs that I have, or it's too difficult to do with my experience level (a working knowledge of Lightroom and the other two I have just gotten and have not really used them yet), or worst case, I really need to use Photo Shop.

Apr 16, 2019 14:32:00 #
You can use LR to do it. To have other's do it for you, you'd have to store the original of the attachment. You'd also be better served placing this into the post-processing section. Attach the original file from the camera so anyone attempting to help has the most data in the image, assuming the file is 20MB or less in size.
When making this kind of replacement in LR, there are a few strategies:
1. Work in pieces, not one long replace "string" following the stick.
2. If the "blend" is difficult to make the replacement invisible, also work in phases. First, doing a clone. Then, finish the blend by using the Heal.
So, if you work with the stick, starting from the top and working down, start a spot-removal. Set the replacement circle slightly wider than the stick and set to "clone". Drag down over the stick for the first stretch of orange to the start of the first black stripe. Release the mouse and let LR select a replacement. If not perfect, click and select the source location and move around to find a better clone-source replacement. It doesn't have to be perfect at this point, but you'll see some sources locations are better than others. If needed, use your history and just back up a step and start over rather than patch on patch on patch without success.
Repeat for the black and orange sections and then the leaves, etc.
Next, change the replacement to "heal" and make the brush / circle just a bit wider. "Heal" your earlier clone replacements, again piece by piece, similar to the cloning effort.
Apr 16, 2019 14:34:52 #
I generally work with Lightroom and I know you will not be able to remove the stick using just Lightroom. It can be easily removed using Photoshop. I do not use Luminar nor On1 so I cannot speak to those programs.
Apr 16, 2019 14:39:04 #
CHG_CANON wrote:
You can use LR to do it. To have other's do it for... (show quote)
Thank you for your input. I don't see "post-processing section" I just see photo analysis.
Apr 16, 2019 14:39:35 #
treadwl wrote:
I generally work with Lightroom and I know you will not be able to remove the stick using just Lightroom. It can be easily removed using Photoshop. I do not use Luminar nor On1 so I cannot speak to those programs.
Without the original, "not able" is difficult to disprove. I only use LR6 and remove items like this regularly, see descriptive steps above. But then again, if it's too hard or doesn't work, I'll crop to remove or just delete and move onto another image.
Apr 16, 2019 14:40:53 #
KerryF wrote:
Thank you for your input. I don't see "post-processing section" I just see photo analysis.
Go to the bottom of this page, select "all sections". Scroll toward the bottom and find post-processing. Subscribe so it appears in your list of filtered / subscribed sections.
Apr 16, 2019 14:41:24 #
KerryF wrote:
Go to "all sections" at the bottom of any UHH page. The volunteer-moderated sections require subscription in order to see topics in "newest topics" or the sampling that comes in your email. Thank you for your input. I don't see "post-processing section" I just see photo analysis.
The direct route: https://www.uglyhedgehog.com/s-116-1.html
(edit - hey Paul!

 )
)Apr 16, 2019 14:44:37 #
KerryF wrote:
Hello everyone, br br This is my first post, tho... (show quote)
This both a simple and semi difficult process -
#1 make copy to work on -
# 2 enlarge the image to about 300%
#3 select a clone brush just larger than the twig - 100% flow and just a little on the soft side
#4 do your alt /click off the side of the twig as close as you can w/out including it
#5 slowly and patiently clone over the twig with the tigers colors- remember if and when you do a click and it is not good - click edit right away and an "undo" choice comes up for the last click.
There are portions of the image that look rather close but the soft brush will help with that-
Good luck
Apr 16, 2019 14:45:10 #
CHG_CANON wrote:
Go to the bottom of this page, select "all sections". Scroll toward the bottom and find post-processing. Subscribe so it appears in your list of filtered / subscribed sections.
Got it, thanks.
Apr 16, 2019 14:47:18 #
Harvey wrote:
This both a simple and semi difficult process - br... (show quote)
Thank you for your step by step instructions. I knew that it wouldn't be easy, but I will give it a shot.
Apr 16, 2019 14:48:22 #
KerryF wrote:
Hello everyone, br br This is my first post, tho... (show quote)
I can't give much constructive advice on how to remove the stick but what an absolutely cool image. Maybe when you originally shot it you might have run up, broken the stick off, said hello to the tiger, and then run back to take the shot--or maybe not. Anyway, I wish you well on fixing the shot to your satisfaction. Again, I just wish it had been I who had taken this shot.
Apr 16, 2019 14:49:11 #
Linda From Maine wrote:
Go to "all sections" at the bottom of any UHH page. The volunteer-moderated sections require subscription in order to see topics in "newest topics" or the sampling that comes in your email.
The direct route: https://www.uglyhedgehog.com/s-116-1.html
(edit - hey Paul!
 )
)
The direct route: https://www.uglyhedgehog.com/s-116-1.html
(edit - hey Paul!

 )
)Thank you Linda, your help is greatly appreciated.
Apr 16, 2019 14:51:39 #
KerryF wrote:
Hello everyone, br br This is my first post, tho... (show quote)
GREAT shot BTW ! ......Thanks for posting.
.
Apr 16, 2019 14:55:08 #
nervous2 wrote:
I can't give much constructive advice on how to remove the stick but what an absolutely cool image. Maybe when you originally shot it you might have run up, broken the stick off, said hello to the tiger, and then run back to take the shot--or maybe not. Anyway, I wish you well on fixing the shot to your satisfaction. Again, I just wish it had been I who had taken this shot.
If I had seen the stick in the first place, I might have done that. As it was, there were 2 tigers, barely visible, lying in the grass and of course there were 20-25 jeeps parked waiting for movement. It took like 20 minutes when this one moved and walked over to some shade and at that point, I was just firing away not to miss this opportunity, so I wasn't exactly scanning the edges (or anywhere else for that matter) for unwanted objects.
Apr 16, 2019 15:15:58 #
KerryF wrote:
If I had seen the stick in the first place, I might have done that. As it was, there were 2 tigers, barely visible, lying in the grass and of course there were 20-25 jeeps parked waiting for movement. It took like 20 minutes when this one moved and walked over to some shade and at that point, I was just firing away not to miss this opportunity, so I wasn't exactly scanning the edges (or anywhere else for that matter) for unwanted objects.
It's a great shot, worthy of some intensive post processing. Wild animals rarely cooperate and give you a perfect pose with no distractions. Be patient with your processing and we will await patiently for your final result.
If you want to reply, then register here. Registration is free and your account is created instantly, so you can post right away.


