Layer Masking Tutorial
This topic is locked to prevent further replies.
Mar 29, 2019 07:35:53 #
Please Click here for a printable version
The purpose of this tutorial/topic is to provide the basic elements of layer masking.
A layer mask in Photoshop allows me to either hide or reveal as much of that layer that I want. The mask itself is either black or white. A black mask conceals (hides) and a white mask reveals. So when it comes to Layer Masking just remember “Black conceals but White reveals.”
There are two basic methods of creating a Layer Mask.
First select the layer you wish to apply the Layer Mask to and then either:
1. Click the Layer Mask Icon [Image #1]
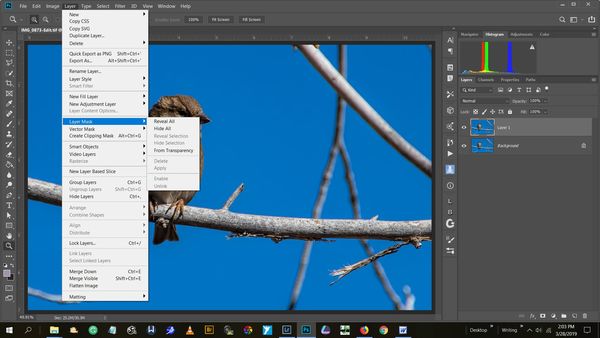
2. Or go to the Menu Bar and select “Layer” then select “Layer Mask” then select “Reveal All.” [Image #2]
A white square (Layer Mask Thumbnail) should appear next to your image thumbnail in the Layers Palette with a link between the two. This method produces a Layer Mask that reveals everything on that layer.
To create a Hide All Layer Mask.
Select the layer you wish to apply the Layer Mask to and then either:
1. ALT + Click the Layer Mask Icon
2. Or go to the Menu Bar and select “Layer” then select “Layer Mask” then select “Hide All.”
This will produce a Layer Mask that conceals everything on that layer.
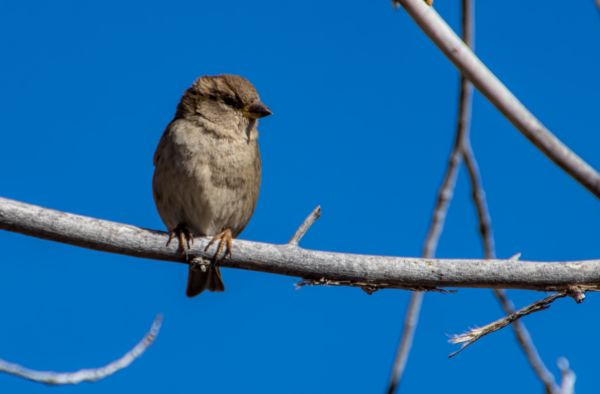
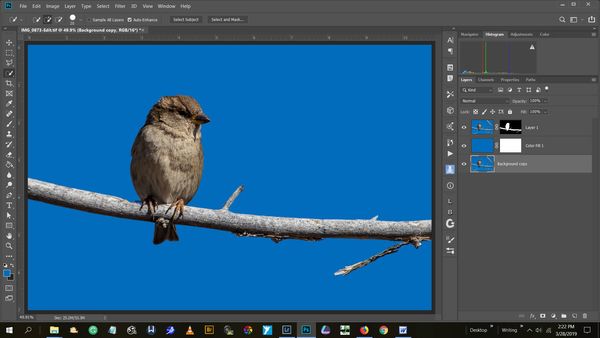
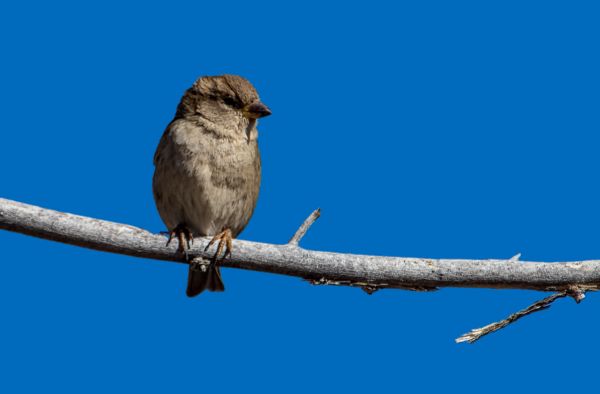
For our example we will use an image of a bird with some distracting branches. Our goal is to eliminate the branches using a layer mask. [Images #3 & #4]
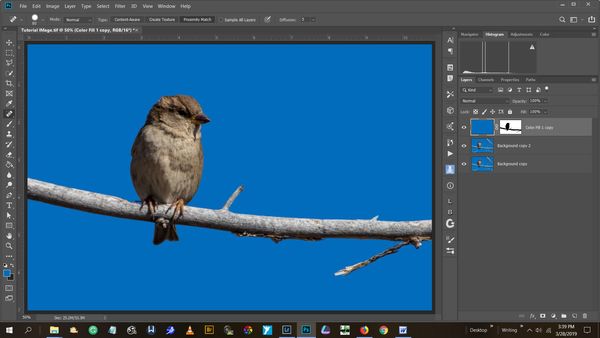
The Hide All Mask Method: [Images #4, & #6]
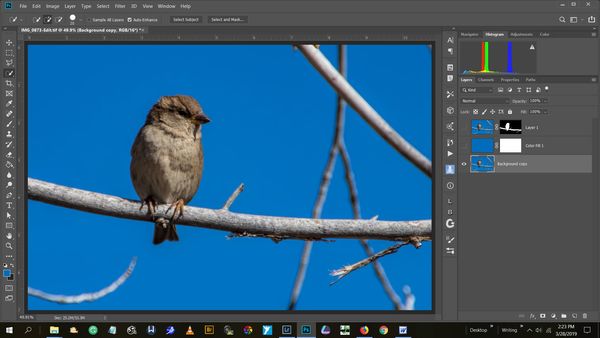
1. In this example I brought the image into Photoshop and created a blue fill layer by using the Eyedropper Tool, selecting the blue sky then going to the Menu Bar and selected “Layer” then “New Fill Layer” and then “Solid Color” and finally “OK.” The purpose of the blue fill layer is to cover all the distracting branches.
2. Next I selected my base image and created a copy using the command CTRL + J. (I could have also duplicated the layer by right clicking on the layer and choosing “Duplicate Layer,” drug the layer Icon down to the “Duplicate Layer” Icon, or accessed the Menu Bar and chosen “Layer” then “Duplicate Layer.”)
3. I arranged my layers by dragging them to the order where the Blue Fill layer was below my duplicated base layer.
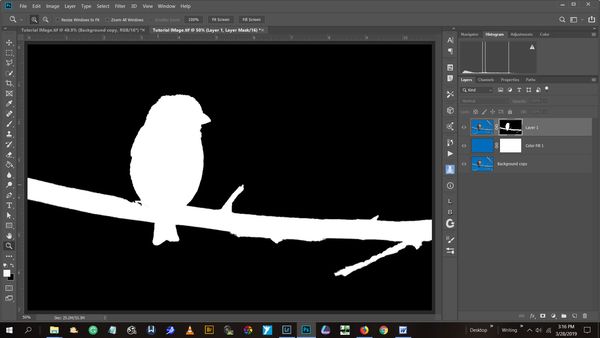
4. Next I add a “Hide All” mask to conceal everything except the bird and the branch it was sitting on.
5. To reveal the bird I selected a white Brush and simply painted the bird in by painting white on the black mask. Remember “Black conceals but White reveals.”
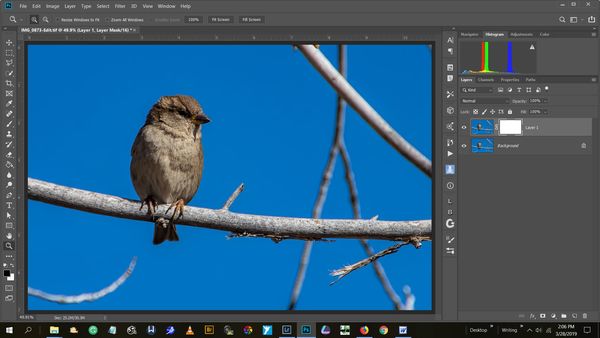
The Reveal All Mask Method: [Images #7, #8, & #9]
1. Using this method I brought the image into Photoshop and then created a blue fill layer as described above.
2. And then I arranged my layers such that the Blue Fill layer was above my base layer.
3. I then added a “Reveal All” mask to reveal everything except the bird and the branch it was sitting on.
4. To reveal the bird I selected a black Brush and simply painted the bird in by painting black on the white mask. Remember “Black conceals but White reveals.” Black in this case concealed the color blue thereby revealing the bird.
Additional Notes:
1. To Move a Mask CTRL + Drag the Mask Icon to the desired layer.
2. To Copy a Mask ALT + Drag the Mask Icon to the desired layer.
3. CTRL + Z for undo
4. SHIFT + CTRL + Z reverses Undo
5. To convert a mask for reveal to hide; or hide to reveal use CTRL + I , or use the Menu Bar and select “Image” then select “Adjustments” and then select “Invert.”
6. Right Click on Mask Icon for additional actions.
7. Double Click the Mask Icon to access Mask Properties.
8. ALT + Click on the Mask Icon to display Mask on the main window, repeat ALT + Click to return to the image.
9. Selections are beyond the scope of this tutorial.
If you are new to Layer Masking I would suggest playing with them to start off. The key to any skill is practice, practice, practice.
For example you could create a new blank document in Photoshop or Elements, and then take the paint brush and change it to a color. Any color except black or white. Next paint squiggly lines or dots, or whatever you want on the blank page. Then go to the Layer Menu and create a New Fill Layer. Then add either a Reveal or Hide All Mask, and then paint either black or white on the mask just to see what it does. After that, delete that mask and add the other type of mask you did not use and paint on it just like before. Experiment, play, have fun!
For additional information on Masking follow these links:
http://helpx.adobe.com/photoshop/using/masking-layers.html
http://helpx.adobe.com/photoshop/how-to/layer-mask.html
http://www.youtube.com/watch?v=h5yW5hHjQrE
http://blog.udemy.com/masking-in-photoshop/
Thanks for looking!!!
I wish you nothing but the very best on your journey!
The purpose of this tutorial/topic is to provide the basic elements of layer masking.
A layer mask in Photoshop allows me to either hide or reveal as much of that layer that I want. The mask itself is either black or white. A black mask conceals (hides) and a white mask reveals. So when it comes to Layer Masking just remember “Black conceals but White reveals.”
There are two basic methods of creating a Layer Mask.
First select the layer you wish to apply the Layer Mask to and then either:
1. Click the Layer Mask Icon [Image #1]
2. Or go to the Menu Bar and select “Layer” then select “Layer Mask” then select “Reveal All.” [Image #2]
A white square (Layer Mask Thumbnail) should appear next to your image thumbnail in the Layers Palette with a link between the two. This method produces a Layer Mask that reveals everything on that layer.
To create a Hide All Layer Mask.
Select the layer you wish to apply the Layer Mask to and then either:
1. ALT + Click the Layer Mask Icon
2. Or go to the Menu Bar and select “Layer” then select “Layer Mask” then select “Hide All.”
This will produce a Layer Mask that conceals everything on that layer.
For our example we will use an image of a bird with some distracting branches. Our goal is to eliminate the branches using a layer mask. [Images #3 & #4]
The Hide All Mask Method: [Images #4, & #6]
1. In this example I brought the image into Photoshop and created a blue fill layer by using the Eyedropper Tool, selecting the blue sky then going to the Menu Bar and selected “Layer” then “New Fill Layer” and then “Solid Color” and finally “OK.” The purpose of the blue fill layer is to cover all the distracting branches.
2. Next I selected my base image and created a copy using the command CTRL + J. (I could have also duplicated the layer by right clicking on the layer and choosing “Duplicate Layer,” drug the layer Icon down to the “Duplicate Layer” Icon, or accessed the Menu Bar and chosen “Layer” then “Duplicate Layer.”)
3. I arranged my layers by dragging them to the order where the Blue Fill layer was below my duplicated base layer.
4. Next I add a “Hide All” mask to conceal everything except the bird and the branch it was sitting on.
5. To reveal the bird I selected a white Brush and simply painted the bird in by painting white on the black mask. Remember “Black conceals but White reveals.”
The Reveal All Mask Method: [Images #7, #8, & #9]
1. Using this method I brought the image into Photoshop and then created a blue fill layer as described above.
2. And then I arranged my layers such that the Blue Fill layer was above my base layer.
3. I then added a “Reveal All” mask to reveal everything except the bird and the branch it was sitting on.
4. To reveal the bird I selected a black Brush and simply painted the bird in by painting black on the white mask. Remember “Black conceals but White reveals.” Black in this case concealed the color blue thereby revealing the bird.
Additional Notes:
1. To Move a Mask CTRL + Drag the Mask Icon to the desired layer.
2. To Copy a Mask ALT + Drag the Mask Icon to the desired layer.
3. CTRL + Z for undo
4. SHIFT + CTRL + Z reverses Undo
5. To convert a mask for reveal to hide; or hide to reveal use CTRL + I , or use the Menu Bar and select “Image” then select “Adjustments” and then select “Invert.”
6. Right Click on Mask Icon for additional actions.
7. Double Click the Mask Icon to access Mask Properties.
8. ALT + Click on the Mask Icon to display Mask on the main window, repeat ALT + Click to return to the image.
9. Selections are beyond the scope of this tutorial.
If you are new to Layer Masking I would suggest playing with them to start off. The key to any skill is practice, practice, practice.
For example you could create a new blank document in Photoshop or Elements, and then take the paint brush and change it to a color. Any color except black or white. Next paint squiggly lines or dots, or whatever you want on the blank page. Then go to the Layer Menu and create a New Fill Layer. Then add either a Reveal or Hide All Mask, and then paint either black or white on the mask just to see what it does. After that, delete that mask and add the other type of mask you did not use and paint on it just like before. Experiment, play, have fun!
For additional information on Masking follow these links:
http://helpx.adobe.com/photoshop/using/masking-layers.html
http://helpx.adobe.com/photoshop/how-to/layer-mask.html
http://www.youtube.com/watch?v=h5yW5hHjQrE
http://blog.udemy.com/masking-in-photoshop/
Thanks for looking!!!
I wish you nothing but the very best on your journey!
Image#1
Image#2
(Download)
Image#3
(Download)
Image#4
(Download)
Image#5
(Download)
Image#6
(Download)
Image#7
(Download)
Image#8
(Download)
Image#9

(Download)
Final Image
(Download)
Mar 29, 2019 09:34:40 #

Thank you very much for your time, Claud. I particularly like your suggestion to practice with a drawing/painting you create. This should help those who struggle with visualizing the purpose and result of a mask.
I always did poorly on "spatial perception" tests, so learning layers, and especially layer masks, was a big challenge for me. I'm so glad I stuck with it because I use them with nearly every image I edit now.
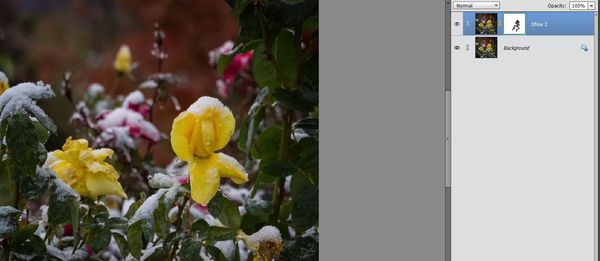
My editor is PS Elements, so my screen prints look different from Claud's. I added a layer of Nik Dfine (noise reduction filter) to my frosted flowers. I wanted to keep more detail in the yellow flower on the right side, so I created a mask to block the noise reduction filter from that area. In screen print #1 see the flower-shaped black area in the white box to the right of the top layer. White reveals the noise reduction effect, black conceals it.
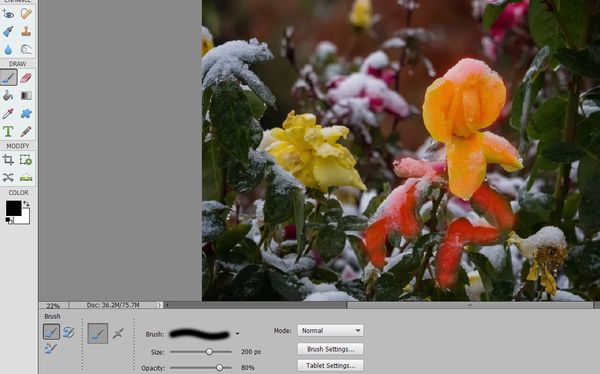
Screenprint #2 shows one way to control the amount of masking: it does not have to be all or none. I changed the opacity of my soft brush to 80% so there is still noise reduction in that section, but less than on the rest.
The red you see is a result of the command to "reveal mask." This is very handy to show what areas you might have missed. If you have painted outside the area you intended, change your color swatch to white, paint over that area, and you have removed that part of the mask.
I encourage those still struggling with the concept to participate in this thread with questions, including a photo of your own if you desire, so we can help you through the steps.
I always did poorly on "spatial perception" tests, so learning layers, and especially layer masks, was a big challenge for me. I'm so glad I stuck with it because I use them with nearly every image I edit now.
My editor is PS Elements, so my screen prints look different from Claud's. I added a layer of Nik Dfine (noise reduction filter) to my frosted flowers. I wanted to keep more detail in the yellow flower on the right side, so I created a mask to block the noise reduction filter from that area. In screen print #1 see the flower-shaped black area in the white box to the right of the top layer. White reveals the noise reduction effect, black conceals it.
Screenprint #2 shows one way to control the amount of masking: it does not have to be all or none. I changed the opacity of my soft brush to 80% so there is still noise reduction in that section, but less than on the rest.
The red you see is a result of the command to "reveal mask." This is very handy to show what areas you might have missed. If you have painted outside the area you intended, change your color swatch to white, paint over that area, and you have removed that part of the mask.
I encourage those still struggling with the concept to participate in this thread with questions, including a photo of your own if you desire, so we can help you through the steps.
Mar 29, 2019 10:11:08 #

Thanks,Claude, for preparing/sharing this!
I will add more to this great tutorial later, but for now, I will reiterate two warnings. These mistakes caused me much grief in my learning about masks. I still sometimes make one of these errors in complex images but at least now they are accidents and not misunderstanding. And more quickly/easily corrected.
1. Be sure you are on the layer you mean to be on and the layer you mean to be on is active (checked, highlighted). If you have multiple layers, it is very easy to get off on the wrong one accidentally.
2. Be sure that when you are working on a MASK, the MASK is active rather than the image itself. Look for the highlighting around the square that denotes which is "active", the image layer or its mask. This, too, is very easy to mix up. For example: If you have a white "reveal" mask, and you paint in black to hide some of it, and you are accidentally on the image instead of the mask, you'll just slap a big wad of black paint on your image instead.
Both these errors can cause you to create your own troubles.
And one more Helpful Hint:
Develop a habit of labeling your layers as you add them. It's worth the trouble.
Mar 29, 2019 10:18:19 #
Linda From Maine wrote:
Thank you very much for your time, Claud. I partic... (show quote)
Great example!
Mar 29, 2019 10:18:44 #
minniev wrote:
Thanks,Claude, for preparing/sharing this! br br ... (show quote)
My Pleasure!
Great points to remember!
Mar 29, 2019 11:25:12 #
minniev wrote:
"Troubles" such as getting so frustrated, you toss your computer out the window 😄...Both these errors can cause you to create your own troubles...
Thank you, Minnie!
Mar 29, 2019 12:00:55 #
Mar 29, 2019 12:09:23 #
GiGiMac103 wrote:
So glad you are enjoying. Keep watch because we're probably not done This is fabulous! Thank you for including me!
 And also, be sure to click the subscribe button for PP Forum (and any other specialty sections of interest) so you won't miss new topics. Go to "all sections" at the bottom of any UHH page for the full list.
Note that if you use the email digest, you won't get all - that's just a sampling. Use "newest topics" at top of page after you've subscribed to the sections you want.
Mar 29, 2019 12:21:47 #
Linda From Maine wrote:
So glad you are enjoying. Keep watch because we're... (show quote)
Thank you Linda!
Mar 29, 2019 14:29:26 #

That is a great tutorial. Thank you Linda et. al., for hosting and providing it.
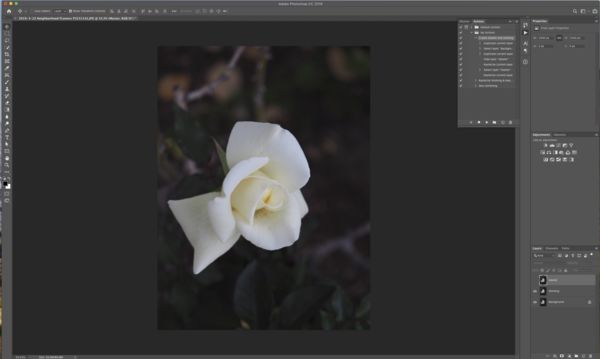
I have a Photoshop Tip I will share. When I open an image into Photoshop I immediately duplicate the background and create two new layers. The first is called "Working" the 2nd is called "Master". After that I don't touch the background. It stays as is. I start my retouching with Working. I can turn it into a smart layer if I want and use ACR, etc. "Master" always stays on top and I can instantly see the "before/after" effects of retouching by toggling master On/Off. Very handy short cut.
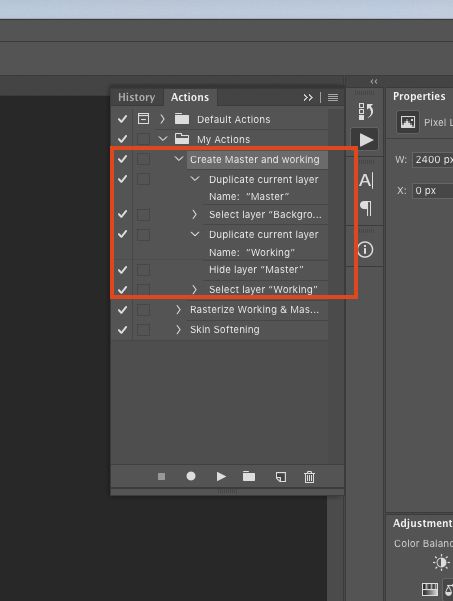
I created a photoshop action to do this so all I have to do is click the action and I have my two layers with Working selected and Master de-selected. See attached screen shots.
I have a Photoshop Tip I will share. When I open an image into Photoshop I immediately duplicate the background and create two new layers. The first is called "Working" the 2nd is called "Master". After that I don't touch the background. It stays as is. I start my retouching with Working. I can turn it into a smart layer if I want and use ACR, etc. "Master" always stays on top and I can instantly see the "before/after" effects of retouching by toggling master On/Off. Very handy short cut.
I created a photoshop action to do this so all I have to do is click the action and I have my two layers with Working selected and Master de-selected. See attached screen shots.
Photoshop with Working and Master layers
(Download)
Photoshop Action to create Working and Master Layers
(Download)
Mar 29, 2019 14:45:04 #
JD750 wrote:
That is a great tutorial. Thank you Linda et. al.... (show quote)
Good point!
I always duplicate my base image when opening a new image.
Thanks for sharing!
Mar 29, 2019 14:46:21 #
Crichmond wrote:
Good point!
I always duplicate my base image when opening a new image.
Thanks for sharing!
I always duplicate my base image when opening a new image.
Thanks for sharing!
Thank you and thank you for the excellent tutorial!
Mar 29, 2019 14:47:18 #
Crichmond wrote:
Good point!
I always duplicate my base image when opening a new image.
Thanks for sharing!
I always duplicate my base image when opening a new image.
Thanks for sharing!
I do the same.
Mar 29, 2019 14:54:35 #
JD750 wrote:
Thank you and thank you for the excellent tutorial!
My pleasure!
Mar 29, 2019 14:55:01 #

If you want to reply, then register here. Registration is free and your account is created instantly, so you can post right away.