Nebula Art
Mar 20, 2019 15:05:28 #
kenievans
Loc: Dallas
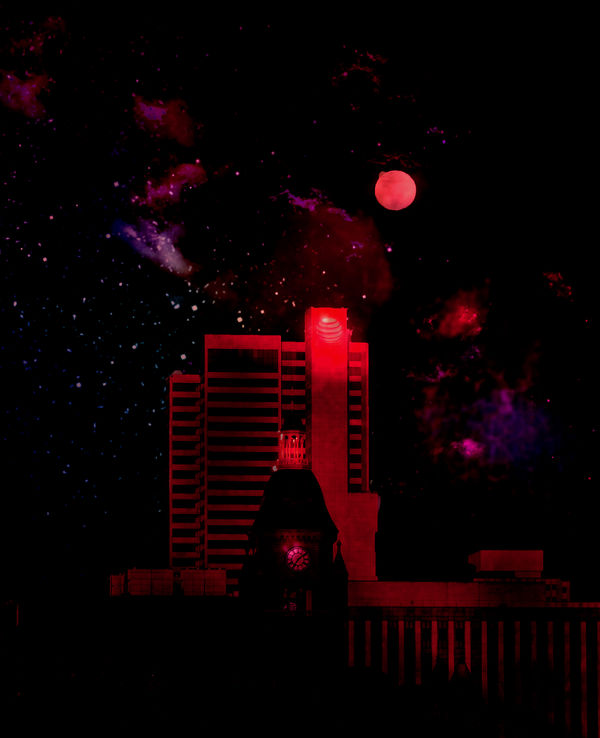
I have been learning how to create nebula art in PS and I am combining it with my photography. This is my first attempt at creating my own. I took the photo last night as an almost full moon was rising over downtown Dallas. I hope you enjoy it.
Mar 20, 2019 15:56:07 #
Wow doesn't quite cover it. When I opened it the ATT(?) building jumped right out at me. Took a little time for my eyes to move around and assimilate all that is in there. As usual your technique is flawless. I really hope to see this part of you evolve.
Mar 20, 2019 16:21:35 #
Mar 20, 2019 16:21:58 #
kenievans
Loc: Dallas
Curmudgeon wrote:
Wow doesn't quite cover it. When I opened it the ATT(?) building jumped right out at me. Took a little time for my eyes to move around and assimilate all that is in there. As usual your technique is flawless. I really hope to see this part of you evolve.
I'm glad you like it. As I learn new techniques in PS it is definitely leading me into a different type of photographic art. Now I need to learn how to make my own texture layers so it really is all mine. I will get there. 9 more years until retirement!

Mar 20, 2019 16:23:58 #
Mar 20, 2019 16:24:44 #
kenievans wrote:
I'm glad you like it. As I learn new techniques in PS it is definitely leading me into a different type of photographic art. Now I need to learn how to make my own texture layers so it really is all mine. I will get there. 9 more years until retirement!
Hang in there it will come. Just remember: Retirement is not all it's cracked up to be--It's a whole lot better than that.

Mar 20, 2019 18:01:57 #

Mesmerizing! When you get a chance, talk a little about the process. Thanks Keni; you are inspiring as always!
Mar 20, 2019 19:09:53 #
kenievans
Loc: Dallas
Linda From Maine wrote:
Mesmerizing! When you get a chance, talk a little about the process. Thanks Keni; you are inspiring as always!
You know Linda.....everything is easy once you learn how to do it!
The first step in creating a Nebula in PS is creating Space with stars. You start with a new blank layer and change it to black. You can use Cntrl Delete to make it black or invert it.
Add a monochromatic noise filter with lots of noise, about 180%. Add a Blur More filter. This will increase the number of grey pixels in the noise.
Add a Levels adjustment to the layer. There are three adjustments arrows under the histogram in the levels adjustment. Move the first arrow to the right as much as you need to in order to turn the screen black with pinpoints of light showing. Those are your stars. The further to the right you go, the less stars will show. Adjust the third arrow back to the left to increase the "brilliance" of the stars. I then use a Sun brush I downloaded and make it very small to add larger stars scattered around, varying the size to increase the sense of depth. Now you have Space the final frontier! I make this my background layer.
To create the cloud nebulas I use a cloud brush set at a lower opacity (25-35). You can either paint the clouds in different colors or apply a color/texture layer over the space layer to add color. It depends on where you are going to go with it. Applying the color layer colors all the stars. Using the brush just colors the stars behind the clouds.
I add a color/texture layer above the star background and set it the blend mode to Vivid Light. I then added my skyline photo layer and masked (blacked) out the sky. I added a different color/texture layer on top of the photo layer and used the Linear Light blend mode. A couple of other adjustments for Hue and brightness and its done.
For those of you that have access to Lynda.com tutorials here is the link to the tutorial I found. This instructor is amazing and does lots of little short videos of different tricks and techniques for using PS as a graphics tool.
https://www.lynda.com/Photoshop-tutorials/Creating-galaxy-Photoshop-Building-star-field/122998/196478-4.html?autoplay=true
Mar 20, 2019 19:14:43 #
kenievans wrote:
Thank you so much for this!You know Linda.....everything is easy once you lea... (show quote)
Mar 21, 2019 05:34:11 #

"This is my first attempt at creating my own."
Stop now, retire a champ, it can get no better than this masterpiece. The effect is fascinating.
Stop now, retire a champ, it can get no better than this masterpiece. The effect is fascinating.
Mar 21, 2019 07:03:47 #

kenievans wrote:
I have been learning how to create nebula art in PS and I am combining it with my photography. This is my first attempt at creating my own. I took the photo last night as an almost full moon was rising over downtown Dallas. I hope you enjoy it.
Mar 21, 2019 07:17:19 #
Mar 21, 2019 08:51:33 #
My, my, you’re galloping now Keni! All very nicely done and I congratulate you on your unstoppable progress with Ps. Don’t forget, you can add a mask to any layer, so colour and texture can be selectively added even though it’s potentially able to affect the whole image.
Mar 21, 2019 09:45:15 #

It is good to see your skills becoming focused on something of your own creation. May this be a new and exciting horizon, making your work more and more your own, creative art.
Mar 21, 2019 15:54:30 #
kenievans
Loc: Dallas
dpullum wrote:
"This is my first attempt at creating my own."
Stop now, retire a champ, it can get no better than this masterpiece. The effect is fascinating.
Stop now, retire a champ, it can get no better than this masterpiece. The effect is fascinating.
I am sure that was very tongue in cheek but I appreciate it none the less. Thanks!
If you want to reply, then register here. Registration is free and your account is created instantly, so you can post right away.