How to make transparent border?
Mar 16, 2019 21:04:14 #

I have seen photos on the site which appear to have a transparent border and I'd like to know how this is accomplished. I may not be using the correct words, but take for example a photo of a bunch of flowers all right next to each other, and then the photo shows a border of the same photo, but the border is slightly transparent.
I'm probably not explaining very well what I'm looking for. I tried searching for it but all I could find were discussions on the border wall!
Does anyone know what I'm referring to and can you point me to an explanation of how to do it? Or even to at least a sample photo? The ones I've seen are usually done with flowers.
Thanks in advance for your help!
Mar 16, 2019 21:19:54 #
cosmo54 wrote:
I have seen photos on the site which appear to hav... (show quote)
It is very easy to do, all you do after applying your border ( in whatever color), you just lower the opacity to the point that suits you best!
Mar 16, 2019 21:25:58 #
The border would be the same as the actual photo, just almost transparent. So do you have the border layer with a low opacity and then put the regular photo cropped smaller, on top of that?
I thi k I have found the person who has done this before so I'm going to PM him(or her)!
I thi k I have found the person who has done this before so I'm going to PM him(or her)!
Mar 16, 2019 21:29:39 #

cosmo54 wrote:
The border is the top layer. Position it to the inside of the original image; then there is no cropping or additional composite work involved. When the border is on a separate layer, you can change not only the opacity, but the blend mode for different looks.So do you have the border layer with a low opacity and then put the regular photo cropped smaller, on top of that?
btw, I did this with an online app called befunky. I just so happened to have discussed the app a bit in this topic in PP Forum today

Mar 16, 2019 21:31:05 #

Linda From Maine wrote:
The border goes inside the image dimensions, so there is no cropping involved. When the border is on a separate layer, you can change not only the opacity, but the blend mode for different looks.
THanks Linda.
Mar 16, 2019 22:30:38 #
Thank you so much Linda! I'll give it a try tomorrow!!!!
Mar 17, 2019 02:34:29 #

Linda From Maine wrote:
The border is the top layer. Position it to the i... (show quote)
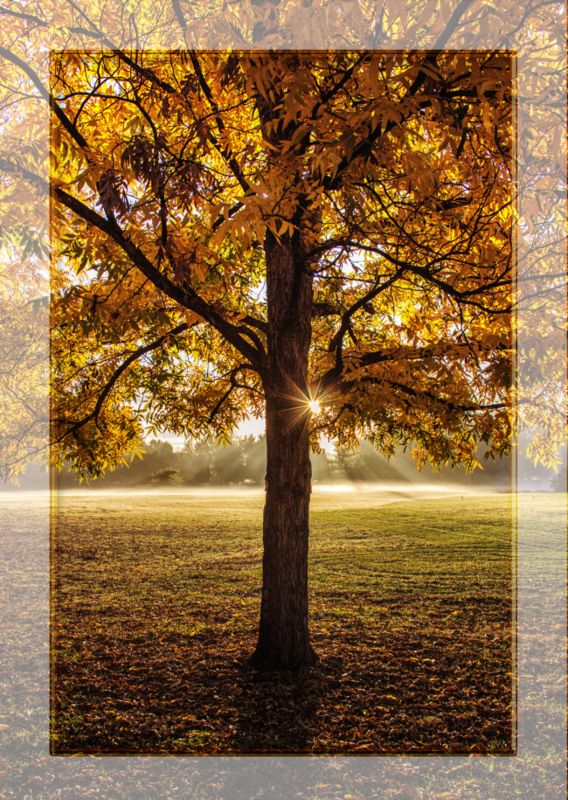
That is a very nice faux border, it looks great. And a great creative shot Linda, with the back lighting bringing out those great fall colors and the sunburst, and crepuscular rays.
Mar 17, 2019 02:36:20 #
Linda From Maine wrote:
The border is the top layer. Position it to the i... (show quote)
That is a very nice faux border, it looks great. And a great creative shot Linda, with the back lighting bringing out those great fall colors and the sunburst, and crepuscular rays.
Mar 17, 2019 08:05:02 #
JD750 wrote:
Appreciate your comments, JD. That's the first time I'd tried that effect (the frame itself is a stock image png) - all thanks to our OP!That is a very nice faux border, it looks great. And a great creative shot Linda, with the back lighting bringing out those great fall colors and the sunburst, and crepuscular rays.
Mar 17, 2019 08:15:16 #


Mar 17, 2019 08:30:09 #

Mar 17, 2019 08:32:49 #
ronichas wrote:
The $35/year version is quite amazing Thanks for the info about Befunky. I just played with it...looks great!!!

Mar 17, 2019 08:35:22 #
Linda From Maine wrote:
The $35/year version is quite amazing
I think it is now $59.88
Mar 17, 2019 08:36:34 #
An easier, quicker way: Draw a border with the marquee tool, invert the selection for the border area, then go to adjustments and increase brightness in the selected area. Deselect and you're done!
Don't think of the border as being transparent, but rather as simply being brighter than the rest of the image.
Don't think of the border as being transparent, but rather as simply being brighter than the rest of the image.
Mar 17, 2019 08:46:41 #
ronichas wrote:
Oh crikey, glad you mentioned that; thanks!I think it is now $59.88
If you want to reply, then register here. Registration is free and your account is created instantly, so you can post right away.