Border Patrol aka Custom Decorative Borders.
This topic is locked to prevent further replies.
Feb 25, 2019 18:59:22 #
Guyserman
Loc: Benton, AR
No, I'm not getting political. This is an account of how I make borders for my images. There are several steps and it may seem a little tedious but you will grasp the concept quickly and eventually be able to breeze through the process. My demo took less than 30 minutes and that included making screen prints. You never know exactly what you will have when you finish but you will have a pretty good idea and some of the results are nothing less than fabulous. So here we go.
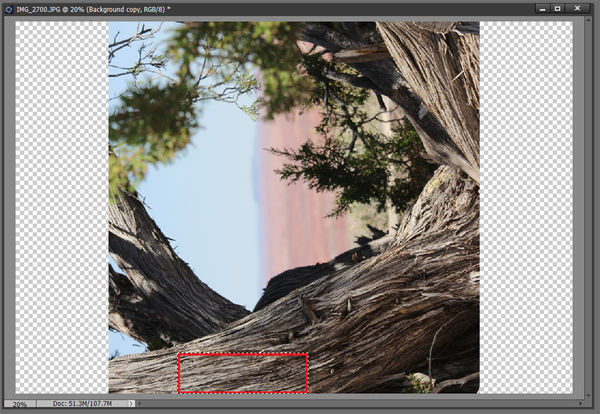
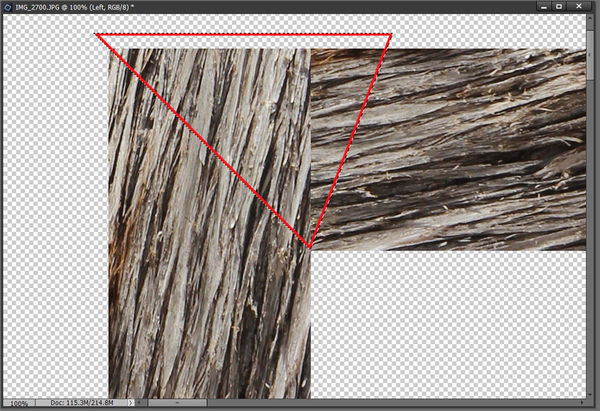
* Choose a picture and duplicate the background. Choose an area to use and make a rectangular selection. In my demo I rotated the picture so that the streaks would be running generally lengthwise in my selection. The red lines were put there only to show what I selected. (#1)
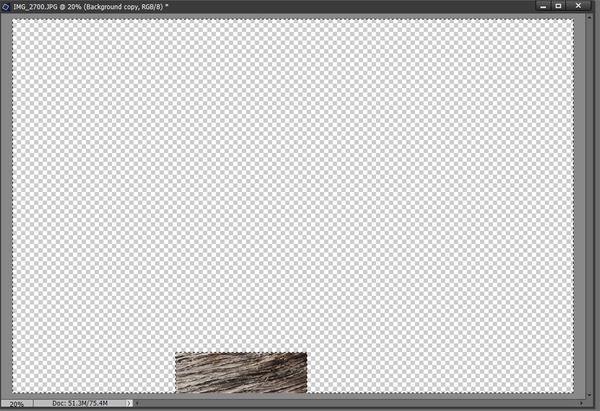
* Inverse the selection and clear to transparent everything except your original selection. Hide the background layer to make your work easier. (#2)
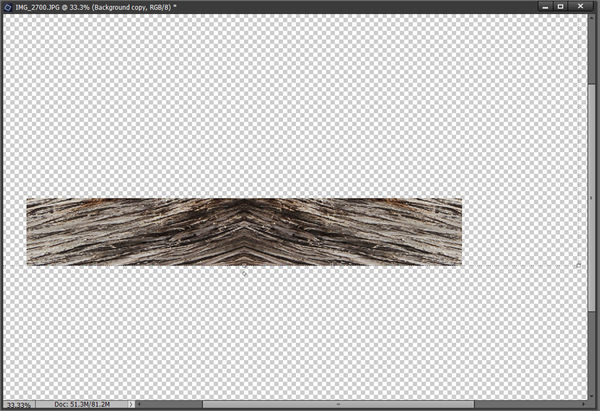
* Duplicate the layer and flip one of the layers horizontally. Position the two layers end to end to form a symmetric section. Merge the two layers together. (#3)
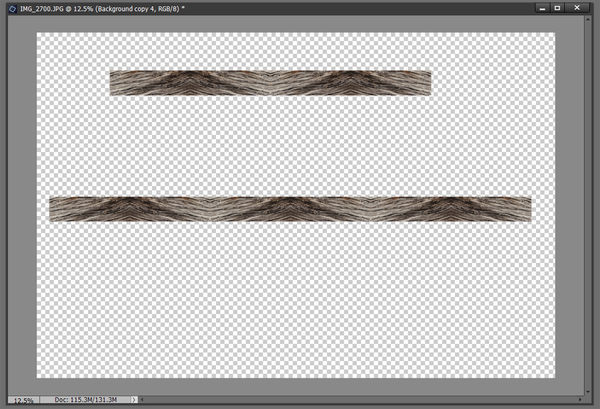
* Duplicate the new layer four times giving a total of 5 layers of that symmetrical image. Align two of them end to end and merge into one layer to be used as the short edge. Align the other three end to end and merge into one layer to be used along the long edge. (#4)
* Duplicate the short edge layer and rotate them in opposite directions. Duplicate the long edge layer and flip one of them vertically. Arrange the four layers to form a rectangle. Be sure that similar edges are facing inward and similar edges are facing outward.
* Zoom in on a corner and see that one image is on top of the other. Make sure only the top layer at that corner is selected. Use the Polygonal Lasso Tool to draw a diagonal line across the corner and select and delete the end of the top image. The red line here is only to show what was selected. Repeat at the other three corners. (#5)
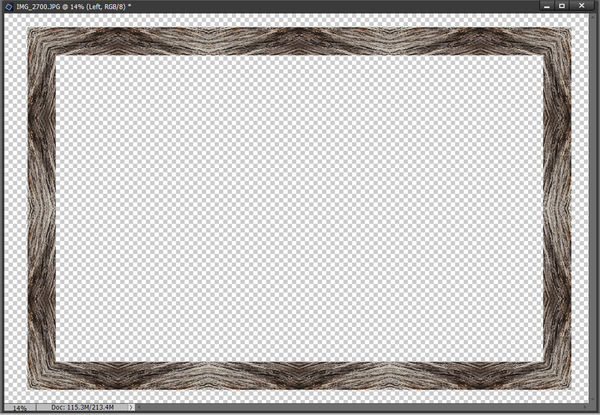
* Merge the four layers forming the four sides and Voila! You have decorative border with a 3x2 aspect. (#6)
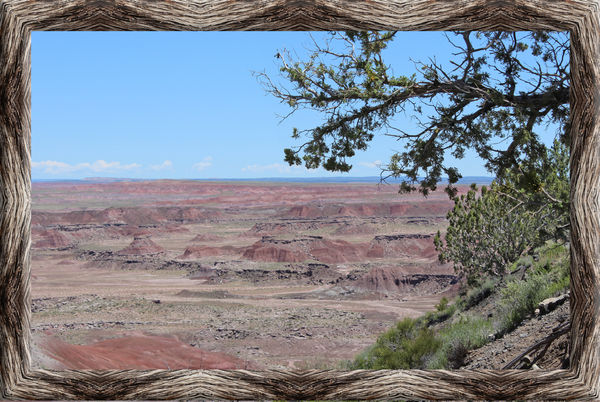
* Layer onto a photograph and resize as necessary. I have added a small bevel and increased the contrast somewhat. (#7)
* Choose a picture and duplicate the background. Choose an area to use and make a rectangular selection. In my demo I rotated the picture so that the streaks would be running generally lengthwise in my selection. The red lines were put there only to show what I selected. (#1)
* Inverse the selection and clear to transparent everything except your original selection. Hide the background layer to make your work easier. (#2)
* Duplicate the layer and flip one of the layers horizontally. Position the two layers end to end to form a symmetric section. Merge the two layers together. (#3)
* Duplicate the new layer four times giving a total of 5 layers of that symmetrical image. Align two of them end to end and merge into one layer to be used as the short edge. Align the other three end to end and merge into one layer to be used along the long edge. (#4)
* Duplicate the short edge layer and rotate them in opposite directions. Duplicate the long edge layer and flip one of them vertically. Arrange the four layers to form a rectangle. Be sure that similar edges are facing inward and similar edges are facing outward.
* Zoom in on a corner and see that one image is on top of the other. Make sure only the top layer at that corner is selected. Use the Polygonal Lasso Tool to draw a diagonal line across the corner and select and delete the end of the top image. The red line here is only to show what was selected. Repeat at the other three corners. (#5)
* Merge the four layers forming the four sides and Voila! You have decorative border with a 3x2 aspect. (#6)
* Layer onto a photograph and resize as necessary. I have added a small bevel and increased the contrast somewhat. (#7)
Feb 25, 2019 19:16:13 #

Feb 25, 2019 19:18:31 #
Very nice! I am still trying to decide if this particular frame draws my eye into or away from the landscape.
Feb 26, 2019 06:20:04 #

I have used the same thing for making frames when there is not a frame to match the picture..
Feb 26, 2019 07:48:29 #

Thanks; great tutorial. I've added to the resource doc on PP Forum's home page:
https://www.uglyhedgehog.com/s-116-1.html
Specifically, the third stickied topic:
https://www.uglyhedgehog.com/t-156310-1.html
.
https://www.uglyhedgehog.com/s-116-1.html
Specifically, the third stickied topic:
https://www.uglyhedgehog.com/t-156310-1.html
.
Feb 26, 2019 07:50:08 #

Feb 26, 2019 07:54:27 #

Feb 26, 2019 13:06:57 #
Thanks so much. I've copied it and saved to my "How to do things in Photoshop" file. Bev
Feb 26, 2019 13:27:05 #

Linda From Maine wrote:
Thanks; great tutorial. I've added to the resource doc on home page 
Where might I find this doc? I went to Home page, clicked on "Links & Resources" and didn't see it... - is that the area you are referring to?
Feb 26, 2019 14:02:12 #
tommystrat wrote:
Sorry, PP Forum's home page:Where might I find this doc? I went to Home page, clicked on "Links & Resources" and didn't see it... - is that the area you are referring to?
https://www.uglyhedgehog.com/s-116-1.html
Specifically, the third stickied topic:
https://www.uglyhedgehog.com/t-156310-1.html
I'll edit my earlier mention. Thanks!
Feb 27, 2019 03:48:57 #
Mar 1, 2019 07:02:33 #
When I started doing hand drawn colored portraits back in 1980 I worked with a professional as far as what frame to pick . I was told to always use a color that is in the picture for the frame and matting if used . Looking at your finished picture without clicking on the download . The frame color works great with the picture and the frame makes the effect to my eyes that I am looking thru a window and over looking the area that you see in the picture . Well done , Tommy
Mar 1, 2019 07:10:02 #
Guyserman
Loc: Benton, AR
kubota king wrote:
When I started doing hand drawn colored portraits back in 1980 I worked with a professional as far as what frame to pick . I was told to always use a color that is in the picture for the frame and matting if used . Looking at your finished picture without clicking on the download . The frame color works great with the picture and the frame makes the effect to my eyes that I am looking thru a window and over looking the area that you see in the picture . Well done , Tommy
Thanks, k king. I always have that principle in mind when I choose my beginning sample. Sometimes I choose it right out of the image I am going to frame as long as that color is contained inside the image and not at the edge.
Your comment is appreciated.
If you want to reply, then register here. Registration is free and your account is created instantly, so you can post right away.