Setup image to print - image size and canvas size
Dec 1, 2018 17:10:27 #

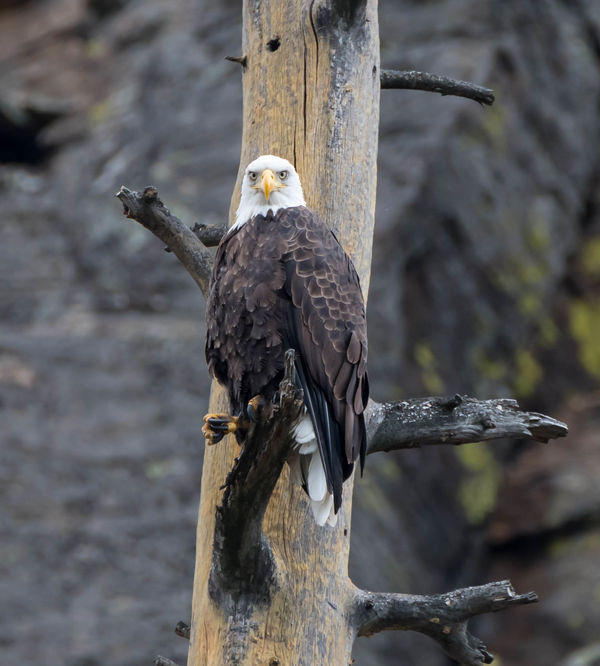
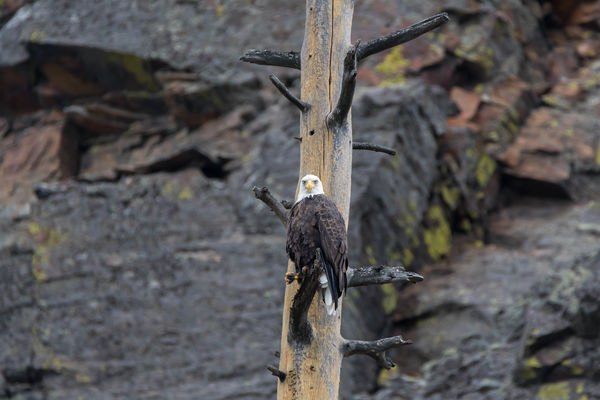
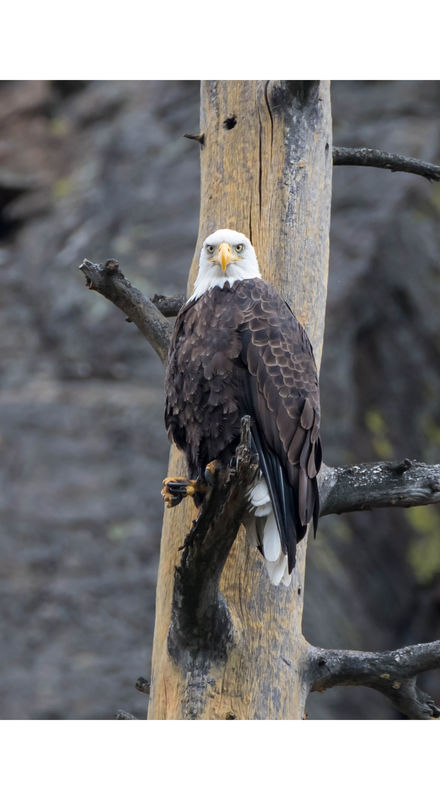
Hi everyone, I am trying to learn how to setup an image to have the image print to fit in a frame with a 2" matt. Take this picture of the eagle...I have a frame that is 20hx11w with a 2" frame - that would mean I want my picture size to be 16hx7w....correct? How do I set the size of the picture and then set the size of the canvas without making the eagle look elongated. The cropped picture is what I would like to print...do I need to change how the photo is cropped?
I have Lr6 and Affinity (still learning Affinity).
Thanks
Cindy
I have Lr6 and Affinity (still learning Affinity).
Thanks
Cindy
Dec 1, 2018 17:16:58 #
By far the easiest would be an 7x16 image on an 11x20 canvas. I think your bird is gonna be kinda small in a horizontal frame.
IMHO, of course
IMHO, of course
Dec 1, 2018 17:43:53 #

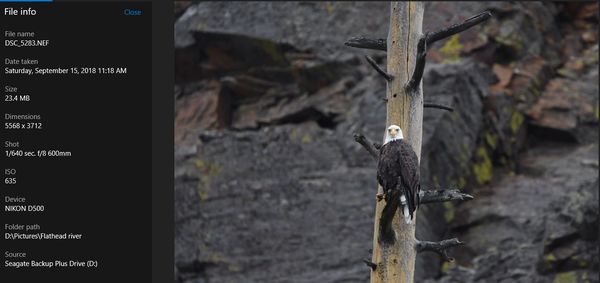
Cindy - You didn’t mention what camera (platform) this fine image was captured with or what the dimensions were of your cropped image. Out of curiousity I saved a copy of the cropped image and examined it on my iPad. The image is small - 600x666 with a resolution of 240. It might be difficult for a lab to enlarge the photo to meet your request. Cropping the photo further just makes the dimensions worse.
Dec 1, 2018 17:54:06 #
rjaywallace wrote:
Cindy - You didn’t mention what camera (platform) this fine image was captured with or what the dimensions were of your cropped image. Out of curiousity I saved a copy of the cropped image and examined it on my iPad. The image is small - 600x666 with a resolution of 240. It might be difficult for a lab to enlarge the photo to meet your request. Cropping the photo further just makes the dimensions worse.
I have the original raw file that is 23 mg...taken with a nikon d500, tamron 150-600 lens....so I must be doing something wrong when exporting to make the jpg that small. I edit in Lightroom but also have Affinity program...not very good with the Affinity program yet.
Dec 1, 2018 17:56:55 #

I would set the crop-box to a 16x7 (or 7x16) ratio, lock the setting, and size and move the crop box for the composition you like.
Can you re-size the editor canvas to the desired size then?
Can you re-size the editor canvas to the desired size then?
Dec 1, 2018 18:00:05 #
TBerwick
Loc: Houston, Texas
You don't have to 2" borders both top/bottom & sides. You could make the top & bottom 1.5" which might help with the proportions.
Dec 1, 2018 18:29:21 #
Longshadow wrote:
I would set the crop-box to a 16x7 (or 7x16) ratio, lock the setting, and size and move the crop box for the composition you like.
Can you re-size the editor canvas to the desired size then?
Can you re-size the editor canvas to the desired size then?
Thanks!! I think I got it...this one should print out to fit in the frame/mat I have if I print the standard size of 12x18 and just center it instead of trying to get it to print out exactly the size the matt is. I have enough room at the top & bottom in the border to adjust and enough room on the left/right to be able to adjust.
Dec 1, 2018 18:52:52 #
Cany143
Loc: SE Utah
I mean you no disrespect, Cindy, but I'm going to give you an uniquely UHH style of reply. That, of course, translates to: a)this is what I do, and you should do the same, and b)this reply will not answer the question you asked.
From the 'a' column: since about, oh, forever, I've subscribed to the gallery/museum approach with regard to matting and framing. My reason(s) for doing so are several, but basically, I think you're going about it slightly backwards in the sense that like most (many? the few? whatever...), you want to put an original work into a mass- (or pre-)produced mat/frame environment. A workable analogy might be, you want to put a square peg into a round hole. It can be done, but the results might come out a little.... well.....
When I've printed something, that's it. That's the only time that particular image will get printed, and good or bad, its intended to be something that's the only one of its kind. Some images require being printed large, others are better smaller, but the actual image size should determine the size of its mount, its mat, and its frame, not the other way around. There are a variety of approaches, from 'classic' to 'contemporary' to 'avant garde,' but I decided long ago to stick with a generally 'traditional' treatment would be, to use the picture dimensions you stated as an example, 16" high x 7" wide would be (dry) mounted onto archival mount board. Then, planning for a 1/4" space on the top and sides of the image, and 3/8" to 5/8" (this variable would be determined by the usual/appropriate amount of space my signature/date/title (if included) would best fit the particular work. In this instance, let's just say I'd allow for a 1/2" space for hand-signed info below the print. (With most artwork, photography included, hand-signed is always best. Watermarked 'signatures,' whether they be placed photographically using some fancy font or a watermarked 'signature' based on your actual hand, are 'nice,' but have no intrinsic 'value' when it comes to a work of art.) Personally, I never sign a photograph. I always sign the mat board that the photograph is permanently attached to; so consequently, this requires allowing for some extra 'signature' space being incorporated into the inner dimensions when the aperture of the mat is cut. In this case, the inside dimensions of your mat would be: 16.75" high x 7.5" wide. On an image of that size, I'd probably want a 2" (or probably, 2.5", but for the sake of simplicity, let's say 2") border on the top and sides, and 2.5" (to 3", same sake of simplicity applied) on the bottom, between the beveled cut of the aperture and the inner edge of the frame, making the outer dimensions of the now mounted and matted piece exactly 21.25" high x 11.5". And those would be the inner mounting area/size dimensions I'd specify when ordering (or making) the frame I'd chosen for the piece. The outer dimensions of the frame would be whatever width the frame had been chosen would be.
The column b) approach would be, take your 20" x 11" pre-made frame, get a pre-cut mat to fit the frame's dimensions (it'll probably have equal side, top and bottom measurements, most likely an inch or two), eyeball your image, visualizing how big or how small you want your eagle and the tree its perched in to appear, print your image, 'float' the printed image around in the mat until it looks good to you, and tape it in place.
Dec 1, 2018 19:06:59 #
Cany143 wrote:
I mean you no disrespect, Cindy, but I'm going to ... (show quote)
Love your explanation...your first paragraph made me smile!!
I want to print this out just for me...no mass production...no signature required, my grampa made the frame and the color of the mat (I think) would look great with this eagle picture...that's why I am trying to learn the steps to setup the sizing correctly.
So Column B will be my approach...at least till I get better at this stuff!!

Dec 1, 2018 19:10:09 #
Linary
Loc: UK
rjaywallace wrote:
Cindy - You didn’t mention what camera (platform) this fine image was captured with or what the dimensions were of your cropped image. Out of curiousity I saved a copy of the cropped image and examined it on my iPad. The image is small - 600x666 with a resolution of 240. It might be difficult for a lab to enlarge the photo to meet your request. Cropping the photo further just makes the dimensions worse.
The cropped image is actually 2109 x 2342 pixels with a print resolution of 240 ppi)
Dec 1, 2018 19:35:16 #
Cany143
Loc: SE Utah
CindyHouk wrote:
Love your explanation...your first paragraph made me smile!!
I want to print this out just for me...no mass production...no signature required, my grampa made the frame and the color of the mat (I think) would look great with this eagle picture...that's why I am trying to learn the steps to setup the sizing correctly.
So Column B will be my approach...at least till I get better at this stuff!!
Whew! I was worried I'd come off sounding like..... well........... whatever.
Frankly, now that I know your frame was made by your grampa, that changes things considerably. That frame is significant, and whatever goes into it should not only be likewise, it should compliment the frame's physical dimensions. I'd suggest you save that frame for an image that better suits it, size wise. And about signing whatever image that might eventually be? Y'might want to think about that some more. I'd bet your grandkids, or their grandkids, might like knowing what you and your grampa did.... and there's her signature, right there Mr. Metropolitan Museum of Art Man!
Dec 1, 2018 19:49:12 #
CindyHouk wrote:
Love your explanation...your first paragraph made me smile!!
I want to print this out just for me...no mass production...no signature required, my grampa made the frame and the color of the mat (I think) would look great with this eagle picture...that's why I am trying to learn the steps to setup the sizing correctly.
So Column B will be my approach...at least till I get better at this stuff!!
I want to print this out just for me...no mass production...no signature required, my grampa made the frame and the color of the mat (I think) would look great with this eagle picture...that's why I am trying to learn the steps to setup the sizing correctly.
So Column B will be my approach...at least till I get better at this stuff!!
Nothing wrong with the "Column B" approach, I still use it sometimes.

Dec 1, 2018 20:29:00 #
Longshadow wrote:
Nothing wrong with the "Column B" approach, I still use it sometimes.

Dec 2, 2018 12:01:11 #
Framing an other than standard photo size usually means a custom matting is needed? The paper size an be standard and need only be larger than the print to the point where it would be able to be worked with and comfortably matted.
Dec 2, 2018 12:09:36 #
I normally size my pictures at 300 dpi instead of 240 dpi. Not sure if the difference is percepable or not
If you want to reply, then register here. Registration is free and your account is created instantly, so you can post right away.