DIY Precision Stack & Stitch System
Nov 25, 2018 18:26:35 #

Hello,
As somewhat of a followup to this older thread regarding modifying the Wemacro Vertical Stand for horizontal use, I've been developing a S&S setup based upon the Wemacro Vertical Stand and a Precision Thor Labs setup.
https://www.uglyhedgehog.com/t-539182-1.html
You can follow the details in these threads below.
https://www.photomacrography.net/forum/viewtopic.php?t=38511
https://www.photomacrography.net/forum/viewtopic.php?t=38512
https://www.photomacrography.net/forum/viewtopic.php?t=38548
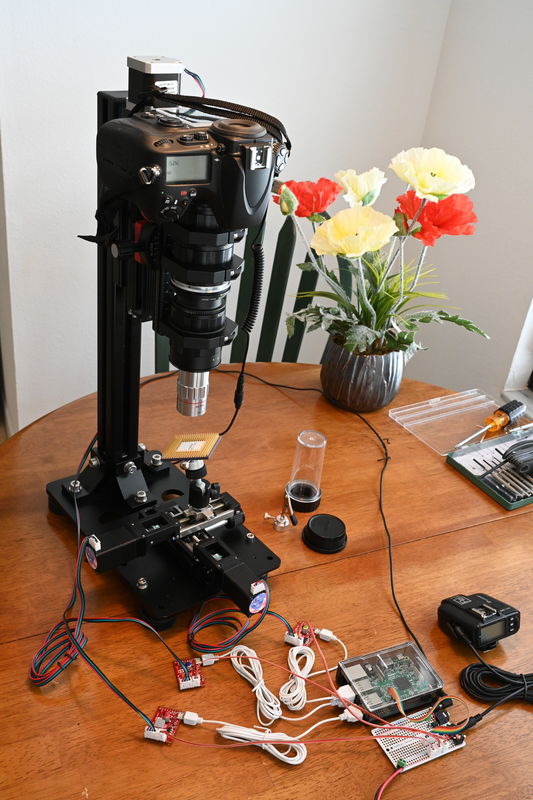
Stack and Stitching involves taking multiple image focus stacks, usually with somewhat high magnifications, then move the camera/lens and/or subject and repeat. You end up with a bunch of images that need to be first focus stacked using specialized software (Zerene for example) at each location, then the post stacked images are stitched together like a panorama. The resultant final image has very high resolution, much more than a normal camera/lens can deliver, but utilizes available components. I have done this (~19000 X 13000 pixels) partly manually, and can tell you first hand it's very time consuming and tedious.
Commercial systems are available to help, but are expensive, and some have limited computer compatibility. So after doing a few S&S sessions manually, I decided to attempt with my cheap Harbor Freight drill press, a few drills and taps, and a soldering iron to create my own precision S&S system. I also don't have any programming skills, and my computer knowledge is quite limited!!
I've spent lots of time "thinking" about how I wanted things to work and decided not to use available software or other techniques...I wanted this work the way I wanted rather than adapted to "fit" another protocol.
I decided to have the initial system be vertically based and move the camera/lens with a precision motorized rail for focus stacking and move the subject for the stitching regions with other less precise motorized rails. My precision setup is horizontally based, so I ordered a 95mm vertical extruded bar (Thor Labs) which is bolted to a sliding rail. The idea was to have the camera/lens attached to a motorized focus rail and move Z axis vertically mounted to this 95mm bar. The subject would be mounted to a X and Y positioning motorized rails, which can be less precise. Then I realized I could use the Wemacro Vertical Stand for this as well, so I decided to use the Wemacro setup as my developing setup rather than the Thor Labs setup, since the Wemacro is smaller and portable.
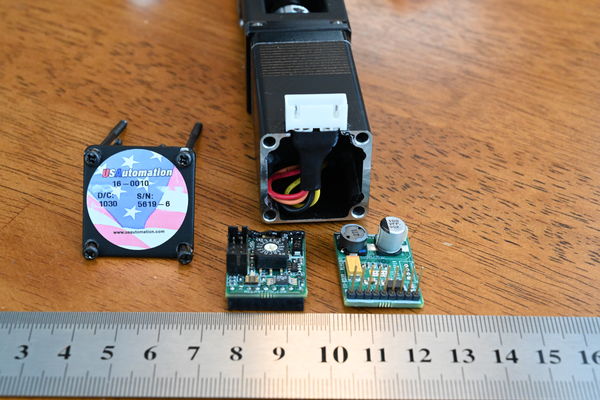
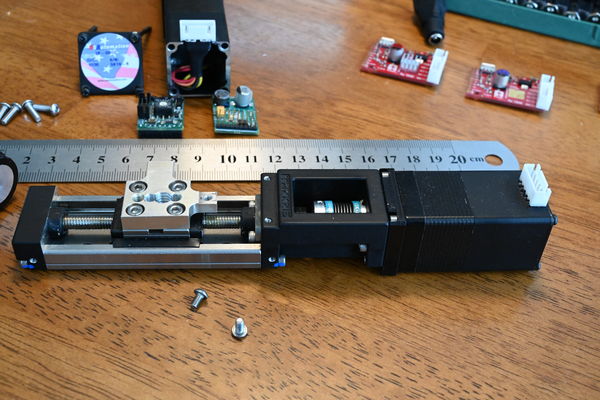
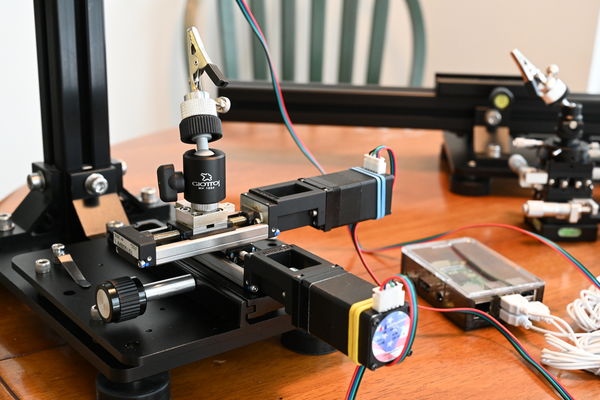
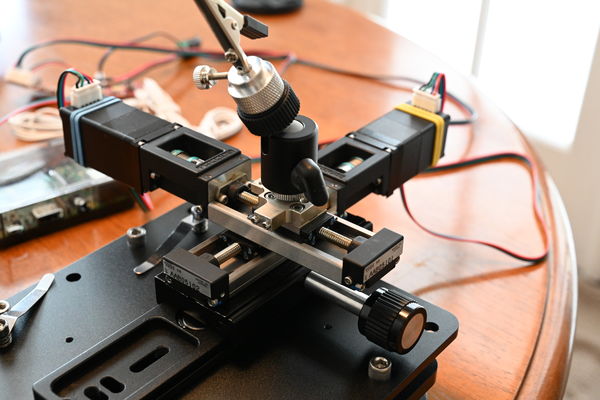
Small motorized rails were what I wanted for the X and Y stage, I could (and did) use larger rails but they were too big and awkward for my usual subjects (Silicon chips). Ebay came to rescue with some small US Automated THK KR15s. These are nice small rails that with a little work can be modified for our macro use, please see the other threads for details. I removed the electronics and wired the stepper motor to an external connectors as shown. I need 2 stepper rails for X and Y and mounted one KR-15 on top the other at right angles, the bottom KR-15 is directly mounted to a long ARCA clamp.
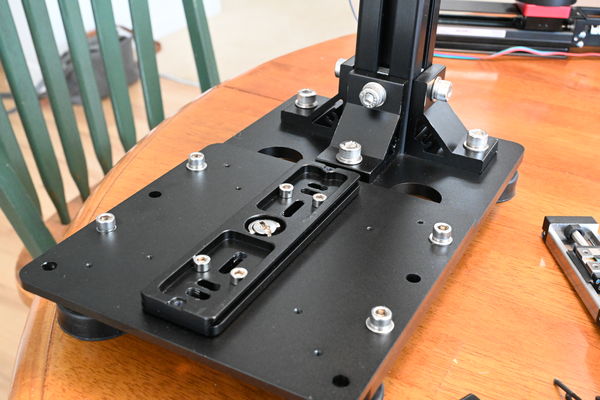
Now mounting this X & Y setup to the Wemacro base was by way of a secured (4 M5 bolts) ARCA plate attached to a Wemacro plate that bolts (4 1/4-20 bolts) to the base as shown. The Z axis is handled by the standard Weamcro setup.
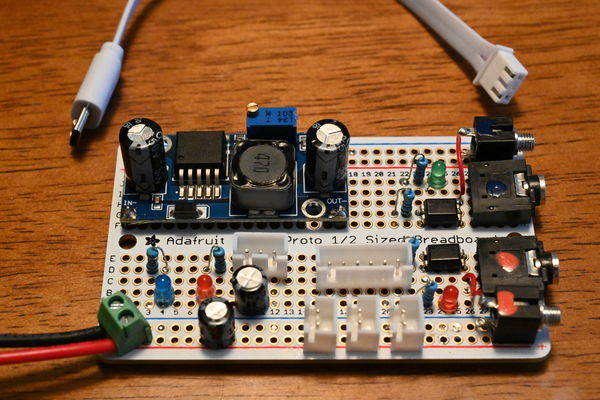
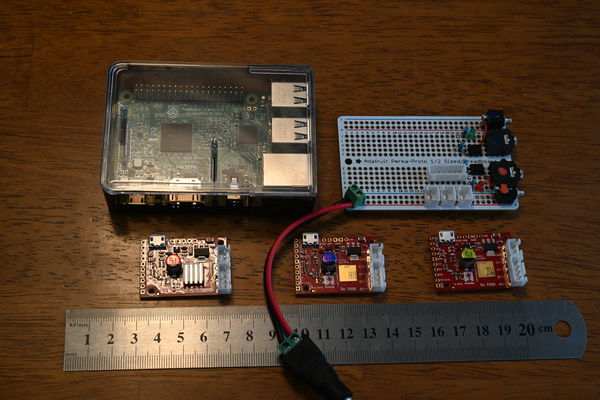
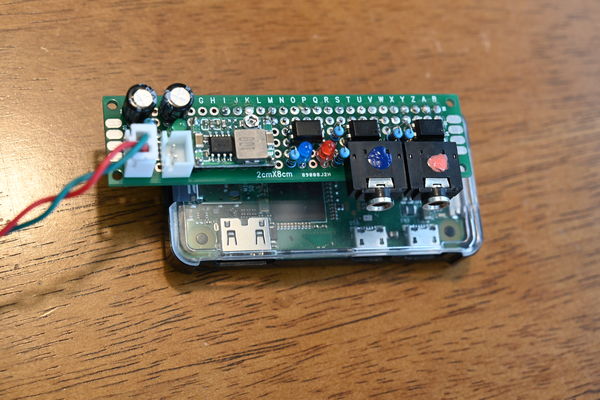
For the electronics the Raspberry Pi was chosen as the base computer, with Pololu Tic-500 as the motor controllers (3). For triggering the camera (and strobes) an optical isolated circuit was used and this allows separate triggering of the strobe/flash without using the camera hotshot. Almost all cameras EFCS and ESCS (all electronic shutter) blocks Hot Shoe triggering during this mode, the work around is to create a separate trigger for the strobe/flash that places the exposure within the shutter opening.
Operating software was created on the Raspberry Pi 3B in Python, these are amazing computers and only cost $35!! Even the tiny $10 Raspberry Pi Zero W will run the entire setup without issue (a little slow though). These Raspberries can operate under VNC mode where no monitor, keyboard or mouse is required with the Raspberry, you have a true remote desktop application which can operate anywhere within your router range!! All 3 Tic-500s are connected by USB, these are splendid controllers (from the folks from MIT, as is Python I believe) that can operate just about any stepper motor system that a macro photographer would need. They have a mode where the motor currents are partially recycled back to the power supply rather than wasted to ground, this allow the entire system, including Raspberry Pi 3B and all controller and electronics, 2 NEMA 11 Stepper motors (KR-15) and a NEMA 17 Stepper motor (KR-20) to operate from a single 12 volt 2.5 amp supply!!
For more details on the development & components of this system and the Thor Labs setup please use the links provided.
Anyway, I hope this helps some DIYers with limited resources (like me!) that may be thinking of tackling a project like this...you can do it!!
Best,
Mike
As somewhat of a followup to this older thread regarding modifying the Wemacro Vertical Stand for horizontal use, I've been developing a S&S setup based upon the Wemacro Vertical Stand and a Precision Thor Labs setup.
https://www.uglyhedgehog.com/t-539182-1.html
You can follow the details in these threads below.
https://www.photomacrography.net/forum/viewtopic.php?t=38511
https://www.photomacrography.net/forum/viewtopic.php?t=38512
https://www.photomacrography.net/forum/viewtopic.php?t=38548
Stack and Stitching involves taking multiple image focus stacks, usually with somewhat high magnifications, then move the camera/lens and/or subject and repeat. You end up with a bunch of images that need to be first focus stacked using specialized software (Zerene for example) at each location, then the post stacked images are stitched together like a panorama. The resultant final image has very high resolution, much more than a normal camera/lens can deliver, but utilizes available components. I have done this (~19000 X 13000 pixels) partly manually, and can tell you first hand it's very time consuming and tedious.
Commercial systems are available to help, but are expensive, and some have limited computer compatibility. So after doing a few S&S sessions manually, I decided to attempt with my cheap Harbor Freight drill press, a few drills and taps, and a soldering iron to create my own precision S&S system. I also don't have any programming skills, and my computer knowledge is quite limited!!
I've spent lots of time "thinking" about how I wanted things to work and decided not to use available software or other techniques...I wanted this work the way I wanted rather than adapted to "fit" another protocol.
I decided to have the initial system be vertically based and move the camera/lens with a precision motorized rail for focus stacking and move the subject for the stitching regions with other less precise motorized rails. My precision setup is horizontally based, so I ordered a 95mm vertical extruded bar (Thor Labs) which is bolted to a sliding rail. The idea was to have the camera/lens attached to a motorized focus rail and move Z axis vertically mounted to this 95mm bar. The subject would be mounted to a X and Y positioning motorized rails, which can be less precise. Then I realized I could use the Wemacro Vertical Stand for this as well, so I decided to use the Wemacro setup as my developing setup rather than the Thor Labs setup, since the Wemacro is smaller and portable.
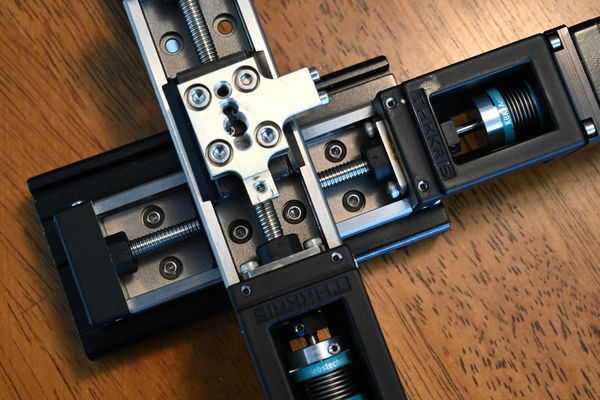
Small motorized rails were what I wanted for the X and Y stage, I could (and did) use larger rails but they were too big and awkward for my usual subjects (Silicon chips). Ebay came to rescue with some small US Automated THK KR15s. These are nice small rails that with a little work can be modified for our macro use, please see the other threads for details. I removed the electronics and wired the stepper motor to an external connectors as shown. I need 2 stepper rails for X and Y and mounted one KR-15 on top the other at right angles, the bottom KR-15 is directly mounted to a long ARCA clamp.
Now mounting this X & Y setup to the Wemacro base was by way of a secured (4 M5 bolts) ARCA plate attached to a Wemacro plate that bolts (4 1/4-20 bolts) to the base as shown. The Z axis is handled by the standard Weamcro setup.
For the electronics the Raspberry Pi was chosen as the base computer, with Pololu Tic-500 as the motor controllers (3). For triggering the camera (and strobes) an optical isolated circuit was used and this allows separate triggering of the strobe/flash without using the camera hotshot. Almost all cameras EFCS and ESCS (all electronic shutter) blocks Hot Shoe triggering during this mode, the work around is to create a separate trigger for the strobe/flash that places the exposure within the shutter opening.
Operating software was created on the Raspberry Pi 3B in Python, these are amazing computers and only cost $35!! Even the tiny $10 Raspberry Pi Zero W will run the entire setup without issue (a little slow though). These Raspberries can operate under VNC mode where no monitor, keyboard or mouse is required with the Raspberry, you have a true remote desktop application which can operate anywhere within your router range!! All 3 Tic-500s are connected by USB, these are splendid controllers (from the folks from MIT, as is Python I believe) that can operate just about any stepper motor system that a macro photographer would need. They have a mode where the motor currents are partially recycled back to the power supply rather than wasted to ground, this allow the entire system, including Raspberry Pi 3B and all controller and electronics, 2 NEMA 11 Stepper motors (KR-15) and a NEMA 17 Stepper motor (KR-20) to operate from a single 12 volt 2.5 amp supply!!
For more details on the development & components of this system and the Thor Labs setup please use the links provided.
Anyway, I hope this helps some DIYers with limited resources (like me!) that may be thinking of tackling a project like this...you can do it!!
Best,
Mike
US Automation THK KR-15
(Download)
US Automation THK KR-15
(Download)
KR-15 Mounted on top another with ARCA clamp below
(Download)
ARCA Plate attached to Wemacro base
(Download)
X and Y KR-15 Mounted on Wemacro base
(Download)
X and Y KR-15 Mounted on Wemacro base
(Download)
Wemacro Vertical Stand with X and Y USA KR-15s

(Download)
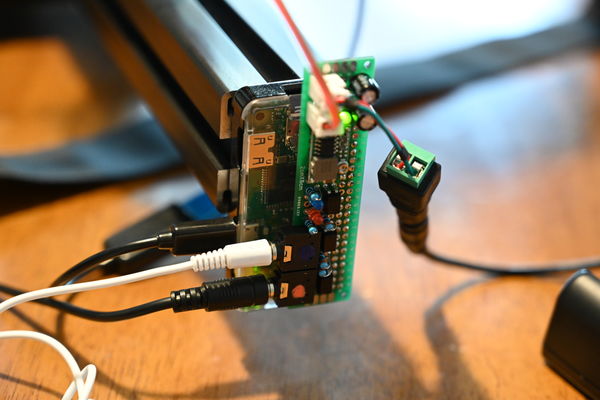
Trigger electronics and 12v to 5 v converter
(Download)
Raspberry Pi 3B, 3 Pololu Tic-500 and early version of Trigger Circuit (no converter)
(Download)
Everything connected up
(Download)
Nov 26, 2018 06:40:03 #
Nov 26, 2018 10:29:17 #
Holy-Moley, that is quite an impressive setup indeed! I'd never be able to build one, but I sure would like to own one. Please post some images taken for I really would enjoy seeing them.
Nov 26, 2018 12:03:14 #
This was/is quite an undertaking, especially since I have limited resources and little to nil programming and computer skills! I'm and EE, so some inside advantage with the electronics, but not so much with the mechanicals, computer and programming. The effort was/is worth it though, as I expect some superb images from the various setups. I'll post some images (one's that I can, many will be proprietary chip images).
eBay has proved to be a wonderful resource for precision surplus gear which usually can be easily modified for macro use, as well as ridiculously cheap electronic components! I'm sure many of you could tackle this and hopefully will consider giving these DIY projects a try.
Best,
eBay has proved to be a wonderful resource for precision surplus gear which usually can be easily modified for macro use, as well as ridiculously cheap electronic components! I'm sure many of you could tackle this and hopefully will consider giving these DIY projects a try.
Best,
Nov 28, 2018 13:33:11 #

I'm impressed, I'll just live vicariously through your adventures..................definitely keep us on your radar
Nov 29, 2018 16:36:07 #
Nov 29, 2018 20:59:37 #

My Stack and Stitch system is substantially similar to the one shared here by Mike. I also use a pair of crossed-KR15's for the XY stitching rails, and a vertical KR20 for the stacking rail. I have a home-built stand rather than the WeMacro vertical stand, and I use the mjkzz Stack and Stitch software. I initially tried using a Win7 system to control the Stack and Stitch, but the software did not work properly on that OS. I ended up buying a cheap Win10 laptop, and it works great to control the mjkzz system.
The images I published in an earlier thread (here: https://www.uglyhedgehog.com/t-555290-1.html) were taken with the system described above. You can view a couple of them here:
https://easyzoom.com/image/125251
https://easyzoom.com/image/125250
The images linked above are 6-image panoramas (2 wide, 3 tall) which optimizes the aspect ratio of the 3:2 aspect ratio APS-C sensor vs the 1:1 aspect ratio coin. It also results in a massive 180MP composite image showing both obverse and reverse.
Dec 12, 2018 21:24:46 #
I've run the system now with a couple test subjects, here's a link to the details.
https://www.photomacrography.net/forum/viewtopic.php?p=242291#242291
This was a silicon wafer sliver that was completely automated hands off captured (~2000 images). The test image is on Nikon Image Space. Final image rendered as 21793 by 20314 pixels (443MP).
Best,
https://www.photomacrography.net/forum/viewtopic.php?p=242291#242291
This was a silicon wafer sliver that was completely automated hands off captured (~2000 images). The test image is on Nikon Image Space. Final image rendered as 21793 by 20314 pixels (443MP).
Best,
Dec 14, 2018 20:36:02 #
Santa came early, and I purchased PTgui. I've reloaded the image on Nikon Image Space without the watermarks and cropped smaller, and another from a session just completed where a small light tent was used to help diffuse the light. Be sure to download the image to see the detail.
http://img.gg/10oj9Jm
Best,
http://img.gg/10oj9Jm
Best,
Mar 20, 2019 14:03:31 #
Here's an update on the development of the DIY Precision S&S System. This effort has now evolved to try to implement motor control algorithms and setups to allow very fast stepping, but still maintain IQ, with a goal of 1~2 second steps. This will be achieved hopefully by reducing motor movement induced vibrations with adaptive motor control algorithms and fully electronic curtain shutters.
Here's a test image that took ~ 3hrs to complete with ~2000 images(others have taken days at ~6000 images). Be sure an download the image to see the resolution achieved with S&S techniques. If the step time can be reduced to ~1.5sec then this 2000 image session can be reduced to ~1hr.
http://img.gg/Z9HVW9O
Here's a link over at Photomacrography for more information and setup images.
https://www.photomacrography.net/forum/viewtopic.php?p=246910#246910
Best,
Apr 4, 2019 08:44:29 #
A few folks have asked that I post a video of the Precision Stack & Stitch System I'm developing. So I'll start out with a single axis system shown, first with the hardware description, second with the software and last with the operation.
Don't expect much as far a video quality as this is the 1st video I've done and nothing was edited, just shoot the setup and post to Google Drive.
The Single Axis System is based upon a Raspberry Pi Zero W computer with a custom interface board to trigger the camera and strobes as well as supply the Pi with 5 volts from the nominal 12 volt motor supply. The interface board sits on top on the Pi using the 40 pin connector.
VNC is utilized to connect to the Pi via wireless WiFi, so no monitor, keyboard nor mouse required to connected to the Pi.
The base is a Wemacro Vertical Stand operated horizontally with a THK KR20 focus rail (1mm pitch) driven by a 400 step NEMA 17 motor. Motor control is by way of a Pololu Tic-500 connected to the Pi by USB. The KR20 has a Panasonic SUNX magnetic sensor for rail "home" detection which is connected to the Tic-500.
Here's the videos, hardware, software and operation. The Precision Automated S&S System will follow when I get some time to shoot the videos.
https://drive.google.com/file/d/1xjGAkQmkn_gmHV0OYKyyY_0YoI7zEhee/view?usp=sharing
https://drive.google.com/file/d/1QpSaV75roRLvFpi7NDzDKK84Tw2Li3J0/view?usp=sharing
https://drive.google.com/file/d/1X7IHTnLEQbniC4MwrMhaN8zjQdshzOrS/view?usp=sharing
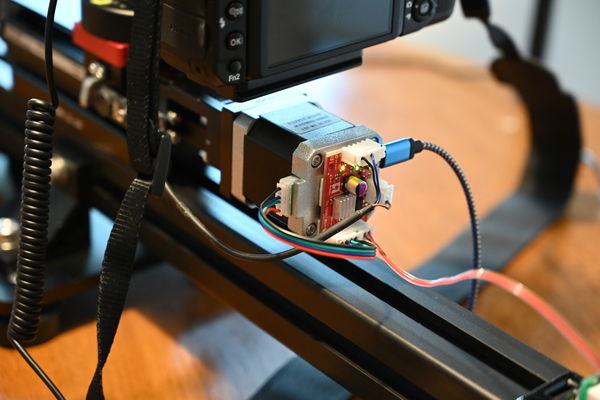
Raspberry Pi Zero W with Custom Interface Board
(Download)
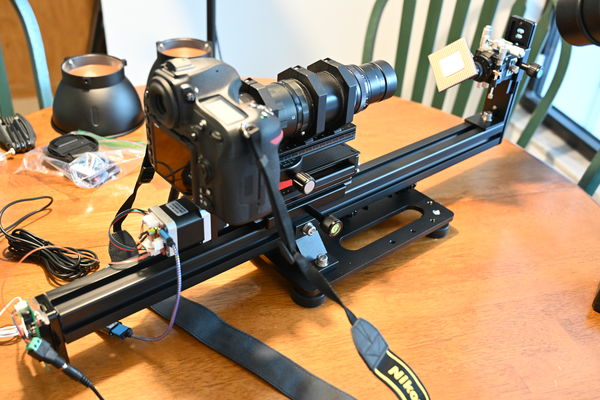
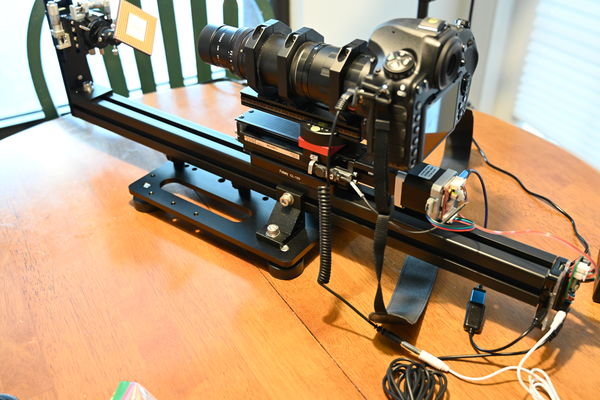
Single Axis Rail Setup
(Download)
THK KR20 Rail, D850, Nikkor 105mm, Wemacro Verticle Stand (Used Horizontally), Pololu Tic-500, Raspberry Pi Zero W
(Download)
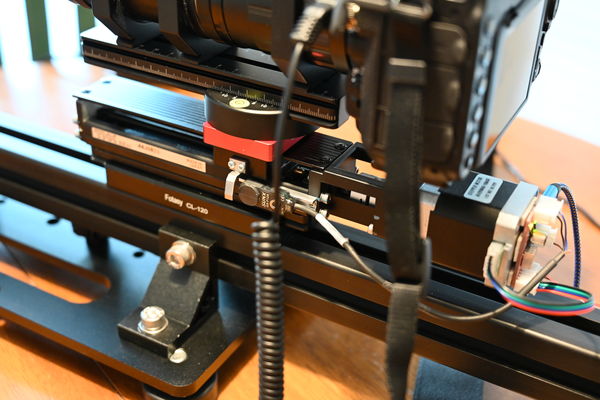
SUNX Magnetic "Home" Sensor
(Download)
Pololu Tic-500 Motor Controller/Driver
(Download)
Raspberry Pi Zero W with Custom Interface Board
(Download)
Apr 4, 2019 21:25:27 #
Here's a few videos of the Fully Automated S&S System (3 axis) I've been developing. Watch the Single Axis Videos above before these because these reference those Single Axis Videos and don't go into the detail they do.
These videos aren't very good, I've only done the previous mentioned videos as my 1st attempts and they haven't been edited, so don't expect much!
The setup uses a THK KR20 with 1mm threads on the Z axis and a pair of KR15s on X and Y. All are controlled by Pololu Tic-500 and these are USB connected to a Raspberry Pi 3B. The Pi is used with VNC to allow remote operation without need for a monitor, keyboard, nor mouse.
Here's the videos, first is the hardware, then software and a couple operational videos (last is long test stack operating quickly).
https://drive.google.com/file/d/1gZqxISGSvuFUqvRiHP5Bf0SFkAyqziCI/view?usp=sharing
https://drive.google.com/file/d/1J4eaSVyoya0N83O2n_-Ty6pVvdF73_fJ/view?usp=sharing
https://drive.google.com/file/d/1s4lN3Qi4PYMHuO6swIcT6YPGpDOKjcaZ/view?usp=sharing
https://drive.google.com/file/d/1f6hYPF09FF5dbehgmX2CdTmxn8J-53II/view?usp=sharing
Best,
Apr 5, 2019 10:49:24 #
That is truly amazing. The regular 'stackers' are plenty ambitious, but this takes it to a whole new level.
Apr 6, 2019 10:48:21 #
Mark,
Thanks, but not quite finished! Still working the motor control current waveform parameters and profiles, this is to further reduce motor/movement induced vibration and not excite system resonances.
Engineering "curse", we are never satisfied with the end result, there's always room for improvement!! The "blessing" is when you realize what you've achieved is "good enough"!!
Best,
Apr 6, 2019 15:46:51 #
Just updated the last S&S Operational video, this is a little better IMO.
https://drive.google.com/file/d/18GxU2UnlrG4TGF2vXnAgTPAC6ogPKGIN/view?usp=sharing
Best,
https://drive.google.com/file/d/18GxU2UnlrG4TGF2vXnAgTPAC6ogPKGIN/view?usp=sharing
Best,
If you want to reply, then register here. Registration is free and your account is created instantly, so you can post right away.