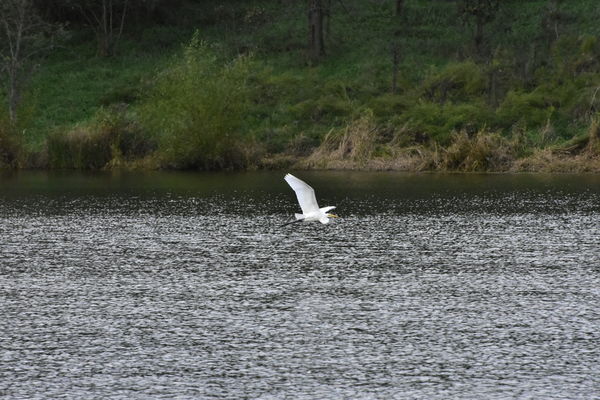
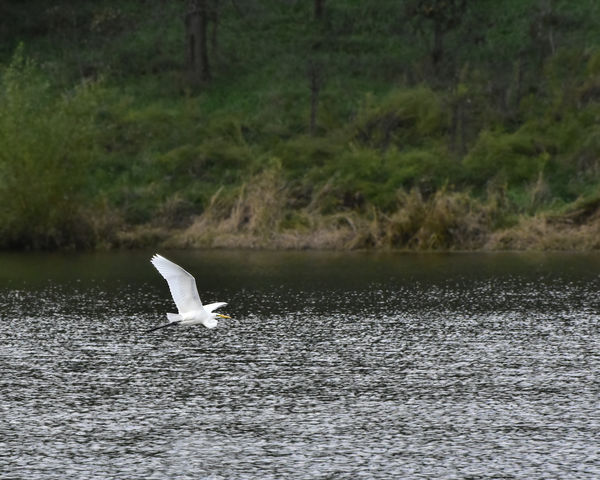
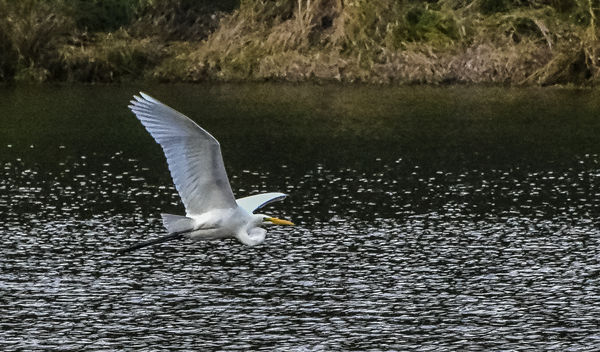
How would you have shot this?
Oct 12, 2018 10:50:37 #

saxman71 wrote:
Other than the fact you were not ready for the egr... (show quote)
As you obviously know, BIF (and wildlife photography in general) is all about preparedness and understanding the creature in question. I do not know enough, but I have shot with friends who seem to just know that a bird, I cannot even see, will be taking off from behind a clump of reeds and flying to the left. I do a good bit of sports shooting and can predict where that action is going to move. But BIF is (to me) a whole different level. Hats off to you.
Oct 12, 2018 11:13:43 #
Unless it was very,very overcast ,I don’t understand a ss of 1/1600 and iso 6400 and why exposer compensation . With these this photo should have been blown out. If a sunny day I would shoot 1/500to 11000 depending on motion at a f5.6 to let in more light and a iso set between 100 and 800.
Oct 12, 2018 11:37:51 #
Nikon1201 wrote:
Unless it was very,very overcast ,I don’t understand a ss of 1/1600 and iso 6400 and why exposer compensation . With these this photo should have been blown out. If a sunny day I would shoot 1/500to 11000 depending on motion at a f5.6 to let in more light and a iso set between 100 and 800.
I have noticed a lot of BIF shooters maintain a high SS to freeze motion, so 1/1600 does not seem out of line. A small aperture allows for greater DOF and better focus acquisition.
Oct 12, 2018 12:21:41 #

swartfort wrote:
Please don't start off by telling me I don't under... (show quote)
Only a handful of cameras can provide close to good exposure with any form of auto-metering. Setting Auto ISO takes some control away. Olympus, Nikon (D810, D850, D5, etc) have a metering mode that takes control of the metering in a good way - they protect highlights from over exposure.
A small sensor camera is limited in poor light - and ISO 6400 is too high for a D3400.
Using F13 is unnecessary, especially in this light - I would suspect that F5.6 would have let you shoot at ISO 1250, and using a shutter speed of 1/1000 would have let you use even lower ISO - all of which would contribute to better image quality. With good panning technique you would still get a great shot.
As far as overall approach to exposure settings, I use the camera's spot meter, and get a reading off something of similar brightness in the same light - in this case, maybe a piece of white paper - and add 1-1/3 to 2 stops additional exposure. This will ensure that there will be detail in the plumage of this bird. Obviously with darker subjects you'd have to adjust your exposure differently. I rarely use any exposure automation when shooting birds or other wildlife.
It's hard to tell, but the bird just might be out of focus. As nice a camera as the D3400 is, precise and fast AF performance is not one of it's strong points. On a Nikon crop camera, you'd need a D500, on FX, a D4, D5, D850 or D810 would be better choices.
If the lighting is flat, you will also not have as crisp a shot as when there is more contrast.
A longer, sharper lens will most certainly help, but if you will be shooting in marginal light, you'd want a fast lens - F4 or faster. The issue with an F4 lens is size and weight, which means you usually need a tripod, making it a bit harder to track something flying.
I do all of my birds in flight hand-held.
This first image was taken in good light, ISO 800, D810, Sigma Sport 150-600 @ 600mm F8, 1/3200 exp comp -.67, highlight protection on.
The second was a bit earlier in the day, ISO 800, D810, Sigma Sport 150-600 @ 400mm F8, 1/2500, exp comp -.67, highlight protection on.
New gear can help, but maybe understanding your equipment's characteristics and limitations may help and it won't cost you a penny. I'd suggest that arriving a bit earlier, when there is more light, shooting that lens wide open, and holding your ISO to 800 or 1000, even if it means some motion blur, will start to help. After a while, your panning technique will improve and your overall image quality will as well.
Oct 12, 2018 12:35:53 #

I'd have used a 16-gage shotgun and aimed just ahead of the bird.
Oct 12, 2018 12:59:39 #

Gene51 wrote:
Only a handful of cameras can provide close to goo... (show quote)
EXACTLY, all of the above - bravo !
When not knowing what might pop up, I am at 1/1250, f8, auto ISO in better light on crop frame.
..
Oct 12, 2018 13:01:35 #
rdgreenwood wrote:
I'd have used a 16-gage shotgun and aimed just ahead of the bird.
Probably need a full choke 12 ga. at that distance


..
Oct 12, 2018 13:16:25 #
rdgreenwood wrote:
I'd have used a 16-gage shotgun and aimed just ahead of the bird.
Ahhh! You went to the John James Audubon school of bird watching!
Oct 12, 2018 13:41:24 #
Oct 12, 2018 13:57:32 #
NCMtnMan
Loc: N. Fork New River, Ashe Co., NC
If possible, a polarizing filter to get rid of as much glare from the water as possible. I find it very distracting and wants to pull my eye from the subject.
Oct 12, 2018 14:11:50 #
amfoto1
Loc: San Jose, Calif. USA
swartfort wrote:
Please don't start off by telling me I don't under... (show quote)
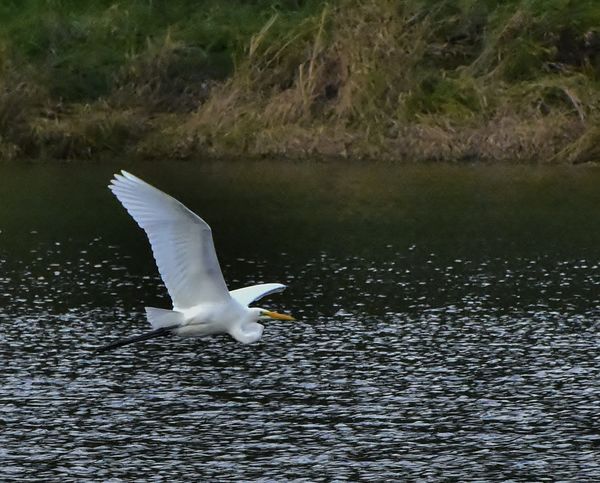
#4... I'll start with #4 because it's the biggest part of the problem... a longer telephoto lens is needed. 300mm just isn't enough to "fill your viewfinder" with the distant bird. When you crop so heavily, you've essentially reduced your image from its full 24MP potential, down to who knows what (your image is only able 2.5MP, but I can't tell from the EXIF if you "up-rezzed" the image or not, when you cropped it). In the cropped version, you've essentially "thrown away" at least 90% of the image and are looking a what remains.
A lens with 500mm or 600mm focal length would have done better... though I have to warn you that no matter how long a lens you have, it's never "enough". There are always still subjects that are just out of range.
Longer telephotos give you a new set of challenges: They are more difficult to get a steady shot... more likely to need a stable tripod or at least a monopod... if for no other reason because you can only handhold the bigger lens for a limited length of time and with wildlife you can spend a lot of time waiting for a shot. Also shooting more distant subjects, there's a lot more atmosphere between you and them, which can cause various image problems, depending upon local conditions. And with the very narrow angle of view of a powerful telephoto, it can be tricky to acquire a distant subject and keep the lens right on it... folks who have to do this a lot use things like gimbal heads on tripods to help, among other things.
Not to mention the cost increases dramatically with focal length!
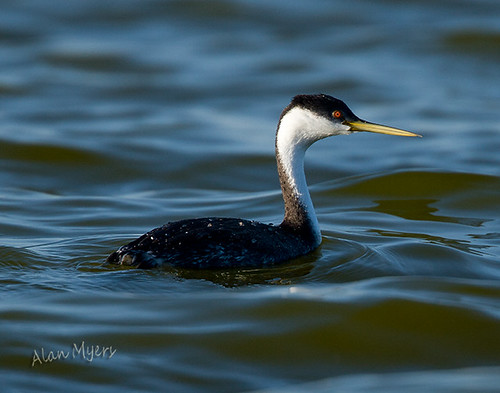
Even with longer lenses, you still need to get as close as possible, fill your viewfinder as much as possible with your subject... For example, the image below was done with a 500mm lens with a 1.4X teleconverter, for effective 700mm total (about $10,000 worth and more than 10 lb. of lens and camera, all sitting on a hefty tripod with a gimbal adapter). Internet resolutions don't do it justice... you can see detail in individual drops of water on the grebes' back and it prints very well to 11x14", even though it was shot using an 8MP camera....
#1. EXPOSURE: There's actually nothing wrong with your exposure. It looks pretty accurate. Actually, the white of the bird isn't "blown out" at all. There's loss of detail, but it's due to other things. (See below.)
If the bird had been closer or your focal length longer, and the bird had filled more of your viewfinder, you actually would have been in a bit trouble using an auto exposure mode with spot metering. If the bird had completely occupied the area being metered, the camera would have under-exposed significantly unless you had dialed in some + exposure compensation (I'm guessing, probably +1 stop or +1-1/3 stop). I don't have your camera so I don't know... but another response suggested that using Manual with Auto ISO precludes using Exposure Compensation. I don't know if that's true or not with your camera. I do know that I can use Exposure Comp with M + Auto ISO with some of my newer Canon cameras (couldn't on earlier ones, so I never used Auto ISO at all).
Spot metering is risky. You have to be more aware of the tonality of the smaller area being metered and often have to dial in Exposure Compensation more precisely, when using any AE mode. For that reason, I tend to use my cameras' Evaluative/Matrix metering mode most often when using any of the AE modes. That method of metering looks at the entire scene, but it puts extra emphasis around the active AF point(s), assuming that's where your primary subject is located. It just has a broader scene to "average out", which is more likely to give an accurate exposure in many situations. Don't get me wrong... Spot metering has its purposes... as do partial (essentially a larger spot) and center weighted metering patterns. I just recommend getting familiar with and learning to use them all.
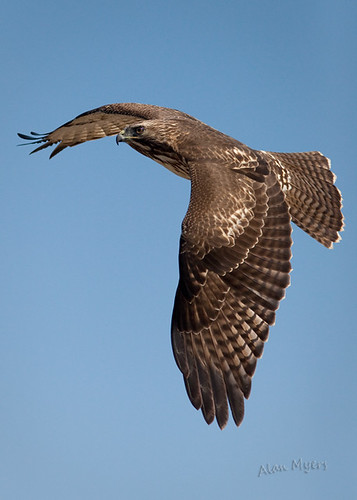
#3 SETTINGS... I probably wouldn't have used Manual + Auto ISO. First, understand that's no longer "manual" exposure. It's an auto exposure (AE) mode just like Aperture Priority, Shutter Priority and Program AE modes. If you truly want full control over exposure, turn off Auto ISO and use M. (I certainly don't recommend every using Auto ISO in conjunction with the other AE modes: A/Av, S/Tv, or P. It's hard to predict what might happen.) Most often I use Aperture Priority, since that's my main concern. I also keep an eye on the shutter speeds that the camera is using use and boost my ISO if needed. You wisely used 1/1600 here, since a fast shutter speed was needed to stop the movement of the egret in flight. But, because you were using M + Auto ISO, you needed to adjust two settings, and either overlooked resetting the aperture or only had time to adjust one. I can sympathize though... you were shooting something else when you suddenly saw an opportunity and had to shoot quickly. But for this reason, I use Aperture Priority AE mode most often. I was shooting subjects in the shade when this redtail hawk suddenly appeared and started hunting near me. I only had time to switch to a telephoto lens and select an f/5.6 aperture... I forgot that I'd been using a higher ISO (800) and AE mode caused the shutter speed to go all the way to 1/8000.... I was very close to over-exposing!
#2 RESOLUTION.... Although a lot of people swear by "manual", there's nothing wrong with using the various AE modes. Even M + Auto ISO could have been made to work here, too. The problem here was that you overlooked adjusting your aperture. And at f/13 on a 24MP, APS-C camera, you are well and deeply into diffraction issues from using too small an aperture. That's part of the reason that you're seeing loss of detail after you crop the image. Diffraction robs images of fine detail. The optimal aperture would be around f/8, to minimize the effects of diffraction. It's dependent upon print size, though.... for a bigger print you'd need to use a stop larger aperture to fully eliminate any diffraction). Google "diffraction limited aperture.
You mention using a 70-300mm lens and there are a lot of those of varying quality. You were pushing the limits of the lens though, when you cropped so heavily. A higher resolving lens like one of Nikon's FL primes (400mm and longer) would have done better at distance and with a lot of cropping. But, of course, those cost a great deal more!
Another thing that strongly effects resolution is your ISO setting. The higher the ISO, the lower resolution. I believe you were at ISO 6400 here, which is getting up there especially when it's combined with heavy cropping.
Sometime do a test of your camera.... pick a target with a lot of detail and shoot it at a series of different ISOs. Download the images and note their sizes... you'll find the higher the ISO, the smaller the file as resolution is reduced. Also closely inspect the images to see how higher ISOs effect resolution.
Selective sharpening can make an subject look sharper in relation to its surrounding, so that it appears better than it is. Sometimes I even increase background blur to make a subject appear sharper, as I did in this case...
Know the limits of your gear and work to get the most out of what you've got. Be patient. There will be other opportunities. Fill your viewfinder as best you can. Or just go for a "looser" composition. You might be able to stalk the critter to get closer or spend some time getting them accustomed to you so you can get closer with shorter focal length lenses. I don't always follow my own advice, of course... But I try!
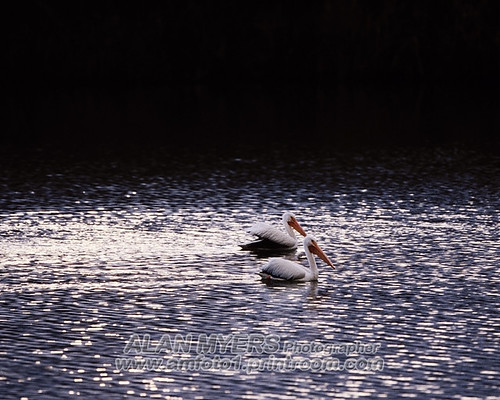
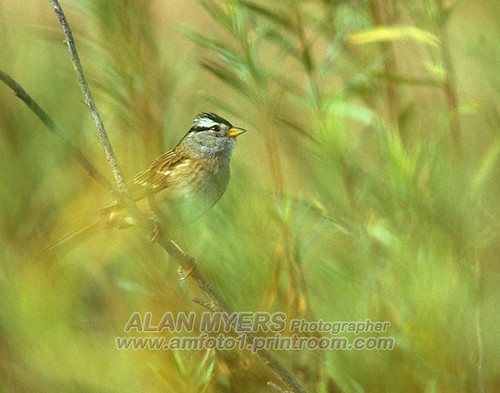
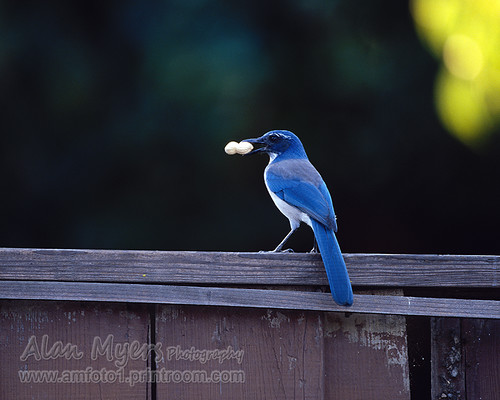
I only had a 70-200mm lens available when I saw the two pelicans above, so I did what I could with it and resisted trying to crop too much (similar to your image). With the white crowned sparrow I was hiding in tall grasses trying to photograph water birds with a big telephoto (and getting eaten alive by mosquitoes!), when it landed nearby and I shot "through the grass" to get an interesting filter-like effect. I shot the scrub jay in my back yard, sitting at my patio table with a beer! I used attractants (like peanuts and feeders) to bring birds to me, rather than trekking around trying to find them.
What I would do with your image is simply not crop it so heavily... show the bird smaller in a larger scene. I downloaded the pre-crop version to try different crop where I positioned the bird according to the rule of thirds. I also applied some high pass filter sharpening very selectively... to the bird alone. When that was applied to the background it increased "graininess" and when it was applied to the specular highlights of the water it increased their contrast too much, IMO. So I used layers and masks to only apply the sharpening effect to the bird.
Adding a high pass filter increases contrast and seemed to brighten the bird a bit. But while editing your image magnified I also noticed some chromatic aberration or "color bleed" at the high contrast edges of the white bird against the darker background. I used Photoshop's color replacement tool to tone those down a little... but I wanted to mention them because if you are using a filter on your lens for "protection", it might be amplifying CA. If using a filter, try some shots without it to see if it makes a difference. It also may help to use a lens hood, if you aren't already doing so (which also will do a better job physically protecting the lens... and protecting a filter if using one).
Here's the end result with your image a bit less cropped, with selective sharpening and a little retouching to reduce CA (with your original and cropped versions below, for sake of comparison)....
P.S. I just added another, further edited version of your image... also less cropped, but with even more selective sharpening to the bird alone (this time using unsharp mask) AND with increased background blur to help the subject stand out and appear even sharper....
MY CROP w/selective sharpening & CA removed

(Download)
ORIGINAL
(Download)
YOUR CROP
(Download)
MY 2nd EDIT w/add'l selective sharpening & increased background blur
(Download)
Oct 12, 2018 14:13:15 #
Auto iso is not for bif photos. It's more for stationary objects and portraits...... for bif set the focus mode to af-c, and 3d tracking, and center weighted metering.
Auto iso is more for when changing from, say, inside to outside quickly. In other words, when changing lighting quickly.
For that time of day i would set iso at 800. F stop around 8. Shutter around 1/800. And adjust shutter from there (up not down).
Auto iso is more for when changing from, say, inside to outside quickly. In other words, when changing lighting quickly.
For that time of day i would set iso at 800. F stop around 8. Shutter around 1/800. And adjust shutter from there (up not down).
swartfort wrote:
Please don't start off by telling me I don't under... (show quote)
Oct 12, 2018 14:46:47 #

1st - the bird takes up too little of the frame to focus or expose optimally. A longere lens would help
2nd - when the subject is white, spot focus, exposure on the bird, and an exposure compensation of -1 to -2 are needed to prevent blowout
2nd - when the subject is white, spot focus, exposure on the bird, and an exposure compensation of -1 to -2 are needed to prevent blowout
Oct 12, 2018 15:21:34 #

The big change I would make is to shoot RAW. Second get a full frame camera and longer glass. However, this pic is not badly exposed and RAW would have given you a lot more to play with as would a camera with more MP.
Oct 12, 2018 16:59:20 #

Delderby wrote:
Well I would have deleted this pic in camera. You might have done better with bracketing. You're on a hiding to nothing with this pic - max reach, high iso, harsh cropping, blown high lights, f-stop too small, wrong lens, unprepared, no tripod? wrong time of day. 1/1600 shutter speed was ok to stop action but not for f-stop at f8 . Back to the drawing board! 
Yeah, but other than that, it's perfect!
If you want to reply, then register here. Registration is free and your account is created instantly, so you can post right away.