One way to make a non-standard crop fit a standard frame
This topic is locked to prevent further replies.
Sep 7, 2018 12:16:59 #

This is for PS Elements; let me know if works same for PS, or how you like to do it!
Choose a background color from the swatches on lower left of the editor.
Enter the numbers to the crop tool section for the finished size you want (8x10, 5x7 etc).
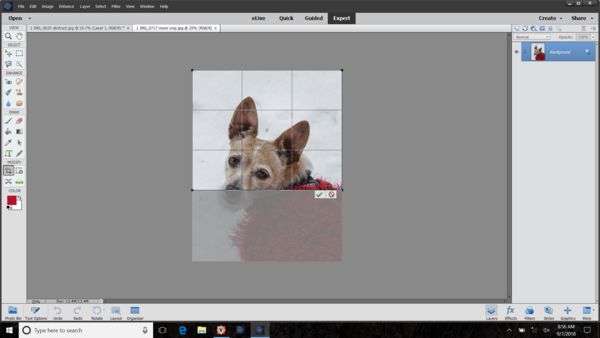
Photo #1: start the crop and when the tool reaches the edge, let go of the mouse. But DO NOT click OK.
Photo #2: Instead, grab the corner again and drag until the position is what you desire.
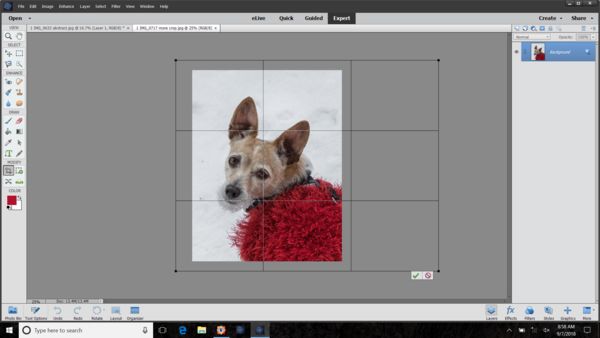
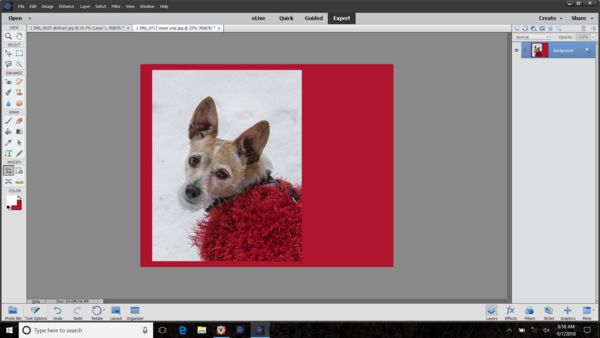
Photo #3: Now let go of the mouse button and your extended canvas will be in place at the dimensions you entered initially to your crop tool options. Add Christmas greetings to this one
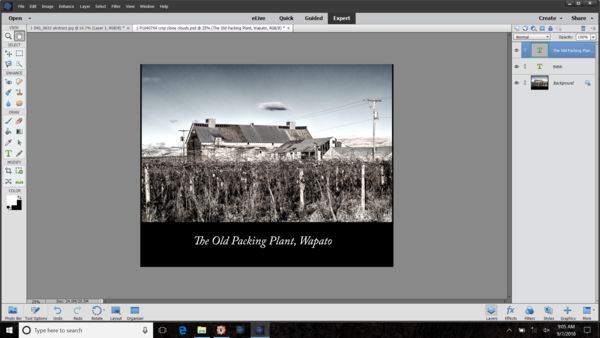
Photo #4: Make an 8x12 into an 8x10, and use the room on bottom to add a title.
Photo #5: white space added as evenly as possible all around so the result would fit an 8x12 frame.
I'll check in later for any questions, corrections or further suggestions. Thanks!
Choose a background color from the swatches on lower left of the editor.
Enter the numbers to the crop tool section for the finished size you want (8x10, 5x7 etc).
Photo #1: start the crop and when the tool reaches the edge, let go of the mouse. But DO NOT click OK.
Photo #2: Instead, grab the corner again and drag until the position is what you desire.
Photo #3: Now let go of the mouse button and your extended canvas will be in place at the dimensions you entered initially to your crop tool options. Add Christmas greetings to this one
Photo #4: Make an 8x12 into an 8x10, and use the room on bottom to add a title.
Photo #5: white space added as evenly as possible all around so the result would fit an 8x12 frame.
I'll check in later for any questions, corrections or further suggestions. Thanks!
Sep 7, 2018 13:12:18 #
granbob
Loc: SW Wisc; E Iowa; W Illinois
Hi Linda - Haven't tried your ideas, but have printed these pages to try them later as they seem like a very helpful idea. Thanks for the tips !
Sep 7, 2018 15:00:59 #
granbob wrote:
Great! People who print a lot probably know to keep their compositions within the standard sizes, or leave enough room to crop, or they cut their own mats Hi Linda - Haven't tried your ideas, but have printed these pages to try them later as they seem like a very helpful idea. Thanks for the tips !
Sep 7, 2018 17:23:06 #
CanonTom
Loc: Birmingham
Linda From Maine wrote:
This is for PS Elements; let me know if works same... (show quote)
Thanks Linda!
Sep 7, 2018 17:24:48 #
Sep 8, 2018 06:18:30 #

1 On some photos, you can change the aspect ratio and no one will know that the trees are taller than in reality.
2 Increase canvas size and clone to fill.
2 Increase canvas size and clone to fill.
Sep 8, 2018 08:09:25 #
dpullum wrote:
Thanks Don. I think R.G. was the first to show an edit like that - as a point of composition and impact, not printing, but good to have on the list of possible solutions.1 On some photos, you can change the aspect ratio and no one will know that the trees are taller than in reality.
2 Increase canvas size and clone to fill.
2 Increase canvas size and clone to fill.
Sep 8, 2018 09:23:12 #

Linda From Maine wrote:
Great! People who print a lot probably know to keep their compositions within the standard sizes, or leave enough room to crop, or they cut their own mats
I always take my photos with some "extra space" around the four sides, so that I can crop to make the photo more pleasing to look at.
I set the cropping tool to "No restriction", then rather than starting the cropping frame in a corner, I'll often place it just anywhere in the photo, then drag a corner or a side, or move the frame around, till what's inside that frame pleases me. And only then click the green check mark.
For my scrapbooking pages, I often want photos to be the same size. So I use a copy of the first photo I cropped, as a clipping mask, clip the next photo to it and manipulate it till I'm pleased with what it shows, then join the mask and photo.
Sep 8, 2018 09:30:50 #
Morning Star wrote:
Thanks very much for your input!I always take my photos with some "extra spac... (show quote)
Sep 8, 2018 09:34:14 #

Very few photos fall into the standard sizes. Sure, you can crop them to fit but doing so will override what is the proper crop based upon the composition itself. Linda presents one workaround. I have a simpler one. Go into PS, crop your print to whatever works best, resize the print with the same aspect ratio and one edge in the final size, and then change canvas to a standard print size. If you want to trim the print, then align one edge of the print with an edge of the artboard. Or, just center it. In this case, you can color the primary border and add text as Linda showed.
Traditionally, prints are offset toward the top. The amount of offset is not arbitrary but figured according to a formula. If anyone is interested, I will glad to send the details.
Traditionally, prints are offset toward the top. The amount of offset is not arbitrary but figured according to a formula. If anyone is interested, I will glad to send the details.
Sep 8, 2018 09:41:36 #
abc1234 wrote:
Thanks very much!Very few photos fall into the standard sizes. Sur... (show quote)
I remember when I was taught how to cut mats (decades ago), we left a little more on the bottom than the other sides. But, unless I'm having a truly senior brain cramp moment, the pre-cut "consumer" mats today are all equal. Probably for most casual viewers (i.e. non-photographers), equal is what they are used to.
Sep 8, 2018 10:03:59 #
Linda From Maine wrote:
Thanks very much!
I remember when I was taught how to cut mats (decades ago), we left a little more on the bottom than the other sides. But, unless I'm having a truly senior brain cramp moment, the pre-cut "consumer" mats today are all equal. Probably for most casual viewers (i.e. non-photographers), equal is what they are used to.
I remember when I was taught how to cut mats (decades ago), we left a little more on the bottom than the other sides. But, unless I'm having a truly senior brain cramp moment, the pre-cut "consumer" mats today are all equal. Probably for most casual viewers (i.e. non-photographers), equal is what they are used to.
No Linda, you are not have a SBC but what you may not know is that displacement was, as I wrote, not arbitrary but by formula. As for your next statement, I would go further and say most photographers do not even know that. In the days when people went to framers, framers might offset everything automatically. Today, when frames are a commodity, manufacturers obviously cannot anticipate picture sizes and orientations and therefore sell a one-size-fits-all solution. I understand that and that is fine. However, if you want to distinguish yourself a bit, then consider offsetting the prints.
Sep 8, 2018 11:20:46 #
abc1234 wrote:
Thanks for the additional note, and I am one who didn't understand that a formula was used to result in a pleasing display.No Linda, you are not have a SBC but what you may ... (show quote)
Sep 8, 2018 11:29:09 #
Linda From Maine wrote:
Thanks for the additional note, and I am one who didn't understand that a formula was used to result in a pleasing display.
An irony, Linda, is that some emote of whether to compose by third's, the golden rectangle or some other pattern but when mounting, plopping down the print in a standard size is good enough.
Sep 8, 2018 11:31:01 #
abc1234 wrote:
But what we don't know won't hurt us An irony, Linda, is that some emote of whether to compose by third's, the golden rectangle or some other pattern but when mounting, plopping down the print in a standard size is good enough.

If you want to reply, then register here. Registration is free and your account is created instantly, so you can post right away.