Why won't PS do what I want!!!!!
Sep 5, 2018 17:04:53 #

Right now I'm raging against PS because I'm trying to follow instructions that simply do not work. Here's the issue: I'm converting colour photos to black and white sketches. I've tried a lot of different methods and have finally found one that worked - once! Cannot get it to work correctly again. I'm using CS5.? and the instructions I'm following were written for CS5. They were taken from Photoessentials.com.
Problem 1: I'm wanting to center 5x7 images on 8.5 x 11 paper. I found two instructions. One was to click on the layer being moved and to go Layer, click "vertical center" then "horizontal center." No such commands under "layer." Another instruction was to click on the icon for "vertical center," and the icon for "horizontal center." Found the icons. Nothing happens when I click them. Why don't they work? Isn't there a method of making sure the image is in the exact center of the page without having to print and measure, print and measure, etc.?
Problem 2: All of the images have problems with the background. I've tried following all the directions for replacing backgrounds and I simply cannot do it. My hands are too shakey, or the instructions simply do not work. So, I'm using the eraser as the final step and simply erasing at 100% the unwanted background. On the screen it looks lively and white. However, when I print it, it looks pink. Very pale pink. AND, the first one I did, I actually did that on the last layer, which is an adjustment layer for adjusting the levels. It worked beautifully. Every time since then it simply doesn't work. I "scrub" with the eraser and nothing happens. So now I have to save the work, then open the new jpeg. The scrubbing seems to work, but it doesn't print out as pure white, which is what I want.
-
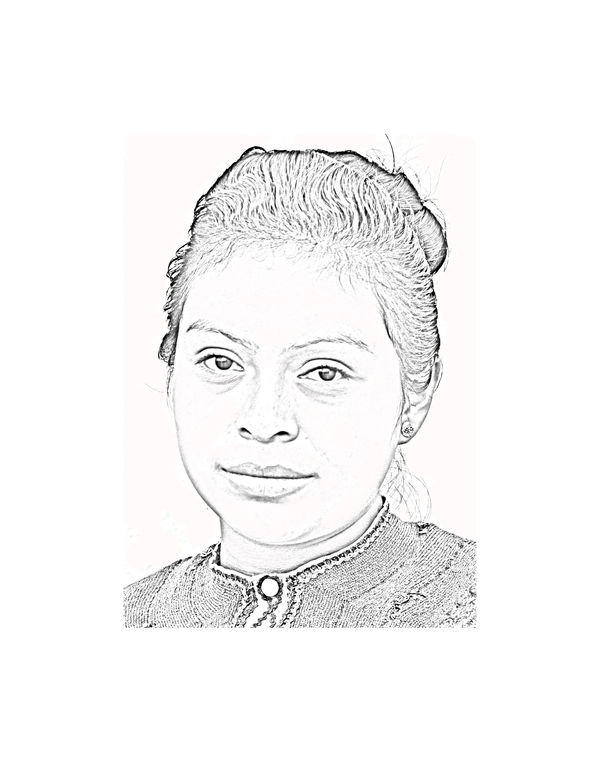
This "scrubbed" background printed out nearly correctly.
(Download)
This scrubbed background prints out a pale pink.

(Download)
Sep 5, 2018 17:26:50 #
I remember processing a shot of my 2 year old son from film using high contrast to create a result much like your two examples. Very nice.
As for the first problem, l'd use the Image > Canvas Size... option to center your 5 x 7 images on 8-1/2 x 11 paper.
1. Open your 5 x 7 image.
2. Select Image > Canvas Size.
3. Enter your 8.5 and 11 inches in the New Size boxes. Do NOT click the Relative box but click the dot in the center of the anchor box. This will insure that the 5x7 image is centered in the new Canvas dimensions.
4. Click OK and you should have the smaller original centered in the new paper size.
As for the color cast issue, the downloaded images attached to your message clearly show a slight pink tinge on my screen. Question: Do you want a clear white background around the figures or a very light gray background? I believe you want a clear white background. First, I would convert the image to Black and White to insure that there is no color cast then I'd use a curves adjustment, contrast tool/adjustment layer or black and white adjustment layer to remove the very light gray values of the background. There are probably 6-8 different ways you could increase the light gray background to pure white, but I think one of these three would be simplest. Good luck.
Sep 5, 2018 17:45:09 #
Thanks so much for responding, Jak86094. As to the first issue - I'll try that method. However, one of the videos I watched still showed the need to center the image. I'll see if I can get it more easily that way. (Always looking for the fewest clicks!)
As to the second one: I do convert to B&W. The instructions said to use "desaturate" and that's what I do. Will it be better if I convert it using the "black and white" command, or maybe the "grayscale" command? I've never known what difference it made and why there were 3 ways of getting to the same result.
As to the second one: I do convert to B&W. The instructions said to use "desaturate" and that's what I do. Will it be better if I convert it using the "black and white" command, or maybe the "grayscale" command? I've never known what difference it made and why there were 3 ways of getting to the same result.
Sep 5, 2018 21:26:01 #
I think Jack has nailed your pink background problem. When I open both pictures in PS they are both sRGB color shots. If you don't want any color at all, simply convert to "Grayscale". You may have to increase contrast a bit (levels or curves) to get the proper look.
Sep 5, 2018 21:58:27 #
Well, you asked a question I had no answerer for. So I tried and tried to figure it out and finally got it.
Have your Levels panel open. If not open check mark Layers under the Windows heading.
Now Highlight both layers. Click top layer and move your cursor over bottom layer and click while holding Shift key.
OK now both layers are highlighted.
Go to Layer>Align>Vertical Centers
Next for Horizontal
Layer>Align>Horizontal Centers
Now all centered up.
Remember this won't work unless both layers are highlighted.
I just tested for black and white and don't see a basic difference between Desaturating or Mode>Greyscale.
If you use the Adjustment layer button on the bottom of the layer screen and choose Black & White a Properties Screen appears and you have additional sliders to fine tune your Highlight Mid-tones and shadows by adjusting the color sliders.
Sep 5, 2018 23:59:20 #
SonyA580 wrote:
I think Jack has nailed your pink background problem. When I open both pictures in PS they are both sRGB color shots. If you don't want any color at all, simply convert to "Grayscale". You may have to increase contrast a bit (levels or curves) to get the proper look.
I'll try that. Thanks.
Sep 6, 2018 00:05:17 #
Jim-Pops wrote:
Well, you asked a question I had no answerer for. ... (show quote)
I'll try the steps you suggest on the alignment. I actually have tried the BW setting, but I didn't know what to do on the following screens. When I have playtime I'll do some fiddling. I do recall that lne of my old printers always put a magenta hue on black and whites. Here it only shows up where I've used the eraser. So I thought it was somehow an effect of that tool.
And thank you so much for all your efforts!
Sep 6, 2018 06:28:35 #
For my HP printer , I go into the settings and select print in grayscale , not color , and the pink is gone for black and white photos. Tommy
Sep 6, 2018 08:18:02 #
Kathy, the way I would centre a small 5 x 7 picture onto a larger canvas Lets say a blank A4 page.
Create a NEW image (Blank A4) in P/shop. Next open your 5 x 7. Now at the top of the screen both image titles should be shown. as image 123 and Image 456. Select the MOVE Tool. Click on the displayed small picture. With the mouse button depressed, drag the 5 x 7 up to the A4 image title, pause for a second or two, still holding the mouse button down. Now press and hold the shift key, dragging the image back down to the middle of the screen. Release the mouse button and then the shift key. You now have the A4 image open, with the 5 x 7 centred on it.
It has taken much longer to type this than to actually do it. A very quick method to achieve what you want without having to go through the align procedure.
Roger
Sep 6, 2018 10:32:28 #
Jolly Roger wrote:
Kathy, the way I would centre a small 5 x 7 pictur... (show quote)
Thanks, Roger That's sort of what I do. It's FINDING the center that's hard. Is there something about holding down the shift key that causes it to automatically find the center? Right now, I've found the grid lines and use them and the rulers to find center. Doing a little math worked. Just want an easier way.
Sep 6, 2018 10:57:32 #
AzPicLady wrote:
Is there something about holding down the shift key that causes it to automatically find the center?
Yes Kathy, holding down the shift key centres it. If you don't hold the shift key all that happens is you move one image on top of a second image.
Give it a go. It's very simple and the fastest, easiest way that I know.
Sep 6, 2018 11:03:59 #
Yes, Jolly Roger's way works holding the shift key at placement. If you forget to hold the shift key the picture will drop on the 8.5 x 11 but in the wrong place. The only way to correct it is the other way I previously mentioned - or - delete this new layer and re-import but this time remembering to hold the shift key.
Sep 6, 2018 11:14:31 #
If you want to reply, then register here. Registration is free and your account is created instantly, so you can post right away.