Fixing 'blacks' in Lightroom
Jul 31, 2018 10:01:21 #

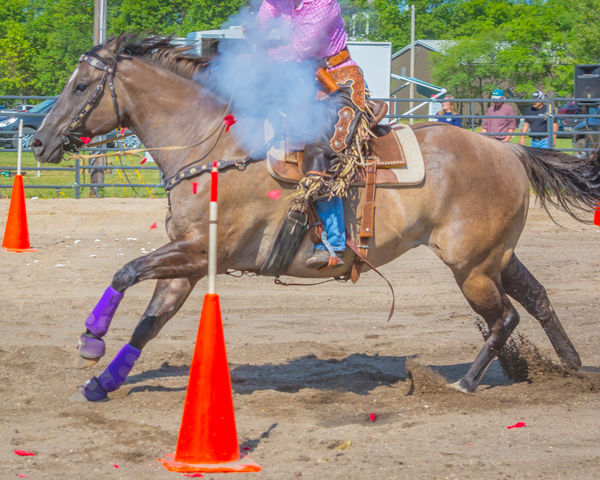
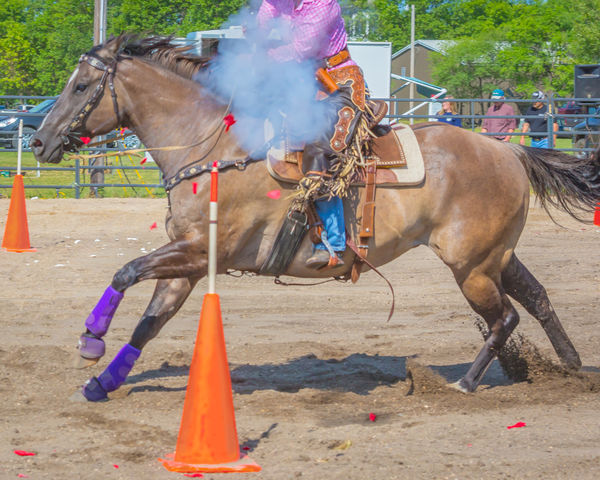
I'm having a heck of a time getting the blacks (actually reds and oranges) shadow clipping in the basic module. The cones in this photo are what I'm having problems with. Thank you for your help.
Jul 31, 2018 10:04:19 #
A lot of cameras tend to over saturate reds.
Have you tried reducing the reds in the HSL module?
Have you tried reducing the reds in the HSL module?
Jul 31, 2018 10:06:42 #

Try the HSL section and adjust the luminance and staturation of the red and orange. I'm not sure of the technical name, but if you click 'spot' in the upper left corner of this section and then clink on the cone, the slider adjustments apply to the colors where you clicked for the selection. It looks like you'll want to add + to the luminance (brighten), then reduce the saturation. If the color is still wrong, then use the Hue to finish.
Jul 31, 2018 10:10:07 #
rwilson1942 wrote:
A lot of cameras tend to over saturate reds.
Have you tried reducing the reds in the HSL module?
Have you tried reducing the reds in the HSL module?
Yes I have, but it doesn't help the muddy look, just changes the color.
Jul 31, 2018 10:18:32 #
CHG_CANON wrote:
Try the HSL section and adjust the luminance and staturation of the red and orange. I'm not sure of the technical name, but if you click 'spot' in the upper left corner of this section and then clink on the cone, the slider adjustments apply to the colors where you clicked for the selection. It looks like you'll want to add + to the luminance (brighten), then reduce the saturation. If the color is still wrong, then use the Hue to finish.
I'll work on that, thanks
Jul 31, 2018 11:00:22 #
thelazya wrote:
I'll work on that, thanks
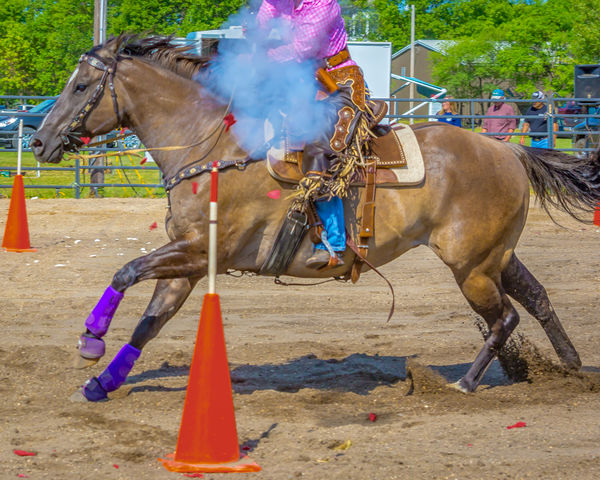
Don't know if this is what you want but here's a quick attempt to fix your photo.
Basic Panel
- Auto
- then Dehaze to +10
HSL Panel
- Saturation
- Red to -31
- Orange to -7
- Luminance
- Red to -30
- Orange to -30
- Hue
- Red to +9
- Orange to +15
Aug 1, 2018 07:35:36 #

THe above comments will work best if the photo is in RAW format. the edits work with JPG, but not as much or as well. Also every time you save the JPG with the same name your are loosing resolution in the picture. Also use the histogram and watch what those adjustments do. This will help also of learning to read the histogram and where adjustments are made first. GL
Aug 1, 2018 08:51:06 #
FrumCA wrote:
Don't know if this is what you want but here's a quick attempt to fix your photo.
Basic Panel
- Auto
- then Dehaze to +10
HSL Panel
- Saturation
- Red to -31
- Orange to -7
- Luminance
- Red to -30
- Orange to -30
- Hue
- Red to +9
- Orange to +15
Basic Panel
- Auto
- then Dehaze to +10
HSL Panel
- Saturation
- Red to -31
- Orange to -7
- Luminance
- Red to -30
- Orange to -30
- Hue
- Red to +9
- Orange to +15
Thank you I'll try this also. And yes I only shoot RAW
Aug 1, 2018 13:34:44 #

thelazya wrote:
I only shoot RAW
I’ve always wondered about this. Is RAW better than JPEG? 😂😂😂
Aug 1, 2018 16:21:14 #
Reds are difficult in their "blooming" and Adobe Photoshop can give many detail options on blacks and shadows.
Aug 2, 2018 15:00:13 #

It's a well recognised fact that most camera sensors don't handle vivid reds very well. The histogram doesn't show much in the way of reds being saturated, but I think the histogram isn't telling the whole story. I think the sensor suffered from more saturation of reds than the histogram suggests, and there is a resulting loss of detail in the cones. The reds are certainly strong enough but the fine detail has been lost.
If you want to make the most of what you have, one possibility is to ramp up the rest of the shot and subdue the cones as much as possible before they start to look too unnatural. If you can make the rest of the image more vivid, the cones will be less attention-grabbing. It's not a perfect answer, but with the exposure as shown, I don't think there is a perfect answer.
-
Aug 2, 2018 20:12:35 #

Holy horsefeathers! How did your camera manage to mess these up so much! :-) It took me 43 steps to get this far, jiggering them closer and closer to what I think were orange cones. I used selection, camera raw vibrance and saturation, hue, curves, blur. Most used was hue, moving the color slider to get closer to orange and adjusting saturation and lightness. Whew! If they had to be perfect, I'd say I'd have to spend as much time as I have already to adjust blending, shading, and edges.
Aug 26, 2018 21:24:45 #
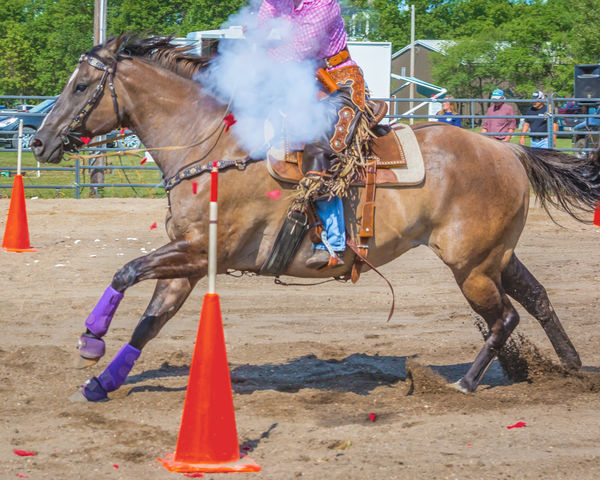
I Made all my edits in Photoshop. I opened with Camera Raw.
Moved sliders,
Temperature +1
Blacks -43
Clarity +5
Vibrance -18
Sharpening Screen:
Amount 83
Masking 53
Luminance 5
The cones had a glow on the edges so I cloned the dirt over to the cone to sharpened the edges on the cones and the pole in front of the horse. I think the glowing edges were creating most of the objectionable color.
I used the Spot Healing Brush to remove several of the red blotches that might have been floating paper.
I have upgraded to a Nikon D850 and have noticed my reds are now the best they've ever been, haven't changed an of my lenses. I shoot a lot of cars and the reds have always been a problem.
HSL Adjustments:
Saturation,
Orange -1,
Purple +1

Aug 30, 2018 17:11:23 #
Since you are shooting JPEG, check the camera for its picture settings. That is where you can adjust the camera presets for standard, vivid, landscape, portrait, monochrome use, etc. This photo appears to be both overexposed and over saturated causing the highly saturated areas to blow out. Some of those camera settings are customizable and the saturation may have been set too high. Some camera sensors tend to oversaturate certain colors, too. One of the suggestions is to shoot in RAW which would probably give you better control over the colors. With JPEGs, the picture settings are baked in and more difficult to adjust. With RAW, nothing is baked in and vibrance and saturation are easier to adjust.
Aug 30, 2018 17:27:27 #

Rab-Eye wrote:
I’ve always wondered about this. Is RAW better than JPEG? 😂😂😂
You funny!
If you want to reply, then register here. Registration is free and your account is created instantly, so you can post right away.