Recommended resizing parameters for digital images
Aug 14, 2020 15:00:18 #

May 1, 2021 12:51:44 #

CHG_CANON wrote:
As DSLRs increase in MegaPixels (MP), larger high ... (show quote)


Thanks for the info CHG. Recently I have been arbitrarily sizing my UHH images to 2200 ppi on the long side, mainly so that the image will be noticeably larger when double clicked. I will change that to 2048 ppi on future posts.
May 1, 2021 12:56:46 #

jackm1943 wrote:
Thanks for the info CHG. Recently I have been arbitrarily sizing my UHH images to 2200 ppi on the long side, mainly so that the image will be noticeably larger when double clicked. I will change that to 2048 ppi on future posts.
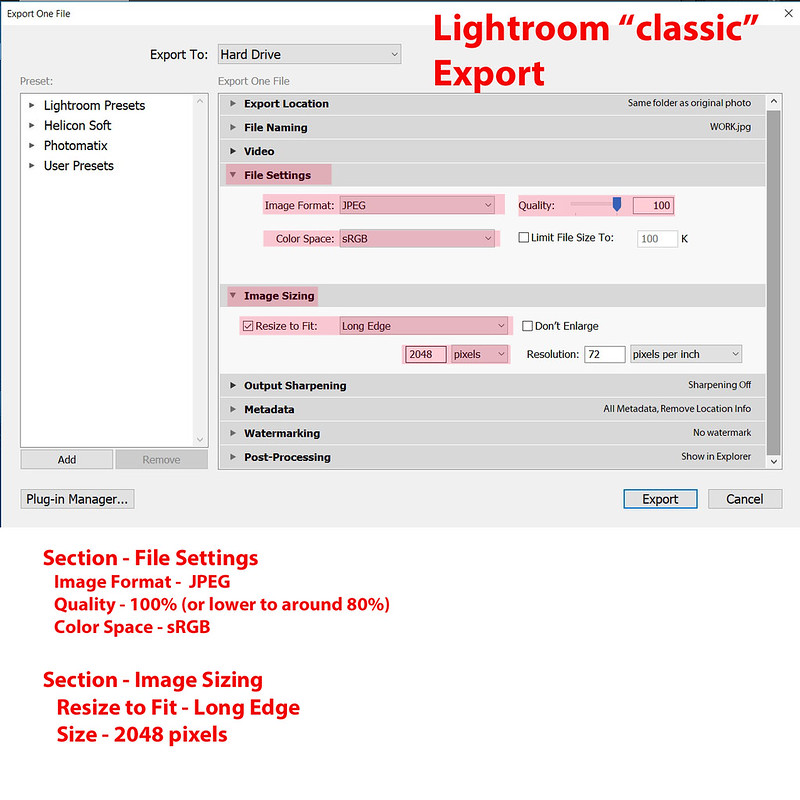
Thank you jackm1943! We're beginning to see the 4K monitor grow into the population. That's a screen that is typically 3840 x 2160 pixels. You can see how things change, but at least this May Day 2021, 2048px remains a useful default standard for 1 output file to be used for all likely digital display devices, phone on up.
May 4, 2021 12:40:31 #
Wow, this is really useful information and something I am not at all familiar with and have not used in the past. I was using the image/resize menu in photoshop and it was creating some problems. My new camera is taking photos at around 180m and in order to use them in hedgehog I have to resize them down to a 5 by 7. Everything else still leaves too many megapixels.
It will take a while to absorb this new information and resize correctly for uglyhedgehog and other things. And this way I can check and make sure it is correctly sRGB as well.
Thanks very much for this.
Gene
It will take a while to absorb this new information and resize correctly for uglyhedgehog and other things. And this way I can check and make sure it is correctly sRGB as well.
Thanks very much for this.
Gene
May 4, 2021 17:06:02 #
CHG_CANON wrote:
As DSLRs increase in MegaPixels (MP), larger high ... (show quote)
Canon
When I looked in file room under the color space, it did say sRGB. So I am still a little confused. Also, this picture was accepted by stock agencies, so that confuses me also.
Thanks, Gener
May 22, 2021 16:25:34 #
CHG_CANON wrote:
As DSLRs increase in MegaPixels (MP), larger high ... (show quote)
Then there is FastStone where you can tweak the compression to as much as 10% without an appreciable loss of quality. First you decide what pixal size you want and then you tweak with the compression. As long as you are working with JPGs.
Nice exhaustive presentation.
Jun 26, 2021 15:17:55 #

CHG_CANON wrote:
Wes, I'd suggest the following: br br 1. Create a... (show quote)
actually my question was more in the line of how does UHH downsize/resample images you upload ? How do I maintain as much IQ considering that process ?
You may have answered that question in all that, but it would have gone over my head lol, sorry.
I was under the impression the dimension limit was 1400 px width.
Jun 26, 2021 16:07:55 #
Jun 26, 2021 18:39:49 #
this will take me some time to even read, no less comprehend lol, but I am one of the less knowledgeable blokes here
for sure. I have copied it so I will have it offline.
The more I try, the more I will succeed.
for sure. I have copied it so I will have it offline.
The more I try, the more I will succeed.
Jun 26, 2021 19:13:29 #
danniel wrote:
actually my question was more in the line of how does UHH downsize/resample images you upload ? How do I maintain as much IQ considering that process ?
You may have answered that question in all that, but it would have gone over my head lol, sorry.
I was under the impression the dimension limit was 1400 px width.
You may have answered that question in all that, but it would have gone over my head lol, sorry.
I was under the impression the dimension limit was 1400 px width.
I am not aware of a 1400 pixel limit. There may be a file size limit but I have already addressed that subject in this thread. Again, FastStone and other utilities can compress a JPG down to as much as one tenth the original file size without an appreciable reduction in quality. For practicality the image only needs to fill the average serious photographer's monitor screen unless the purpose of the upload is to draw attention to part of a larger image.
Jun 26, 2021 19:17:46 #
Well then I will have to review that software I just use Photoshop and keep it as high as possible I haven't even looked at the file size of my image but yes that's certainly something to look into which I will do later tonight I'm working off my phone right now because I'm obviously not sitting up there's a lot of downtime with this condition and sitting is not one of the things I'm not allowed to do freely LOL
But I certainly do appreciate your knowledge and not only to help you giving me but all the help you've given everyone else it surprised me today that I think this last post I made had inspired someone to get out there tubes which I'm thrilled about a good macro shots and find what a what a joy it is so back when I was at the rookery I was teaching people how to be successful photographing birds in flight and I ended up with a little Entourage people following me around but they quickly got bored of doing Virgin flight I never get bored of photographing anything I didn't think I could ever get bored to go to dropping cricket spiders albatross osprey airplanes it wouldn't make a difference I just love photographing
And please forgive the horrible apparent run on sentences with no punctuation I'm speaking to the phone and it's doing the typing and it's frequently wrong and I can't really get the little cursor to go back where I need to make marks so it all looks like one big running on settings three paragraphs long but it's really not intended that way :-)
Jun 26, 2021 19:19:18 #
Jun 26, 2021 20:07:08 #
I Photoshop is usually what I use but it's like Photoshop 6 and I'm sure they've made improvements in JPay compression since then and the phone is not very big I mean they're not very small sorry usually one and a half to two and a half I'm not trimmed down I'd have to look I really haven't paid much attention of light but yeah I like I said I'm going to go through the the posting requirements and actually make sure I haven't got this screwed up with another place LOL
Jun 27, 2021 07:09:14 #
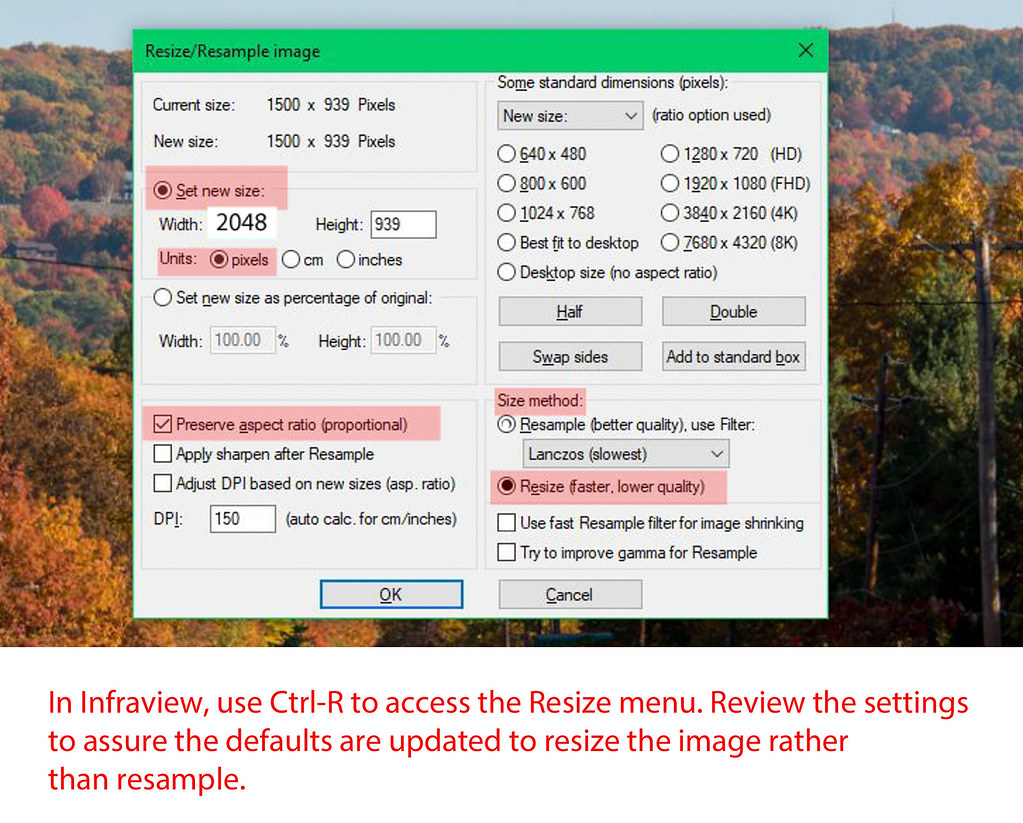
Dannie, no12mo - I read two ideas in the recent June 26 questions. First, UHH doesn't do anything to your file attachment regarding the actual attachment. The relevant issue here is the thumbnail width at 800 pixel wide. An image at 800px or less wide displays as-is within the UHH page. An image wider than 800px is compressed as a thumbnail as displayed within the UHH page. When the attached file is opened and displayed (in another browser page or downloaded and displayed locally), the file is the same / unchanged file as the community member uploaded and stored as an attachment.
The 'limit' to UHH attachments is 20MB - megabytes. There is no pixel size limit as long as you can hold the file size under 20MB. Remember there is no 1 to 1 relationship of pixels to bytes in a JPEG file.
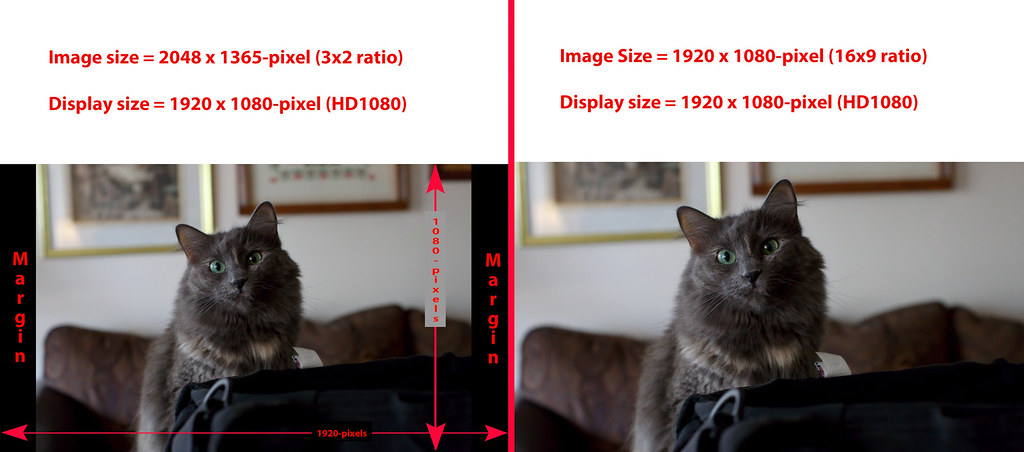
The idea presented in the topic of this post is your UHH community members will 'see' your file attachment on screens that range from 1920x1080 (2.1MP) to 3840x2160 (8.1MP), where that larger size is an ultra modern "4K" TV or video monitor. That 4K resolution, aka UHDTV, is still smaller than your circa 2006 10MP Canon Rebel Xti or the 10MP Nikon D80 from the same year (3872×2592).
When you resize your digital image to 2048x1365 (2.8MP), you're filling or nearly filling every most every possible target screen in the community, as well as easily holding the file size on the 20MB file size limit.
The 'limit' to UHH attachments is 20MB - megabytes. There is no pixel size limit as long as you can hold the file size under 20MB. Remember there is no 1 to 1 relationship of pixels to bytes in a JPEG file.
The idea presented in the topic of this post is your UHH community members will 'see' your file attachment on screens that range from 1920x1080 (2.1MP) to 3840x2160 (8.1MP), where that larger size is an ultra modern "4K" TV or video monitor. That 4K resolution, aka UHDTV, is still smaller than your circa 2006 10MP Canon Rebel Xti or the 10MP Nikon D80 from the same year (3872×2592).
When you resize your digital image to 2048x1365 (2.8MP), you're filling or nearly filling every most every possible target screen in the community, as well as easily holding the file size on the 20MB file size limit.
Jun 27, 2021 14:27:03 #
CHG_CANON wrote:
b Dannie, no12mo - /b I read two ideas in the re... (show quote)
Much appreciated information. I do not know why I thought there was a limit on dimension.
I am sure what I am seeing in the difference in IQ of the thumbnail vs the original. Now I know. Thanks.
I do post on another forum from time to time and I know they have limits, so perhaps I mixed them up.
I tried changing my IQ when saving today, from a 12, the highest, to 11, and saw no difference other than file size.
This will save me some disk space as I have over 72k jpg files, but I always save the Raw anyway.
I am still trying to find the best Fstop for this lens. The camera says its F4, but I think F8.
I need to set up a proper test.
I find with the tubes I do loose depth, so sometimes stacking may be required more often to obtain what I want.
CS6 seems to do Ok for stacking so far.
If you want to reply, then register here. Registration is free and your account is created instantly, so you can post right away.