Unitary White Balance and ETTR / EBTR
Mar 3, 2016 21:12:02 #


This article refers to the images linked above. The first image is SOOC, the second Post Processed.
Explanation of Unitary White Balance and its use in certain digital imaging
Abbreviations Used in this Article
ACR - Adobe Camera RAW
blinkies - in camera or Photoshop, areas that appear to be over or under exposed.
DR - Dynamic Range
EBTR - Expose Beyond the Right
ETTR - Expose to the Right
Histogram - a graphical representation of the distribution of numerical data.
PS - Photoshop
WB - White Balance
UWB - Unitary White Balance
To start the explanation of Unitary White Balance one must first be aware of the construction of the sensor assembly within the digital camera.
The Sensor
The sensor is constructed of a rectilinear pattern of light sensing diodes, called photosites. These sites are sensitive to light. Thats it. Each site knows a photon has struck it, but is insensitive to the colour. Each site only registers how many photons have struck that site. Thus, we essentially end up with a black and white type of image. How to solve the problem of getting colour from this component.
Enter the Bayer filter, developed for Kodak in 1974 through 1975 by Bryce E. Bayer. Kodak patented this filter in 1976. This is a rectilinear filter comprised of squares of Red, Green, and Blue coloured squares, such as a checkerboard. The pattern is:
GRGRGRGRGR .
BGBGBGBGBG
GRGRGRGRGR
BGBGBGBGBGB .
"There are twice as many green elements as red or blue because this mimics the way the human eye provides the sharpest overall color image." Ken Parulski, former chief scientist for Kodak's digital camera division, explained. The rows are made in this manner. The odd number rows are alternating Red and Green. The even number rows are alternating Blue and Green. This produces an RGBG pattern. This is placed over the sensor such that each square is aligned with a photosite.
Each photosite will record the number of photons which are not filtered through the various squares of Red, Green, and Blue. In order to reconstruct the full colour image from the incomplete colour samples output from the sensor, a demosaicing algorithm is used. This algorithm has the following traits:
Avoid introducing false colour artifacts
Maximum preservation of the image resolution
Computation is simple to provide fast processing
Easily allow analysis for accurate noise reduction.
So, now we know why we have a filter in front of our sensor. We also know that the filter provides more green then either red or blue. Most of the digital cameras we use acquire images using a single image sensor overlaid with this Bayer filter, so demosaicing is part of the processing procedure required to render these images into a viewable format. Most or our digital cameras can save images in a raw format allowing the user to demosaic them using software, rather than using the camera's built-in firmware.
A Hint of Where Were Heading
Now, there have been many discussions on this site regarding Expose to the Right (ETTR) and Expose Beyond the Right (EBTR). What if we could augment these methods and get an even more of our available DR? One that would allow us to optimize the exposure of RAW images. We could use the histogram, but the histogram is, ordinarily produced by in-camera software after the RAW data has been converted to a JPEG image. The problem is that the resulting JPEG image can differ quite a bit from the true RAW histogram. The JPEG image on the back of the camera, and the resulting histogram can be a less than accurate tool for assisting in the capturing the maximum dynamic range without clipping. Additionally, there is a problem comparing jpg histograms with RAW histograms because the scales of the X-axis differ.
Parenthetically, in my, and others, opinion the only useful comparison of the jpg histogram with the RAW histogram, of the same image data, is to overlay the two histograms with coincident points of middle gray (127) and EV 0 on the x-axis.
Unitary White Balance
Enter the somewhat kludgie trick of using UniWB. My camera is set up to make use of UniWB. In doing so the image is specifically designed to produce a JPEG that be a truer representation of the RAW capture, and will look greenish when viewed. However, the result is also that it is a very good approximation of the real RAW histogram and thus makes optimum use of the sensors available DR, as shown in the Processed version of the photograph. Its a method of optimizing both ETTR and EBTR to work with the full RAW dynamic range of the sensor rather than the, potentially conservative, limits imposed by the in camera jpg.
So, there is the explanation regarding the greenish tint of the original SOOC image and its overexposed appearance. It also explains the detail available for use in post processing the image. Now a disclaimer, in all honesty, the above is a synopsis of several articles available on the web. If one cares to delve deeper into the subject of Unitary White Balance, there are links to some web articles containing additional, and in some cases very detailed information. They are at the end of this article. So, how was this done? The following is a description of how I applied this information to use in my Nikon D700.
Preparing the Camera
Making use of the Unitary White Balance setting
To my knowledge there are only two camera brands that will allow the use of a custom WB, Canon and Nikon. Since Im using a Nikon D700, Ill only address the steps necessary to create a custom WB using Unitary White Balance in that camera. In addition, keep in mind that this is a 5 year old camera. The current models of cameras have improved sensors and, additionally, more dynamic range. The method discussed here may not be as applicable, or necessary, to the more recently released models of todays cameras which have a DR of 13-14, which can effectively render 15-17 using EBTR.
The appropriate file .NEF file was downloaded from the link found on Guillermo Luijks web page, see links below, addressing UWB. This file provides the D700 with the necessary information to reasonably approximate the actual output of the sensor.
Following the Nikon Owners Manual, I installed the file as a custom WB in my camera and select that for my WB setting.
The was pretty much it for setting the camera up to utilize UWB.
(For those wanting an easier method to setting up the camera, check out the QUICK METHOD FOR OBTAINING THE UNIWB section in Guilermo Luijk web site).
After installing the file and placing the cameras WB setting to use it, it was time for testing. I took numerous photographs of a Macbeth Color Chart. With each photograph I increased the exposure by 1/2 step over the previous. I then opened each RAW file in ACR and made exposure adjustments to normalize the image. At some point, there was a photo that could not be brought back to appear as the original color chart appeared. At that point, I reached where the camera failed to expose without blowing out the highlights, the white square on the chart. This rendered a determination of 1-1/2 to 2 stops of additional exposure I could use to utilize the DR of the sensor.
ETTR and EBTR
Expose To The Right and Expose Beyond The Right, addressed in other posts in this site, are very valid and useable concepts. They should be incorporated into any carefully exposed image one desires to take. The metering of the scene should be careful and dutiful attention should be placed on making sure one is metering the brightest portion of the scene and placing it appropriately at the right of the DR of the camera.
Having all this background information, Its time to address taking the photograph in the example.
Determining The Exposure Setting
I have my cameras Exposure Mode set to Manual and the Metering Mode set to center weighted. The reason for this, instead of spot, is that I want to provide myself with some wiggle room when determining the brightest part of the scene to obtain the exposure setting. I also have the custom UniWB selected for the White Balance setting. As explained above, this affords me a little bit more usable DR than any of the standard WB settings.
I then visually determine the brightest part of the scene to be photographed and center the viewfinder on that part of the scene. In this case, the very brightest areas of the clouds closest to the camera. Pressing the shutter release button 1/2 way to allow viewing of the shutter speed and f-stop settings within the viewfinder. I then make the shutter speed and f-stop adjustments, as necessary.
The Actual Settings for Exposure
Unlike Black and White film exposure, where exposure is set for the darkest part of the scene and development is, ideally, timed to produce a negative density suitable to rendering the brightest part of the scene appropriately, colour and digital imaging are pretty much the exact opposite. The exposure is set for the brightest part of the scene and the subsequently darker values fall below that.
As mentioned earlier, careful testing of my camera revealed that I can expose 1-1/2 to 2 stops greater than what the camera indicates as overexposure and still capture useable data in the image. Also, realizing that the meter is indicating a Zone V exposure for whatever I am metering, in this case the brighter parts of the clouds, I can increase the shutter speed/f-stop combination to provide additional steps above the indicated reading to place those areas in the appropriate zone.
Instead of using a meter indication with the "needle" aligned with 0, the "needle" will be significantly to the + side of the meter.
The amount of adjustment towards the + side will vary depending upon the observed brightness and pre-visualized conceptual value placed on the area being metered. The values lower than the brightest part of the scene will fall at appropriately related darker levels within the image. Any adjustment of the shutter speed or f-stop will slide all of the values together the same amount.
Keeping all of the this in mind, I placed the rectangular meter indicator within the viewfinder on the brightest portion of the clouds closest to the camera. Since there was little observable detail within that area, I chose to place that value in Zone IX. This required an adjustment to the camera to increase the exposure by 4 stops.
Incidentally, I also use a Sekonic L-758DR exposure meter, which has a profile stored within it that replicates the in camera metering. This allows me to use either in camera metering or external metering and achieve the same result.
Taking the Image
With the exposure setting now set, I then compose the scene within the viewfinder and take the image. The resulting image, SOOC, when previewed on the back of the camera will show a green tinted image with an inordinate amount of blinkies. Using this technique renders chimping rather useless, as Ive stated in a number of prior posts. Viewing just the histograms on the back is much more useful. I rarely do this, as I am very familiar with what my camera will give me.
http://static.uglyhedgehog.com/upload/2015/10/11/1444601010698-d700_2015091301_012_sooc.jpg
Post Processing the Photograph
The most important step in the post processing of the image is making the appropriate compensations for the exposure. As I mentioned I can expose 1-1/2 to 2 times over what would be considered too much exposure. Knowing that, the first step in Adobe Camera RAW is to move the Exposure slider to the left, or minus value, 1.5 to 2.0. I then do a overall white balance of Auto. This provides me a good starting point from which to adjust the remaining sliders prior to opening the image in PS.
Once open in PS, I do an image specific white balance, a bit of burning, dodging, vignetting, and sharpening. That is pretty much it.
http://static.uglyhedgehog.com/upload/2015/10/11/1444601010978-d700_2015091301_012.jpg
Closing Thoughts
As stated, this was done with a Nikon D700. With todays digital cameras, the DR is quite a bit more than it was 5 years ago and significantly greater than cameras available 10, or more, years ago. So, this extra effort may not be as applicable today, or in the future. Modern cameras have larger DR capabilities. Still the same, if one can get a bit more range and utilize it, why not? However, the effort in using this practice may yield little advantage versus that effort of using it. I would still advocate using ETTR and EBTR, but without the UniWB profile.
Additionally, who knows, there could be a camera coming out in the future that will provide a histogram utilizing the RAW data.
Links for further reference and reading
http://www.malch.com/nikon/UniWB.html
http://www.dslrbodies.com/cameras/camera-faq/what-is-uniwb.html
http://www.guillermoluijk.com/tutorial/uniwb/index_en.htm
http://photo.stackexchange.com/questions/664/what-is-universal-white-balance-uniwb
Apr 12, 2016 22:54:36 #

rmalarz: Thanks for the tutorial on getting more dynamic range captured in camera.
Am I correct, meanwhile, in supposing the use of AE(Lock) for exposing the bright sky serves as a poor man's substitute for your method?
I've noticed that having the sky properly exposed in camera tends to true up the colors of the other areas in the image.
Further, in using ETTR, I've found the RAW image to look way overexposed, although the Histogram shows the image graph short of the rightmost point of the Histogram.
Either way, the coloration and saturation of the resulting image look very appealing to the eye, for somehow looking more natural.
I look forward to your reply.
Apr 13, 2016 01:02:22 #
anotherview wrote:
rmalarz: Thanks for the tutorial on getting more ... (show quote)
anotherview, You're welcome.
Using the sky is a good way to set the camera for a Zone VI exposure, assuming your are in the northern hemisphere, and point the camera north at around noon. The idea of ETTR is to expose the brightest source of light in the scene so that it is in Zone VIII or VIX, depending if it is just very bright or specular.
Study the scene you are about to photograph, carefully determine the brightest object in that scene. Spot meter on that source of light and then, either, open the f-stop a couple of stops, probably 3, or, slow the shutter speed 2 to three stops. You can also use a combination of f-stop and shutter speed adjustments to obtain a 2, preferably 3 stop additional exposure to what you measured.
Yes, the original RAW file may look over exposed. However, in post processing, I'm using ACR as an example, one would slide the exposure slider to the left slightly, probably 1-1/2 to 2 stops. That will slide the histogram to a more centrally located position.
Using the sky, as you suggested, works to a limited degree. Using the brightest part of the scene and pushing that just to the point where the jpg preview on the camera back shows blinkies is a much better method. Just don't worry about the blinkies. I can't tell you exactly how much to push the exposure to the right, as each camera is slightly different. That includes same model from the same manufacturer. They all vary slightly.
I hope this answers your question, and provides you a bit more information.
--Bob
Apr 13, 2016 09:23:19 #
Thanks for this general confirmation of using AE(Lock) to expose for the sky: "Using the sky, as you suggested, works to a limited degree. Using the brightest part of the scene and pushing that just to the point where the jpg preview on the camera back shows blinkies is a much better method."
I've been using this method only recently, and like the result. I note that using AE(lock) to set exposure for the sky tends to darken the foreground, slightly increasing the noise there. Even so, the improved coloration of the main subject I see as worth it, because the sky correctly exposes this way. Images then start with the sky looking very close to the natural view.
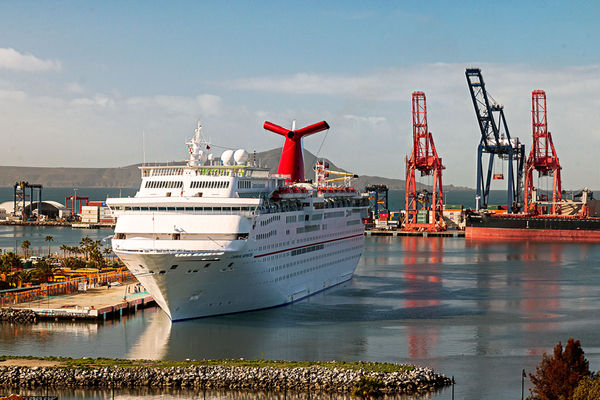
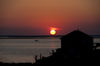
See one example below from use of AE(Lock).
I've been using this method only recently, and like the result. I note that using AE(lock) to set exposure for the sky tends to darken the foreground, slightly increasing the noise there. Even so, the improved coloration of the main subject I see as worth it, because the sky correctly exposes this way. Images then start with the sky looking very close to the natural view.
See one example below from use of AE(Lock).
rmalarz wrote:
anotherview, You're welcome. br br Using the sky ... (show quote)
Cruise Ship, Ensenada Harbor
Jul 27, 2017 11:12:35 #
rmalarz wrote:
Holy $hit. That is quite a difference. Absolutely wonderful.
Oct 14, 2017 21:50:36 #
Oct 15, 2017 08:14:11 #
Thanks for that detailed explanation! That certainly opened my eyes to an interesting technique. I'll "give it a go"👍🤓👍
Dec 7, 2017 22:12:34 #
Thanks all and my apologies for not replying sooner. Things in my real life can get a bit busy at times.
--Bob
--Bob
Dec 18, 2020 18:07:15 #

rmalarz wrote:
Thanks all and my apologies for not replying sooner. Things in my real life can get a bit busy at times.
--Bob
--Bob
And three years plus a few days later this is still a reference...
Dec 18, 2020 18:24:57 #
Rongn...., thank you.
—Bob
—Bob
Rongnongno wrote:
And three years plus a few days later this is still a reference...
If you want to reply, then register here. Registration is free and your account is created instantly, so you can post right away.