Tutorial: Welcome to Raw Exposure
Mar 25, 2016 16:56:13 #

Rich1939 wrote:
Dave, I believe that a light has come on in my co... (show quote)
You are absolutely right..."open shade" works quite as well as an overcast day.
And I can easily relate to your feeling of a light coming on...I felt that when reading Bruce Fraser's Adobe white paper on Raw Exposure and Michael Ricmann's article on "Expose to the Right", and Jeff Schewe's further observations on the matter.
Sep 21, 2016 20:47:57 #
I received some questions from Gary Minor, re-read the tutorial, and changed some wording that could easily have been confusing.
This:
"or,
what about being able to cut your already fast shutter speed in half to permit hand-holding with a longer lens, or using a monopod instead of a tripod?"
...has been replaced with this:
with this;
"or,
what about being able to cut your already short shutter duration in half (reduce it by one full stop) to permit hand-holding with a longer lens, or using a monopod instead of a tripod?"
I have long been used to speaking of "shutter duration" rather than shutter speed, but occasionally lapse into the more common ( and occasionally confusing) phrase "shutter speed". My apologies to any who found the original sentence understandably confusing.
The text of the tutorial is being changed.
Best regards,
Dave
Sep 22, 2016 22:22:16 #
Gary, you wrote:
Dave, Thanks for the response.
I knew that you meant shutter duration. This was clear from the rest of the sentence.
However I think that the complete opposite is true.
You say:
EBTR allows cutting the shutter duration in half to permit hand-holding with a longer lens, or using a monopod instead of a tripod.
I say:
EBTR requires increasing the shutter duration by double, preventing hand-holding with a longer lens, or requiring using a tripod instead of a monopod"
You say:
The advantage to EBTR is that it maximizes ALL exposure options beyond those available for raw capture with a lesser dynamic range.
I say:
The disadvantage to EBTR is that it reduces ALL exposure options below those available for raw capture with a lesser dynamic range.
Thanks for the listening,
Gary
xxxxxxxxxxx
Gary,
The assertions you make are unaccompanied by the rationale upon which you base them.
In essence, you are stating that a camera with a sensor of lesser dynamic range is to be preferred to a camera with a sensor of greater dynamic range. Why not support that promise for starters..???
And be sure to relate your comments and justifications to raw capture, NOT JPEG files. It is in that connection with raw capture that EBTR becomes essential.
Dave
Sep 23, 2016 11:04:56 #
Garyminor
Loc: Raleigh, NC
Uuglypher wrote:
Gary,
The assertions you make are unaccompanied by the rationale upon which you base them.
In essence, you are stating that a camera with a sensor of lesser dynamic range is to be preferred to a camera with a sensor of greater dynamic range. Why not support that promise for starters..???
And be sure to relate your comments and justifications to raw capture, NOT JPEG files. It is in that connection with raw capture that EBTR becomes essential.
Dave
Dave,
Without a doubt, the best quality comes from exposing as far to the right as you can, without exceeding the capabilities of the sensor.
Certainly, I would prefer a camera with a sensor of large dynamic range.
I'm simply pointing out that it is not always best to use all of that dynamic range, depending on the scene and the objectives.
It may be more important to have larger depth of focus, or shorter shutter duration, rather than a higher quality image.
I also understand that if the brightest highlights fall one stop less than the highest available from the sensor, then 50% of the possible sensor values are going unused.
My assertion is that when you expose beyond the right, you incur the cost of longer shutter duration or larger aperture.
Here is my rationale.
Start with a normally exposed, sunny day scene, ISO 100, 1/100 sec shutter, f/16 aperture, using a 200mm lens.
In this case, it would be difficult to hand-hold the 200 mm lens, but a monopod would probably be OK.
If instead, you expose beyond the right, then according to the tutorial, the shutter duration would become 1/200 and you would be able to hand-hold a 200mm lens.
It seems to me that this is incorrect.
What actually happens is that the shutter duration becomes 1/50 sec, and a tripod is required. This is exactly opposite of what is stated in the tutorial.
Note 1: My comments and justifications are related to raw capture.
Note2: This is not an expression of my opinion of when to use EBTR. Each user must evaluate the benefits and cost, depending on the objectives.
Thanks,
Gary
Sep 23, 2016 12:24:54 #
Garyminor wrote:
Dave, br br Without a doubt, the best quality com... (show quote)
Gary,
Your premise is incorrect.
When you use the "Sunny-F/16" rule you are using the accepted and very useful rule for exposing film and JPEG files.....
NOT for exposing for optimal raw image data capture.
Raw capture is a totally different imaging medium from film and JPEG files.
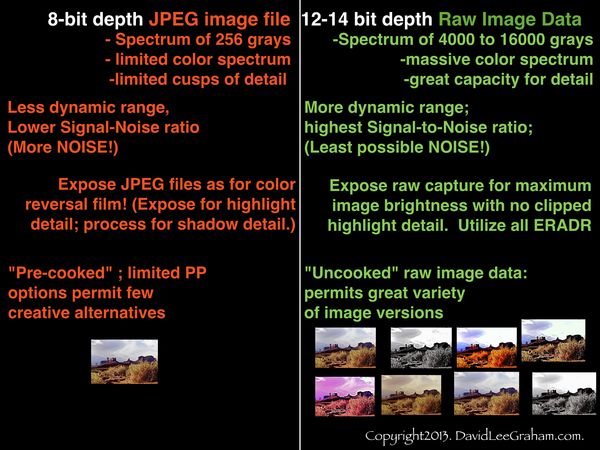
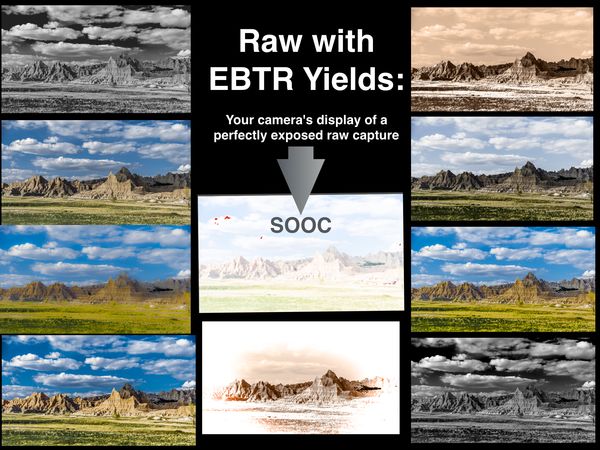
There is no "down side" to an appropriately exposed raw capture. If you need to stop motion, use an ultra-short shutter duration; if you need a shallow DOF , use a large aperture, if you need....well...you get the idea. The image seen in your camera's display will be washed-out with blown highlights...which is what you WOULD have captured IF you had shot a JPEG file. But when you download that SOOC raw file into your raw converter and tonally normalize it by sliding the Exposure slider to the left, you'll find the image you visualized capturing.
You really have to give it an honest try, Gary, before you can begin to understand its merits. And having captured an appropriately exposed raw capture, you'll find that image file has amazing creative versatility from high-to low-key approaches and imaginative manipulations of tonal and color range and spectra.
And finally, the decision as to whether or not to use EBTR is, of course, up to the photographer. From my perspective, if capturing raw image data, EBTR is always the exposure tactic of choice; however, if JPEG capture is to be used ... for example when it it must be under some circumstances...such as some burst exposure modes for B.I.F.s ...then the traditional film/JPEG exposure strategies that I've used since the late 1940s become the comfortable recourse.
It's all based upon and derived from what I consider to be the basic Canon of Digital Exposure Knowledge:
Reichmann, Michael, essay in Luminous Landscape, 2003
"Expose Right"
http://www.luminous-landscape.com/tutorials/expose-right.shtml
...and a follow-up in 2011:"Optimizing Exposure"
http://www.luminous-landscape.com/tutorials/optimizing_exposure.shtml
Fraser, Bruce,
"RAW Capture, Linear Gamma, and Exposure"Adobe White Paper, 2004,
http://www.adobe.com/digitalimag/pdfs/linear_gamma.pdf
Fraser, Bruce, and Jeff Schewe, "Real World Camera RAW.
Peachpit Press, 20O9,
Schewe, Jeff, "The Digital Negative", Peachpit Press, 2013
Schewe, Jeff, "The Digital Print" , Peachpit Press, 2014
I can't remember if I've posted these graphics in our discussions, but if I have...redundancy has its merits.
Best regards,
Dave
Sep 23, 2016 13:29:43 #

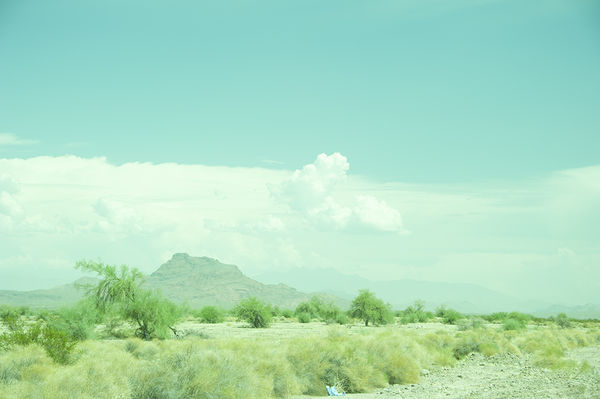
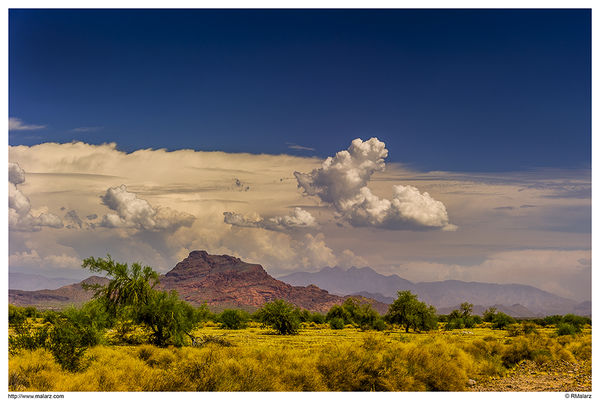
Just to add a couple of examples, inspired by Dave's posts of a while back, here is one I did when starting to use the ETTR/EBTR approach. I view this technique as a reverse of The Zone System, wherein I set my exposure for the highlights of the scene and process for the shadows.
Dave, I hope you don't mind my posting a photo illustrating the premise of your post.
--Bob
Dave, I hope you don't mind my posting a photo illustrating the premise of your post.
--Bob
Uuglypher wrote:
A Tutorial for Newcomers to Raw Capture br br Now... (show quote)
Sep 23, 2016 14:31:16 #
rmalarz wrote:
Just to add a couple of examples, inspired by Dave's posts of a while back, here is one I did when starting to use the ETTR/EBTR approach. I view this technique as a reverse of The Zone System, wherein I set my exposure for the highlights of the scene and process for the shadows.
Dave, I hope you don't mind my posting a photo illustrating the premise of your post.
--Bob
Dave, I hope you don't mind my posting a photo illustrating the premise of your post.
--Bob
Not at all, Bob.
your SOOC and post-tonal normalization images are good additional examples of result of proper raw exposure, the typical appearance of the washed-out image in the thumbnail of the camera's display, and the definitive evidence of the tonally replete, final, post-processed image.
Gary's questions stimulate valuable discussion because they are of the sort commonly heard from those inexperienced with proper raw exposure, pointing out what a different medium raw image data is from both film and the JPEG image file.
Nice examples, Bob; thanks.
Dave
Sep 23, 2016 18:12:05 #
Garyminor
Loc: Raleigh, NC
Dave,
Thanks for the links. I have read, understood, and agree with all of them. I also agree with most of your tutorial where you describe the benefits of EBTR.
The primary concern is your assertion that EBTR allows cutting the shutter duration in half to permit hand-holding with a longer lens, or using a monopod instead of a tripod.
Can you give me an example of that, using numerical values for shutter duration and lens focal length?
Gary
Sep 24, 2016 06:03:38 #
Garyminor wrote:
Dave,
Thanks for the links. I have read, understood, and agree with all of them. I also agree with most of your tutorial where you describe the benefits of EBTR.
The primary concern is your assertion that EBTR allows cutting the shutter duration in half to permit hand-holding with a longer lens, or using a monopod instead of a tripod.
Can you give me an example of that, using numerical values for shutter duration and lens focal length?
Gary
Thanks for the links. I have read, understood, and agree with all of them. I also agree with most of your tutorial where you describe the benefits of EBTR.
The primary concern is your assertion that EBTR allows cutting the shutter duration in half to permit hand-holding with a longer lens, or using a monopod instead of a tripod.
Can you give me an example of that, using numerical values for shutter duration and lens focal length?
Gary
Well Hi there, Gary,
I was just settling in to read your latest installment and see that you've put a rubric tint on reference to the passage that seems to bothe....Oh...My...Gawd! ...that passage I wrote makes NO ... SENSE ...AT ...ALL!
FUDGE!
Sheesh...!!!
At this very moment I envision the "...big brown truck..." pulling into my driveway to deliver what could only be my trophy for having exceeded all previously known records for, and examples of a ridiculously extended duration of blyth obliviousness to such a weird and non-sensical, illogical gaffe! I have to wonder if an entry, in my name, has been submitted for next year's contest. (My wife says it's likely!)
And I suspect that a brown truck is also on its way to you, Gary, bearing a richly deserved award for polite consideration in abjuring use of such terms as " stupid idjit" and "ignorant dolt" in the course of trying to draw my attention, politely, to the ludicrousitude* of my lapse of logic.
Thank you, Gary; you are, indeed, a gentleman and a credit to those who raised you! I can think of a few who would delight in pilloring someone for such a blatant error.
So let's keep this just among the two of us....O.K.?
Best regards to a patient gentleman,
Dave
*A neologism a day keeps the riff-raff away!
Sep 24, 2016 10:39:59 #
Garyminor
Loc: Raleigh, NC
Uuglypher wrote:
Well Hi there, Gary, br I was just settling in to ... (show quote)
Dave,
Thanks for your very gracious response. That makes it all worthwhile.
A new friend,
Gary
Oct 31, 2016 09:30:11 #
Uuglypher wrote:
A Tutorial for Newcomers to Raw Capture br br Now... (show quote)
Thanks for a great tutorial I just found. A few questions:
1. Is your first image the one intended? The white looks more blown than the one just below at allegedly higher shutter speed (less exposure).
2. The text talked to changing aperture for the test but your examples change shutter speed. Please clarify.
3. The last exchange suggests you agree that decreasing shutter speed isn't going to create sharper images with longer lenses. Did I get that right?
Thanks
Oct 31, 2016 09:33:10 #
MtnMan wrote:
Thanks for a great tutorial I just found. A few questions:
1. Is your first image the one intended? The white looks more blown than the one just below at allegedly higher shutter speed (less exposure).
2. The text talked to changing aperture for the test but your examples change shutter speed. Please clarify.
3. The last exchange suggests you agree that decreasing shutter speed isn't going to create sharper images with longer lenses. Did I get that right?
Thanks
Ah. Rereading answered the first question. You increase aperture to get to the starting point for the test. Got it.
Nov 22, 2016 10:01:30 #
Nov 22, 2016 10:13:46 #

runakid wrote:
What is a RAW converter? Sorry, but I don't know.
Any software that converts the raw data you upload from your camera or card to an image you can see and edit. Lightroom, Adobe Camera Raw, the software that came packaged with your camera, and many others. Here's a link to an article about what these folks consider some of the better ones - http://www.whatdigitalcamera.com/roundup/accessory-roundup/best-raw-photo-editing-software-11150.
Feel free to ask more as you go, we are pretty friendly folks on this section!
Nov 23, 2016 11:56:15 #
MtnMan wrote:
Ah. Rereading answered the first question. You increase aperture to get to the starting point for the test. Got it.
Hi, runakid,
A raw converter is a software application that is necessary for decoding of the raw data captured by your particular camera model, and permits its processing in a linear and non-destructive manner. The software disc that came with your camera contains raw converter software specifically for the proprietary raw data captured by that brand and model camera. There are also raw converters that are updated as new camera models are released. Each update allows converting and processing of raw capture data by many (essentially all...) camera models available as of the date of issue of the latest version of the converter. If you are using Photoshop or PS Elements the raw converter is Adobe Camera Raw (A.C.R.), the best known and generally considered the most versatile of available raw converters. Photoshop Lightroom is based on ACR and thus also provides linear (non-destructive) processing.
Is that too much or not enough info.?
Was it adequately useful?
Dave
If you want to reply, then register here. Registration is free and your account is created instantly, so you can post right away.