Tutorial Daytime to Nighttime with Lighthouse as an example
Feb 9, 2016 18:10:52 #
This Tutorial is basic steps to change a daytime photo to a nighttime photo using a lighthouse as an example.
Photoshop CC, Nik SilverEfx Pro2 and Topaz Star Effects were used to create this image. Although, not necessarily required. This is also based on your knowledge working with layers in photoshop.
1. Convert the image to black & white then make two gradient adjustment layers.
2. Reduce the opacity of the second layer to 20%.
3. Create a curves adjustment layer to lighten and invert that layer.
4. With the paint brush, paint with white brush over the lighthouse, rocks and parts of the ocean where it should show light direction.
5. Next, on the keyboard, press shift, option, command E keys (all at the same time) on a Mac and control,alt. shift E on a PC.
6. This locks in everything that has been done previously and creates a new layer.
7. Change that layer Blending Mode to luminosity.
8. Create another adjustment layer (shift, option, command E on a Mac).
Im on a Mac so the Mac terms are what I will be using from here on.
At this point the background layer (first layer) and the luminosity layer are the only layers that should be on.
1. Next go into Silver Efex (or any B&W conversion software) to convert back to B&W.
2. Once in Silver Efex choose underexpose. Click ok, and return to Photoshop.
3. Use Topaz filter Star Effects to create the style for the lighthouse light.
4. Create a new curves (lighten) adjustment layer. Paint to the desired lightness needed.
5. I added a different sky with clouds to create some drama which is optional and changed the blend mode to multiply. Erase excess clouds on the lower portion of the photo, just visible in the sky and around the lighthouse.
6. When finished erasing click option, command E.
7. Add a new layer (gradient layer) with both, foreground & background set to black. Change the blend mode to soft light. With the eraser tool set at a low flow (6%) erase the areas needed to be light for light direction. I have made three separate gradient layers but there is no rule to how many each is desired. Create as many needed.
8. Final layer is to convert to smart filters and create a sharpen layer. (I use the high pass filter) change the blend mode to soft light.
Note: I would recommend to experiment with the blend modes to get different effects.
Screen Shot #1
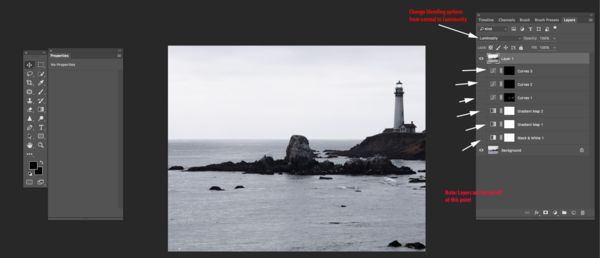
(Download)
Screen Shot #2
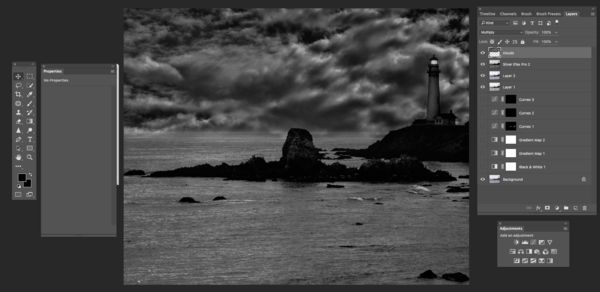
(Download)
Screen Shot #3
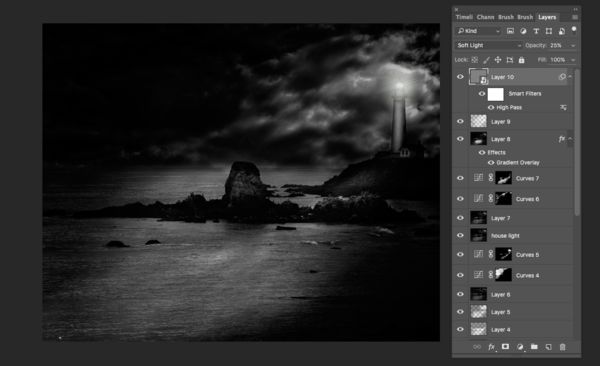
(Download)
Final image
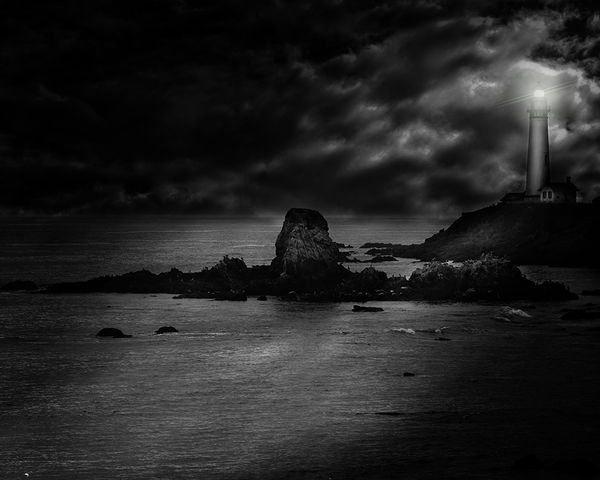
(Download)
Feb 9, 2016 18:24:47 #

Dave Chinn wrote:
This Tutorial is basic steps to change a daytime p... (show quote)
Very nice, Dave. This is definitely worth taking note.
--Bob
Feb 10, 2016 06:42:30 #

Feb 10, 2016 08:51:34 #

Feb 10, 2016 10:57:28 #
Dave,
thank you very much for sharing your mind and processes. I need
to work through this and learn what I can.
Usually I just duplicate a layer, apply an effect, and then mask it where I wish.
You make heavy use of gradient adjustment layers and curve adjustments. I don't
use/know these tools - but now thanks to you, I will learn them and see how to fit them
into my workflow. I also will have to figure out the SHIFT-E thing, to lock in a
set of changes and create a layer from them. I have never done this, but it sounds
like a MUST-KNOW kind of thing.
In the past I think I might have conceptually gotten as far as your screen shot 2, and
am appreciative of the boldness you use in darkening the dark to get to screen shot 3.
I really enjoy the mood/drama of low-key images and I thank you very much for sharing
more about your thought and process to create these.
Feb 10, 2016 11:39:53 #
rmalarz wrote:
Very nice, Dave. This is definitely worth taking note.
--Bob
--Bob
Thank you Bob !!! I am hoping to do a video of the same tutorial to make it easier to follow along .... I think.
Dave
Feb 10, 2016 11:40:17 #
Feb 10, 2016 11:42:38 #
pfrancke wrote:
Dave, br br thank you very much for sharing your ... (show quote)
Thank you !!! Just to let you know as I mentioned above I'm working on a tutorial video that I will post when finished to make things easier to follow.
Dave
Feb 10, 2016 11:50:41 #
waltchilds wrote:
Dave, very nice tutorial and am looking forward to giving it a try.
Thanks Walt !!!
Dave
Feb 10, 2016 12:48:00 #

I completed my run-through, and came out with a credible though unpolished product, it will take more practice. Blessedly, Dave helped out patiently answering questions and adding other screenshots when I got stuck on steps that were unfamiliar to me.
A BIG help in following the steps was to download the screenshots with the layers showing, enlarge it, and use it to check off each step. Dave has some layers in there that he didn't ask us to set up, so don't worry if you find a layer in the screenshot that doesn't have an accompanying instruction, just skip that layer for now, but don't skip any of the ones there are instructions for. It was pretty easy to match up the essential layers and their instructions, once I got some of the terminology figured out.
Thanks again Dave, for bringing us a cool new way to use the tools we have!
Feb 10, 2016 12:50:16 #
pfrancke wrote:
Dave,
... I also will have to figure out the SHIFT-E thing, to lock in a
set of changes and create a layer from them. I have never done this, but it sounds
like a MUST-KNOW kind of thing.
...
... I also will have to figure out the SHIFT-E thing, to lock in a
set of changes and create a layer from them. I have never done this, but it sounds
like a MUST-KNOW kind of thing.
...
Yes, it is an essential. 'command/option/shift/E' on a mac.Once I discovered it, I didn't know how I managed without it.
Apr 4, 2016 18:49:59 #
minniev wrote:
Yes, it is an essential. 'command/option/shift/E' on a mac.Once I discovered it, I didn't know how I managed without it.
:thumbup: :thumbup: :thumbup:
--Bob
If you want to reply, then register here. Registration is free and your account is created instantly, so you can post right away.