Using Flash in Auto and Aperture Mode - Help
Oct 27, 2015 05:20:51 #

Wendy2 wrote:
I've noticed this too with my photography. I shoot in manual and use flash, but never on the camera. I will shoot a scene and it looks one way, then change the settings, maybe a different aperture, and the scene takes on a different color as well. Or I will shoot a scene without flash, one color, then use flash and it either warms it or cools it.
I really don't understand this aspect of photography and would love to hear from anyone that can explain.
I really don't understand this aspect of photography and would love to hear from anyone that can explain.
There are two things going on:
Exposure
White balance.
If you shoot manual exposure and manual flash you will get a controllable, consistent exposure. It will be the same every time.
If you shoot anything auto....then you are left wondering what the camera did this time (to me it's not worth it...it's frustrating. It takes more time to track down what went wrong than to shoot in manual in the first place.)
As for the color; that's the camera deciding on white balance and it makes a slightly different decision every time you hit the shutter. That's why using a grey card or color checker and manual white balance and manual exposure are so valuable in my opinion; you can take 25 pictures of a room in a house (or more than one room I guess) and all have the same white balance and all are exposed nicely. What's left in Lightroom is minimal instead of major surgery.
Oct 27, 2015 09:55:05 #

wayne-03 wrote:
I give up.
Too bad for once someone gave a clear explanation that needed not to be picked apart simply because using JPG compression throws a monkey wrench into the histogram.
Oct 29, 2015 00:29:08 #
The ambient light in a room has a certain color temperature depending on the light source. (Sometimes it can be a mix of temperatures with incandescent, florescent and natural light) The flash unit has a color temperature, close to that of daylight. If there is a significant difference between the color temp of the ambient and the flash and you make changes to the exposure that change the amount of ambient vs flash light, the color temperature of the scene will change hence the difference between the two photos. Photographers will often put a colored gel on the flash to make it as close a possible to the ambient light. CTO (orange) for incandescent or Plusgreen for cool florescent for example.
Nov 30, 2015 14:49:40 #
gvarner
Loc: Central Oregon Coast
Moose wrote:
Attached are two pictures shot using my Panasonic ... (show quote)
I use manual, 1/200, f4, ISO 400, TTL flash on or off camera. Then adjust ISO if needed to reach out a little farther. Indoors the TTL will properly light the subject regardless of ambient light. Outdoors, if you can sync flash to higher shutter speeds, you can use that feature to make backgrounds go dark. My D7000 can be set to sync at 1/8000. Even bright days go dark.
Dec 9, 2015 18:30:23 #

I realize that this is an older thread, but I just ran across it and have some answers if anyone or the OP is still interested.
Flash photography in the various automatic modes can be intrinsically problematic. For straight casual shots with an on- camera flash unit or perhaps a simple 2 light programmed system, things like party shots and simple portraits, the results can be pretty decent and somewhat more predictable as to color quality, exposure accuracy and the general quality of the image.
Once, however, you begin to attempt things like interior architectural shots, mixed lighting situations and other more specialized scenarios, different and more advanced techniques have to be employed to obtain better imagery. Much of theses requirements are beyond the scope of fully automatic and programmed exposure systems and therefore, manual mode must be employed. It may sound rather complex but with a few tips and knowing what to look for in a scene can bring good results with just a little more effort.
To simplify things from the start, portraits, unlike interior shots, are fairly simple when it comes to color balance and tone. With electronic flash or any other straightforward and unmixed light source, all you are looking for is a nice accurate skin tone or color. If there is a slight imbalance, it is best to err on the warm side.
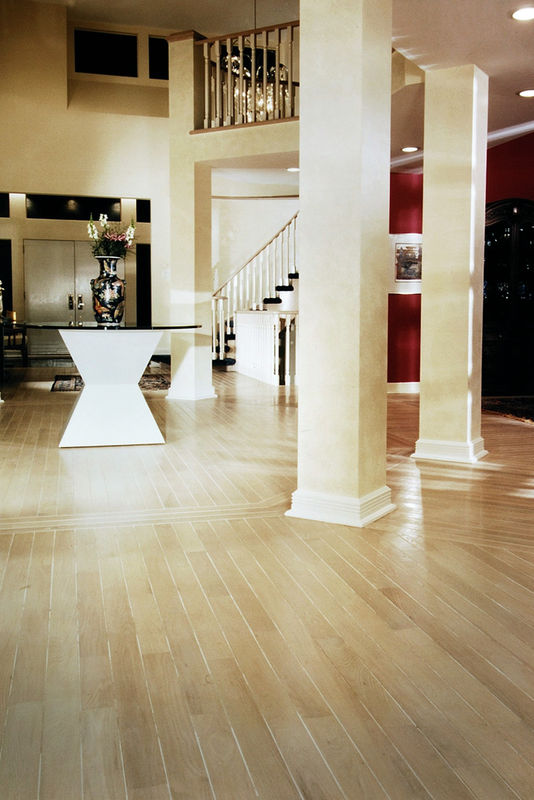
In the olden days, interior and furniture photography was usually done with complex multiple lighting setups, oftentimes in studio environments and even nowadays, there are large specialized studios that employ set designers and carpenters and build sets, creating room interiors and lighting each article of furniture or detail in the room in a separate but comparable manner. Nowadays, however, for budgetary and aesthetic reasons, a more natural approach is preferred by art directors, clients, and architects. As a non-professional, you can use some of theses more simplified methods can be applied.
The mood of a room setting depends on the natural light sources designed into the interior. It could be natural daylight entering the room through the windows or especially at dusk or at night, by lamps, chandeliers, wall sconces, spotlights in the ceiling or indirect lighting built into the perimeter of the room. There could be a mix of lighting types as to color temperature, but there is usually one more dominant source.
If it is artificial light provided by incontinent or fluorescent lamps, your camera's auto white balance can pick it up and adjust for it. I may be possible to shoot with available light only but if you need to fill in the shadow areas more, all you need to do is place the same kind of light source, perhaps just an unshaded lamp with a bare light bulb or one of those coiled fluorescent, same as the ones in the existing lights, and shoot away- no flash needed!
In the case of daylight coming in through windows, the same procedure holds true except the fill can be supplied by your flash unit, preferably bounced off a back wall or the area where the ceiling meets the wall behind the camera. Don't aim the flash unit in the forward bounce position or it will likely overexpose the ceiling and possibly the foreground. The flash should yield about 2 f/stops below the ambient light source. The flash will usually blend well (color wise) with natural light and lamps or areas lighted by artificial light will be more on the yellow/red side but that is usually not objectionable.
Of course, this is a very simplified system but can yield very pleasant and acceptable results. There are more complicated methodologies, but they are very painstaking and require specialized equipment and materials. You will need a steady tripod in that some conditions may require small apertures and long exposures in order to gain more depth of field so that everything in the room is in acceptable focus.
Some other tips on your image: You have quite a bit of linear distortion- that is caused by using a wide angle lens and tilting the camera up or down in order to get everything you want to include in the frame. This kind of distortion makes the walls look crooked or like the are falling over forward or backward. In more advanced and professional work, some of theses issues are solved by the use of specialized cameras and accessories with enables camera movements that compensate for theses distortions. With a simple DSLR, there is an easy remedy. You measure or estimate the height of the ceiling (the distance between the floor and the ceiling) and simply place the camera a the halfway height. An 8' ceiling will require a 4' camera height. Then- do not tilt the camera up or down and if you have too much floor or ceiling in the frame, you can correct that in cropping.
Lastly, when you are doing a room shot, you can get a bit more depth in your image by slightly under-lighting the foreground so that the viewer's eye tends to want to walk into the room. If there is a fireplace in the shot- light it up.
Attached is an image using available light and a mild fill.
Hope this helps! Ed
Flash photography in the various automatic modes can be intrinsically problematic. For straight casual shots with an on- camera flash unit or perhaps a simple 2 light programmed system, things like party shots and simple portraits, the results can be pretty decent and somewhat more predictable as to color quality, exposure accuracy and the general quality of the image.
Once, however, you begin to attempt things like interior architectural shots, mixed lighting situations and other more specialized scenarios, different and more advanced techniques have to be employed to obtain better imagery. Much of theses requirements are beyond the scope of fully automatic and programmed exposure systems and therefore, manual mode must be employed. It may sound rather complex but with a few tips and knowing what to look for in a scene can bring good results with just a little more effort.
To simplify things from the start, portraits, unlike interior shots, are fairly simple when it comes to color balance and tone. With electronic flash or any other straightforward and unmixed light source, all you are looking for is a nice accurate skin tone or color. If there is a slight imbalance, it is best to err on the warm side.
In the olden days, interior and furniture photography was usually done with complex multiple lighting setups, oftentimes in studio environments and even nowadays, there are large specialized studios that employ set designers and carpenters and build sets, creating room interiors and lighting each article of furniture or detail in the room in a separate but comparable manner. Nowadays, however, for budgetary and aesthetic reasons, a more natural approach is preferred by art directors, clients, and architects. As a non-professional, you can use some of theses more simplified methods can be applied.
The mood of a room setting depends on the natural light sources designed into the interior. It could be natural daylight entering the room through the windows or especially at dusk or at night, by lamps, chandeliers, wall sconces, spotlights in the ceiling or indirect lighting built into the perimeter of the room. There could be a mix of lighting types as to color temperature, but there is usually one more dominant source.
If it is artificial light provided by incontinent or fluorescent lamps, your camera's auto white balance can pick it up and adjust for it. I may be possible to shoot with available light only but if you need to fill in the shadow areas more, all you need to do is place the same kind of light source, perhaps just an unshaded lamp with a bare light bulb or one of those coiled fluorescent, same as the ones in the existing lights, and shoot away- no flash needed!
In the case of daylight coming in through windows, the same procedure holds true except the fill can be supplied by your flash unit, preferably bounced off a back wall or the area where the ceiling meets the wall behind the camera. Don't aim the flash unit in the forward bounce position or it will likely overexpose the ceiling and possibly the foreground. The flash should yield about 2 f/stops below the ambient light source. The flash will usually blend well (color wise) with natural light and lamps or areas lighted by artificial light will be more on the yellow/red side but that is usually not objectionable.
Of course, this is a very simplified system but can yield very pleasant and acceptable results. There are more complicated methodologies, but they are very painstaking and require specialized equipment and materials. You will need a steady tripod in that some conditions may require small apertures and long exposures in order to gain more depth of field so that everything in the room is in acceptable focus.
Some other tips on your image: You have quite a bit of linear distortion- that is caused by using a wide angle lens and tilting the camera up or down in order to get everything you want to include in the frame. This kind of distortion makes the walls look crooked or like the are falling over forward or backward. In more advanced and professional work, some of theses issues are solved by the use of specialized cameras and accessories with enables camera movements that compensate for theses distortions. With a simple DSLR, there is an easy remedy. You measure or estimate the height of the ceiling (the distance between the floor and the ceiling) and simply place the camera a the halfway height. An 8' ceiling will require a 4' camera height. Then- do not tilt the camera up or down and if you have too much floor or ceiling in the frame, you can correct that in cropping.
Lastly, when you are doing a room shot, you can get a bit more depth in your image by slightly under-lighting the foreground so that the viewer's eye tends to want to walk into the room. If there is a fireplace in the shot- light it up.
Attached is an image using available light and a mild fill.
Hope this helps! Ed
Dec 25, 2015 19:28:19 #
gvarner
Loc: Central Oregon Coast
This will work for 95% of your flash shots as long as it is a TTL flash:
Manual mode
ISO 400
1/200 sec
F4
The f stop and ISO control subject exposure. Shutter speed controls (affects?) ambient light. I usually start with this and then adjust as needed. With the high shutter speed, ambient light indoors won't be an issue so subject motion isn't much of an issue, the flash freezes it. I just got a set of Yongnuo radio flash triggers that will allow off camera TTL function with my Speedlight. Anxious to see how that works.
Dec 25, 2015 19:51:40 #
gvarner
Loc: Central Oregon Coast
This will work for 95% of your flash shots as long as it is a TTL flash:
Manual mode
ISO 400
1/200 sec
F4
The f stop and ISO control subject exposure. Shutter speed controls ambient light. I usually start with this and then adjust as needed. With the high shutter speed, ambient light indoors won't be an issue so subject motion isn't much of an issue, the flash freezes it. I just got a set of Yongnuo radio flash triggers that will allow off camera TTL function with my Speedlight. Anxious to see how that works.
If you want to reply, then register here. Registration is free and your account is created instantly, so you can post right away.