Tutorial - Splintered Glass Effect
Aug 11, 2015 08:45:51 #

Over the past few weeks I have developed a "style" I call the Splintered Glass Effect. It is very similar to an older form, Cubism (although the similarities were coincidental, not intentional). A number of folks have asked how this was done. This tutorial gives a short description of the workflow I use to produce these images.
1. Choose an appropriate subject, usually a photo that has a simple colorful background which is not "too" busy, and a foreground subject that holds interest.
2. Clean up the original photo before adding the Splintered Glass Effect. In my case, I remove small distractions from the photo by using the Lasso Took, then Fill at 100% with Color Adaptation checked. I then use NIK Viveza and Piccure + to sharpen the image. Finally, I applied a layer of Image>Adjustments>Photo Filter>Cooling Filter (80) to give the leaves a cooler look. I then saved the image as SplinteredGlassTutorial_Original.jpg. Leave Photoshop open with this version still in the workspace.
3. Open FotoSketcher 3.10. Execute File>Open a Drawing>SplinteredGlassTutorial_Original.jpg. In the Drawing Parameters menu, I choose Drawing Style "Emergence 2", set the other parameters to taste, then click on the Draw Icon. At this point, the pane to the right will begin to "render" the original photo in incremental steps. The menu at the top left will change to read "Interrupt Process (Esc), Save Drawing As. In the bottom right hand corner, there is a display of the completion percentage for the rendering process. When it gets to 18%, I click on the menu item "Interrupt Process". I then use the File Menu to Save the drawing as>SplinteredGlassTutorial_Original_FotoSketcher.jpg
4. Back in Photoshop, open this new file. File>Open>SplinteredGlassTutorial_Original_FotoSketcher.jpg. When the image is open, do a Ctrl-A, or Select>All to select the image. Do an Edit>Copy to copy the image to the clipboard. At this point you can Close the file SplinteredGlassTutorial_Original_FotoSketcher.jpg. Return to the file you left open before, SplinteredGlassTutorial_Original.jpg Do an Edit>Paste. This will place the Splintered Glass Effect image in a layer above the Background image. Now, I create a mask so that I can show my main subject against the splintered glass background. To do this, click on the Add Vector Mask icon in the Layers panel (rectangular shape with an oval in the middle). This will add a white layer mask to the right of the second layer. To mask the image so that it shows elements from the background layer, use the Brush Tool (Mode: Normal; Opacity: 86%; Flow: 100%), make sure the Foreground Color is set to Black, then "paint over" the areas that you want to display in the final image. Don't worry if you go outside the lines .... you can always cover it up later by switching the Foreground Color to White, and painting over the excess. Once you have gotten it the way you like it, flatten the image (Layer>Flatten Image)
5. Add whatever effects you like to finalize the "look". In my case I used a number of layers - Smart Photo Editor (Softblur and Canvas), Topaz ReStyle (Night Collection, Midnight Waterfalls - for a darker, bluish cast), and Topaz Star Effects (Jewel Sparkle II - to add some highlights to the flower blossoms).
1. Original photo for comparison
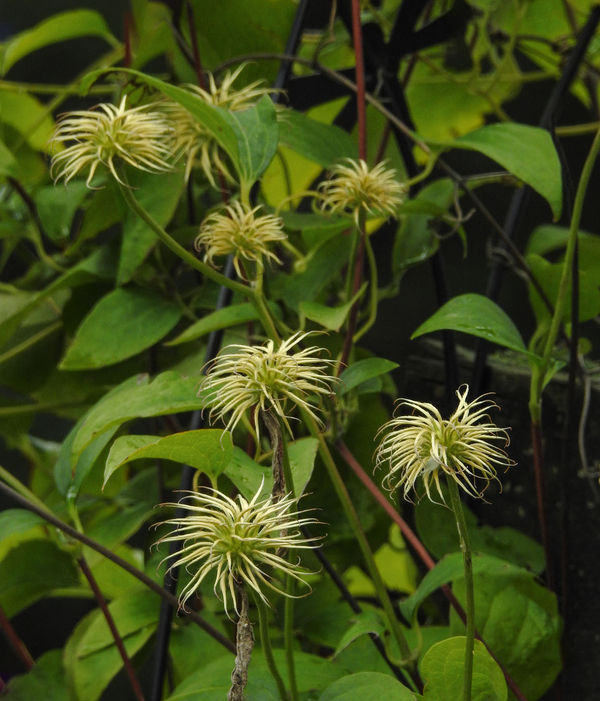
(Download)
2. A touch of NIK Viveza and Piccure + (Sharpening)
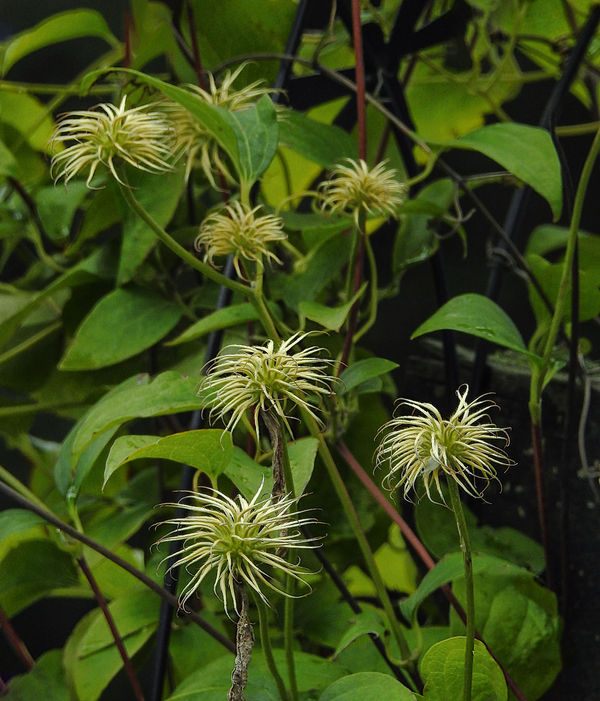
(Download)
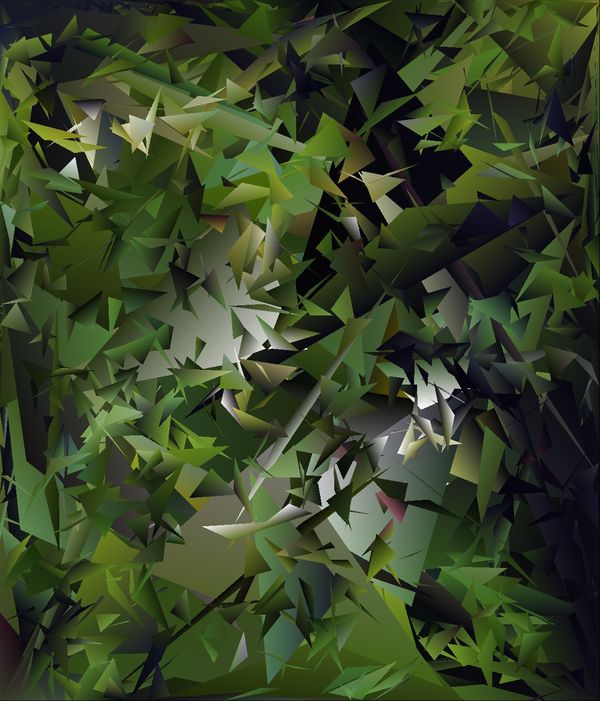
3. FotoSketcher rendition, 18%
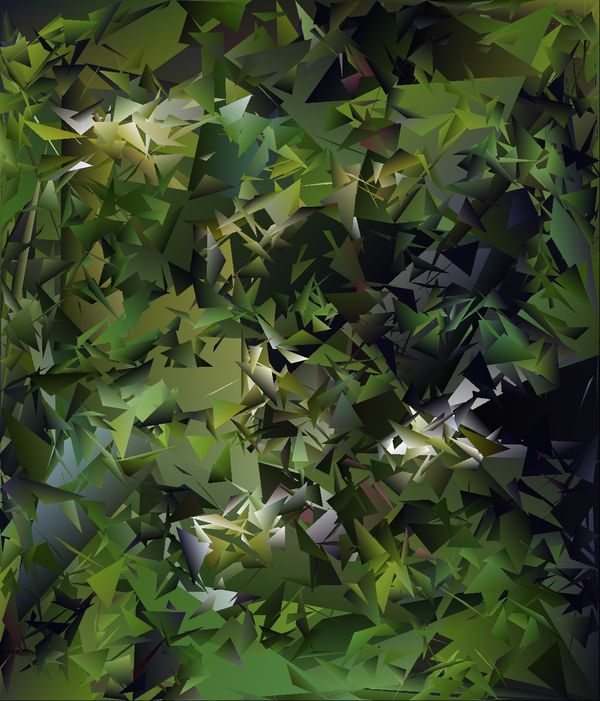
(Download)
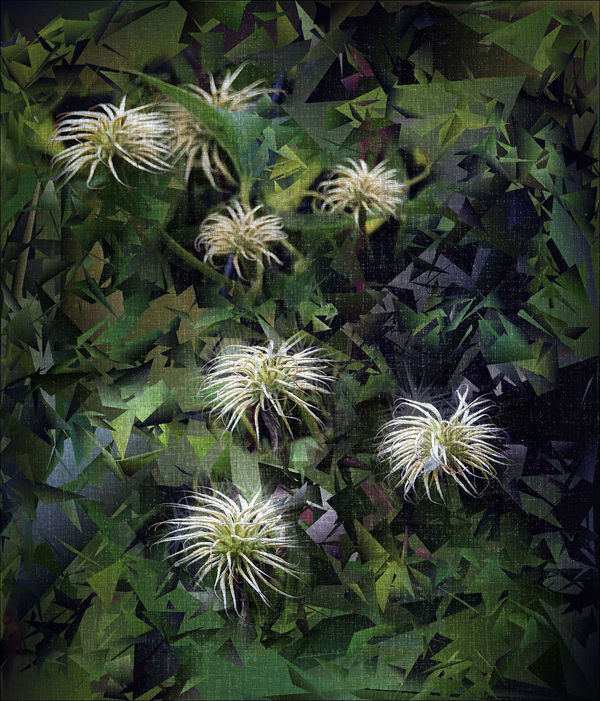
4. FotoSketcher background, masked to show flowers
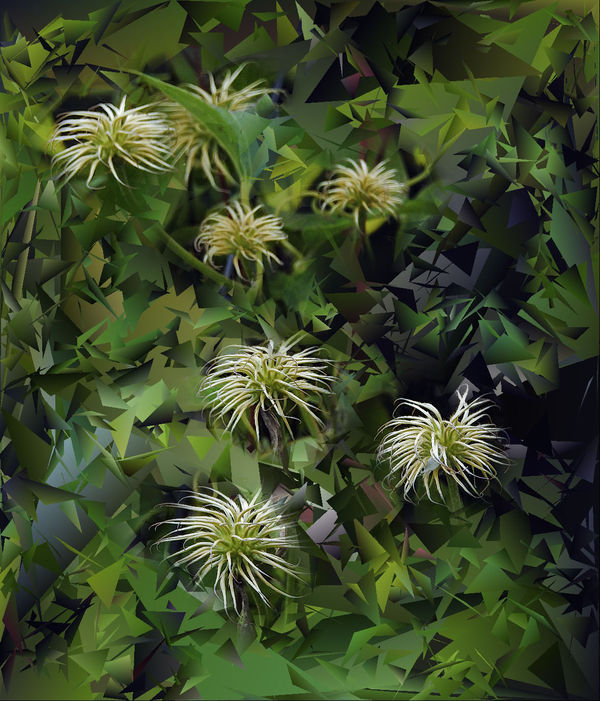
(Download)
5. Post processing in Smart Photo Editor, Topaz Restyle and Topaz Star Effects
(Download)
Aug 11, 2015 09:42:02 #

Thanks for sharing all this Bob... Very interesting. For the record I prefer #4
Aug 11, 2015 09:43:10 #

BOB, you are corrupting all of us who take perfect photos perfectly composed and free of noise and other defects right out of our cameras. It is thus, being part of the Republican Conservative platform committee for 2016... "Our people will refrain from frivolous photo manipulations such as those found in programs such as found on:"
http://www.fotosketcher.com/download-fotosketcher/
Others found on the list compiled by the Moral Decency group are JIXIPIX programs and plugins and Dynamic Autopainter and compaion PhotoReactor
http://www.mediachance.com/dap/
http://jixipix.com/downloads.html
And... of course, Topaz is another evil... See you at a Webinar BOB... :thumbup: :)
Aug 11, 2015 10:00:10 #
FrodoBaggins wrote:
Thanks Michael. I suspect this process is a bit longer than most folks are willing to undertake. This is what I like about being retired - I have all the time in the world.Thanks for sharing all this Bob... Very interesting. For the record I prefer #4
Aug 11, 2015 10:03:11 #
dpullum wrote:
I have the utmost respect for ANYONE who can create a perfect image SOOC dpullum. I'm not one of them (but would that I were).BOB, you are corrupting all of us who take perfect photos perfectly composed and free of noise and other defects right out of our cameras.
Aug 11, 2015 11:08:37 #

Really interesting even if I don't have the skills or all of the software you mentioned. While Michael and I often agree I have to say that this time I very much like #5.
Aug 11, 2015 11:37:17 #
MattPhox wrote:
Thanks Matt. The nice thing about plugins is that after you've collected them for 3 or 4 years they start to add up. Many of these I discovered because someone else had used them on UHH and I thought enough of their results that I purchased the software. I certainly didn't start out this way. There was a time when I didn't even want to touch Photoshop because the learning curve was so steep. But by taking baby steps along the way I've finally gotten to a point where I am more or less comfortable with the product.Really interesting even if I don't have the skills or all of the software you mentioned. While Michael and I often agree I have to say that this time I very much like #5.
Aug 11, 2015 14:08:55 #
Thanks for sharing your technique. Some of these have been really interesting, and nice to know how you did them. Very creative of you.
Aug 11, 2015 14:33:09 #
Treepusher wrote:
Thanks Randy. Perhaps I can convince you to show us how to use Topaz Glow to enhance cat photos?Thanks for sharing your technique. Some of these have been really interesting, and nice to know how you did them. Very creative of you.
Aug 11, 2015 14:33:14 #
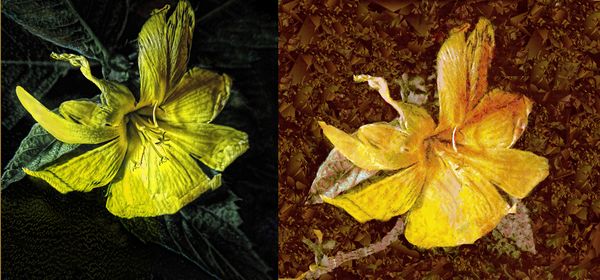
BOB, thank you, the use of your tutorial and Topaz Restyle and Clarity, have lead to the modification of a photo as shown... left as was right the mod. Thank you. Now I no longer need to take any more photos... just modify the ones I have... each photo will yield hundreds of unique masterpieces. :thumbup:
BOB Said.... "I have the utmost respect for ANYONE who can create a perfect image SOOC dpullum. I'm not one of them (but would that I were)."
BOB, I always enter my shots at the CClub as "Altered Reality" catagory. Never as SOOC. So many of the SOOC in the UHH Gallery need Topaz Detail and Clarity to bring them to life.... do they not realize that SOOC is not natural, only 2D not 3D.
On the left was "Beauty Fades" on the right "Beauty Reborn."
Aug 11, 2015 14:56:09 #
dpullum wrote:
Actually dpullum, I think you need to get out and shoot some more, even if just give your Topaz inbox a wider variety of material to choose from. Now I no longer need to take any more photos... just modify the ones I have... each photo will yield hundreds of unique masterpieces.
Aug 11, 2015 16:55:07 #
:thumbup: Pretty
But, how did the leaves which are so large turn into a multitude of small triangles?
I think I might like large ones the size of the leaves, but not really sure.
But, how did the leaves which are so large turn into a multitude of small triangles?
I think I might like large ones the size of the leaves, but not really sure.
Aug 11, 2015 17:00:33 #
robertjerl wrote:
I suppose if I had interrupted the flow at about the 12% mark it would have displayed much larger triangles, but I think they would have been TOO large. I chose a couple different interrupt points and liked this one best.:thumbup: Pretty
But, how did the leaves which are so large turn into a multitude of small triangles?
I think I might like large ones the size of the leaves, but not really sure.
But, how did the leaves which are so large turn into a multitude of small triangles?
I think I might like large ones the size of the leaves, but not really sure.
Aug 11, 2015 18:26:33 #
Bob Yankle wrote:
I suppose if I had interrupted the flow at about the 12% mark it would have displayed much larger triangles, but I think they would have been TOO large. I chose a couple different interrupt points and liked this one best.
I kind of like this one without the flowers. It might make a great camo pattern.
Aug 11, 2015 19:23:02 #
robertjerl wrote:
I think the whole point of a tutorial is to give you enough information to pick and choose the settings you like best. I'm quite happy with the ones I chose to illustrate the process.I kind of like this one without the flowers. It might make a great camo pattern.
If you want to reply, then register here. Registration is free and your account is created instantly, so you can post right away.