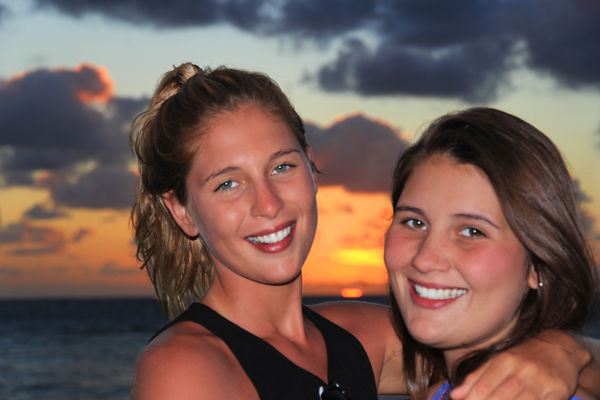
realistic skin tones
Jan 31, 2014 22:10:35 #
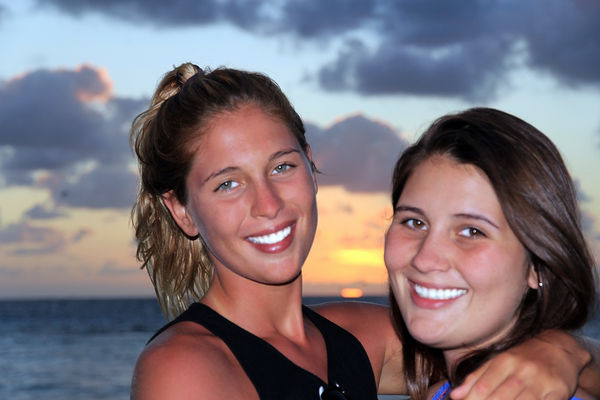
In Lightroom 5 the Highlights slider does a great job of removing glare. You can use the adjustment brush to apply it selectively and/or adjust exposure.
The HSL individual color sliders can be helpful with skin tones (red and orange usually), but they won't help this picture since they'll affect the sunset and aren't available with the adjustment tool.
I think your skin tones are fine, but I tend toward saturated colors. You can use the adjustment brush on each daughter to individually adjust the saturation (less on the left and more on the right), exposure, clarity. I would use the adjustment brush to select the background to increase the saturation for the sky and sunset.
Feb 2, 2014 16:39:31 #
drk64
Loc: Washington State
OK, I had to look up my password to UHH, I don't usually respond to too many but I just had to try. This took me approx. 8-10 minutes in portrait professional.

Feb 2, 2014 16:41:53 #

drk64 wrote:
OK, I had to look up my password to UHH, I don't usually respond to too many but I just had to try. This took me approx. 8-10 minutes in portrait professional.
That's excellent-- I am not familiar with portrait professional-- I'll google it.
Thanks
Bruce L
Feb 2, 2014 16:47:15 #
drk64
Loc: Washington State
It's about $40 US. You can spend hours with the program, my wife has tamed me down a bit. I used to go way overboard, because you can virtually change everything in the picture from eye color, hair color and skin. Lots of fun but I will tell you if you don't know the people in the picture it's a little intimidating. Thank you for letting me try.
Feb 2, 2014 16:49:14 #
drk64 wrote:
It's about $40 US. You can spend hours with the program, my wife has tamed me down a bit. I used to go way overboard, because you can virtually change everything in the picture from eye color, hair color and skin. Lots of fun but I will tell you if you don't know the people in the picture it's a little intimidating. Thank you for letting me try.
I had a quick look on the internet-- looks like fun-- I'll get it. Thanks for the tip.
Cheers,
Bruce L
Feb 11, 2014 00:39:35 #

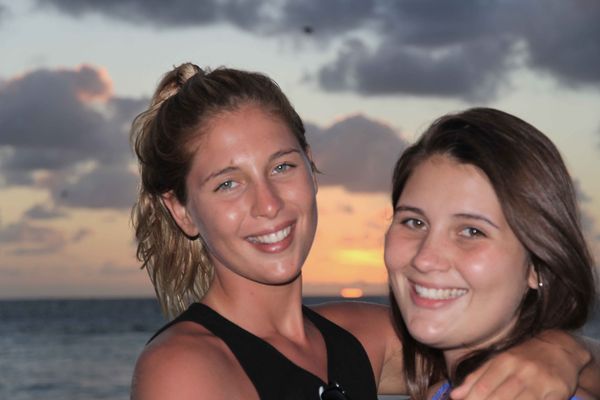
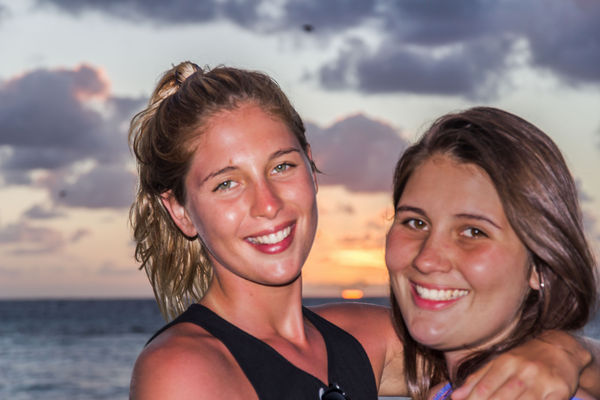
Hi DryDock, I tried to remove the shine and do a little sharpening. Not sure if this is what you are looking for. Just used the clone & sharpened. Your girls are beautiful!
Feb 11, 2014 04:11:22 #
Mirage wrote:
Hi DryDock, I tried to remove the shine and do a little sharpening. Not sure if this is what you are looking for. Just used the clone & sharpened. Your girls are beautiful!
Thanks Mirage-- looks good
Feb 14, 2014 22:52:32 #
Feb 16, 2014 10:58:16 #

Bill Houghton wrote:
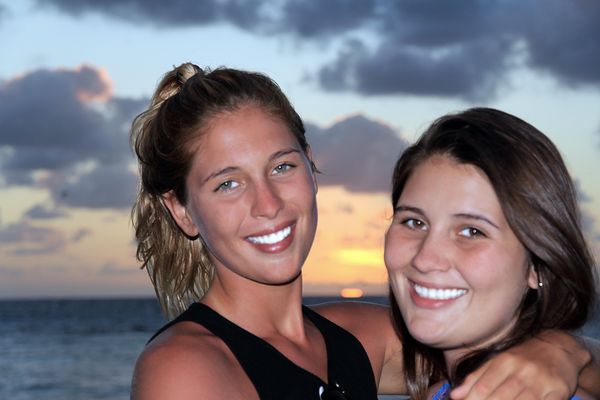
Another view without the Pimples
Nice job Bill but I think you should have left the catchlights in their eyes. AS someone else mentioned, it is out of focus but I'm not sure if that's a drawback. Elements has a tool for softening focus on portraits so it's a common practice, especially on women.
Also, am I the only one that notices the two massive dust spots in the sky? Maybe they're out of focus birds but they look like black dust spots.
Feb 19, 2014 10:58:20 #

drydock wrote:
I am struggling to get realistic skin tones in lig... (show quote)
These two poor young women have been killed twice and then some more...
Head on flash as fill is not a good idea...
Raw processing is not simple 'convert' despite what some may think.
Depending on the color space sRGB, RGB and ProRGB* you need to adjust the gamma value if not set. it differs from one to the other, something rarely mentioned but critical, especially in mid-tones like the skin...
W3.org wrote:
http://www.w3.org/Conferences/WWW4/Papers/53/gq-gamma.htmlIf an image is under or over gamma corrected, this also affects the colour balance. Over correction (in addition to making mid-tones too light) shifts colours towards neutral grey, while under correction (in addition to making mid-tones too dark) shifts colours towards the display primaries.
Reading:
http://www.cambridgeincolour.com/tutorials/gamma-correction.htm
http://www.cgsd.com/papers/gamma_intro.html
* Developed by Kodak and sometime referred to as 'fantasy' or 'Sciences Fiction' color space.
Mar 1, 2014 00:20:27 #
You already received good information on the correct use of flash with portraits.
When you're trying to fix an existing photo, the simplest, least complicated and time consuming types of edits are the best. I think Mirage's sample is the best so far and does a nice job of rendering a more natural look. The only thing I thought needing a tiny little adjustment is the skin is a bit over-saturated - so I merely toned down the "vibrancy" (not the saturation). Making adjustments to skin tones using Saturation levels has a tendency to change the natural coloring, while vibrancy seems to leave them unchanged.
When you're trying to fix an existing photo, the simplest, least complicated and time consuming types of edits are the best. I think Mirage's sample is the best so far and does a nice job of rendering a more natural look. The only thing I thought needing a tiny little adjustment is the skin is a bit over-saturated - so I merely toned down the "vibrancy" (not the saturation). Making adjustments to skin tones using Saturation levels has a tendency to change the natural coloring, while vibrancy seems to leave them unchanged.
Mar 1, 2014 21:39:30 #
There is a Topaz plug in for Lightroom and PS called Clarity that has a Skin even preset that would even out the skin tones nicely.
Mar 26, 2014 20:45:08 #
I love the sunset so I wanted to play with it too. Here's mine.
May 20, 2014 12:52:06 #

A trick that I've seen used in the past is to select the over-flashed parts and use the WB and tint sliders to bring them closer to the un-flashed skin. This works especially well if the flash introduced a blue tint, where a nudge of the WB slider to the right reduces the excess blue. Your pic didn't seem to have that problem, though, and I found that a mere single notch to the right (+1) was enough. For my edit I also nudged the tint slider right three notches (+3).
Other adjustments to the selection were Exposure -0.1, Highlights -100. I also did a a global adjustment to Vibrance of -5.
I'm not offering this as a complete edit - just an attempt to equalise the skin tones of the two girls. I suspect that the nearest girl has less of a suntan than the other, in addition to getting more flash.
-
May 25, 2014 22:10:36 #
Los-Angeles-Shooter
Loc: Los Angeles
The skin color isn't that bad. The real issue is that you used on camera flash without a diffuser or any other attempt at making it less harsh. Hence the shiny shin with unattractive specular highlights. If you must use flash you gotta de-uglify it by diffusing it. And maybe warm the flash up a little with a filter such as amber. If you want to see the difference between on-camera unimproved flash, and a studio strobe with diffuser, see this photo.
If you want to reply, then register here. Registration is free and your account is created instantly, so you can post right away.