Tutorial - Creating a Textured Gradient Background for Animal Portraits
Apr 9, 2017 17:23:11 #

I recently finished publishing a series of dog photos and portraits from a Dog Show in Raleigh a few weeks ago. Some folks asked how I created the textured backgrounds. This tutorial will give a brief outline of how these were done.
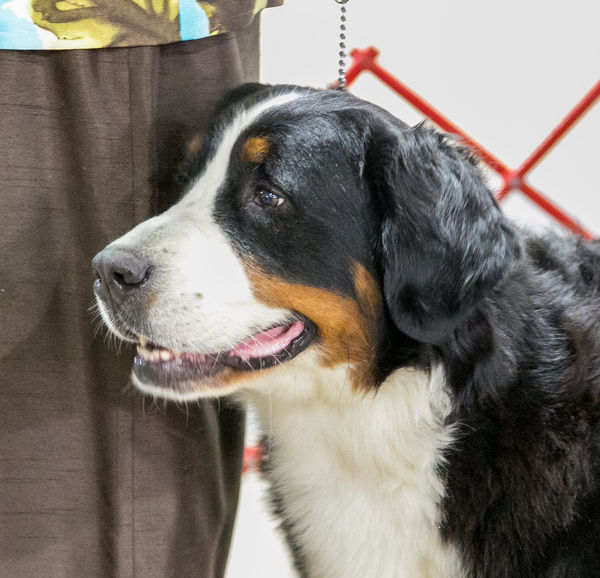
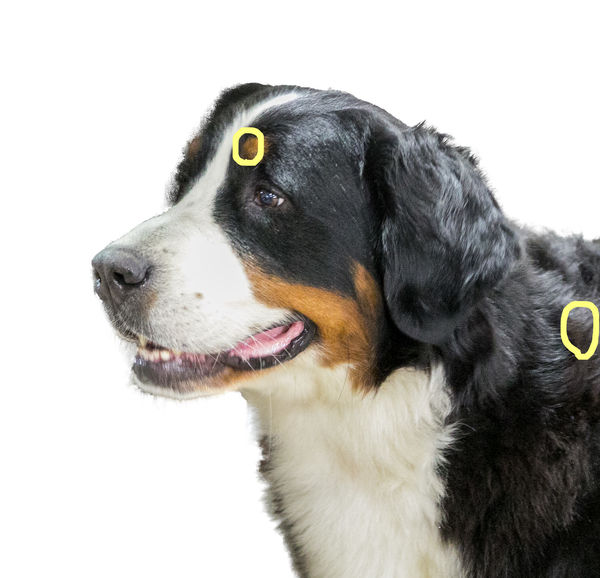
1. Start with an Original Photo. This image had already been cropped considerably just to concentrate on the part of the dog that would make a pleasing portrait.
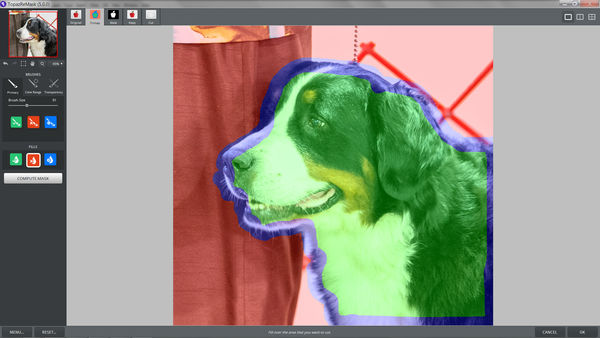
2. Select just the dog. This can be done a number of ways ...... I chose to use Topaz Remask 5 for the task
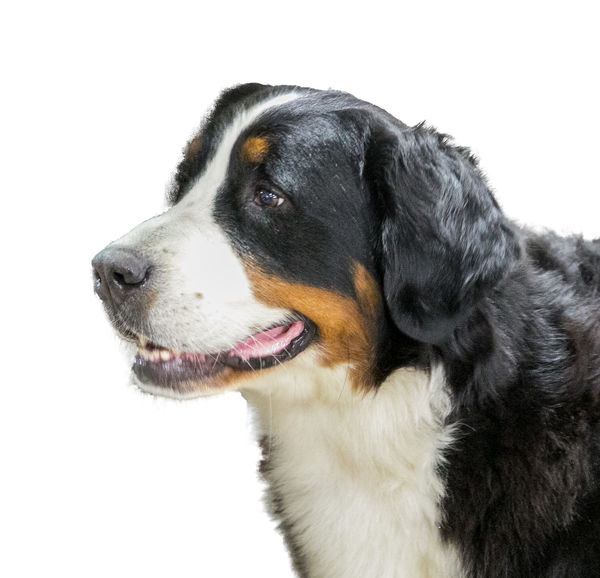
3. After masking, you will end up with a new layer that has just your masked subject on it with a transparent background. It appears white here, but in the Layer stack, it will be transparent
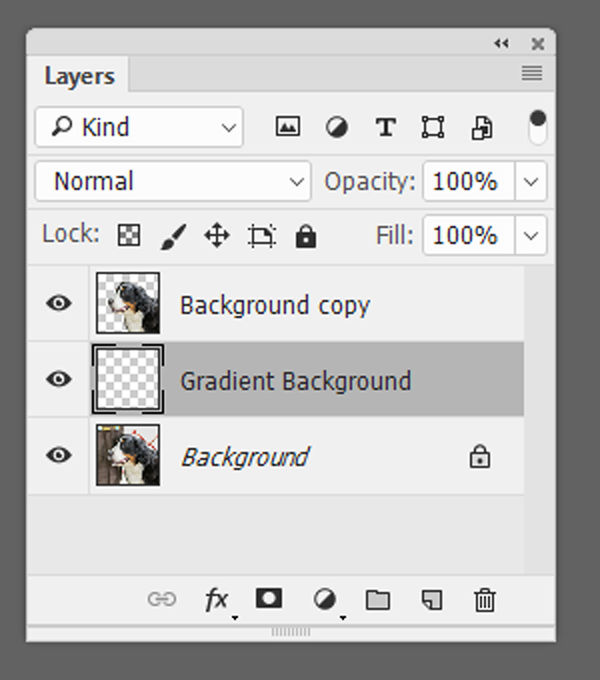
4. Create a New Layer that will hold the Textured Gradient Background. To get the layer, click on the Background Layer to make it Active, then execute Layer>New>Layer. I named this Layer "Gradient Background"
5. Choose colors to be used as a starting point for the colors of the background. These colors are best selected from within the image itself, so as to closely match the hues and tones of the original. I selected the Top Layer with the dog only, then used the Eyedropper tool and selected a light color from a patch above the dog's eye and a darker, brownish color from his coat. Later, I used the Foreground/Background color picker to adjust the colors to my liking
6. Select the Background Gradient Layer to make it active. For this background, I chose to use the Gradient Tool, [Mirrored Image preset], then dragged a diagonal line from just in front of the dog's ear down and left to under its jaw. This created a diagonal line behind the dog and wide enough to highlight some of its coat. By keeping the Top Layer visible, you can see where the background will appear, and perhaps delete your original gradient attempt if necessary and try again. It normally takes me 3 or 4 tries before I'm happy with the result.
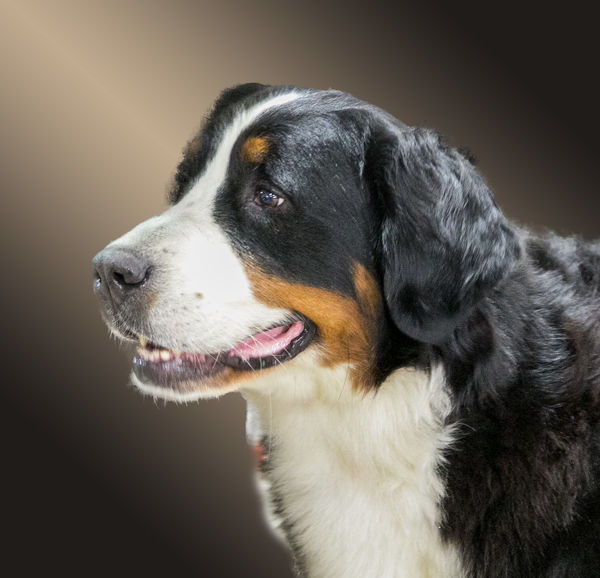
7. Click on the Gradient Background layer and Execute Filter>Anthropics>Smart Photo Editor. Select the [Grungy Texture 007 preset] and decrease the Opacity to about 40%. The click on File>Save and Close
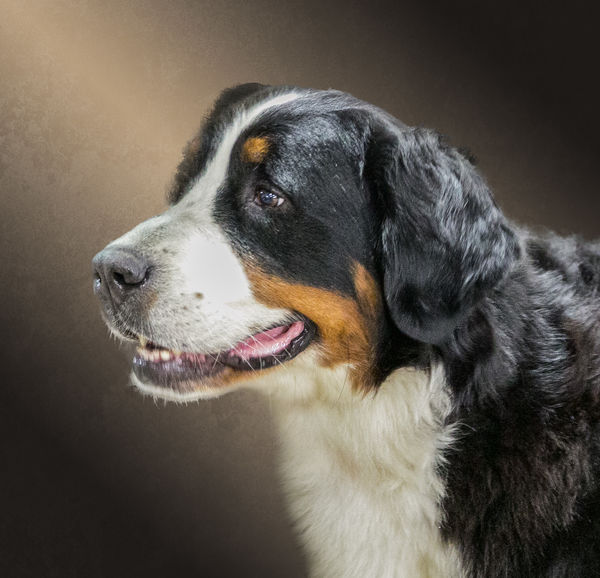
8. Create a Layer Mask on the Top Layer (Dog Image), and use the Paint Brush tool set to Black to paint over the edges of the dog where it meets the background. This will blend the two layers together, smoothing the edges. I start out at about 23% Opacity, with a fairly small brush, and move the opacity up to about 80 if I need to obliterate more of the original and cover it with background gradient.
9. Once the edges are blended, I normally Flatten the Image (Layer>Flatten Image), then call NIK Color Efex Pro and use the [Pro Contrast and Darken/Lighten Center] presets to create the correct contrast and darken the edges (but without using a vignette).
10. I use two more adjustment layers - a. On1 Adjustment Brush [Detail] to paint over the dog's eye and make it very sharp and bright, then b: Topaz Texture Effects to apply a texture at low capacity to give the image a painting effect. I would then have saved this image and labeled it "Swiss Mountain Dog Portrait".
1. Start with an Original Photo. This image had already been cropped considerably just to concentrate on the part of the dog that would make a pleasing portrait.
2. Select just the dog. This can be done a number of ways ...... I chose to use Topaz Remask 5 for the task
3. After masking, you will end up with a new layer that has just your masked subject on it with a transparent background. It appears white here, but in the Layer stack, it will be transparent
4. Create a New Layer that will hold the Textured Gradient Background. To get the layer, click on the Background Layer to make it Active, then execute Layer>New>Layer. I named this Layer "Gradient Background"
5. Choose colors to be used as a starting point for the colors of the background. These colors are best selected from within the image itself, so as to closely match the hues and tones of the original. I selected the Top Layer with the dog only, then used the Eyedropper tool and selected a light color from a patch above the dog's eye and a darker, brownish color from his coat. Later, I used the Foreground/Background color picker to adjust the colors to my liking
6. Select the Background Gradient Layer to make it active. For this background, I chose to use the Gradient Tool, [Mirrored Image preset], then dragged a diagonal line from just in front of the dog's ear down and left to under its jaw. This created a diagonal line behind the dog and wide enough to highlight some of its coat. By keeping the Top Layer visible, you can see where the background will appear, and perhaps delete your original gradient attempt if necessary and try again. It normally takes me 3 or 4 tries before I'm happy with the result.
7. Click on the Gradient Background layer and Execute Filter>Anthropics>Smart Photo Editor. Select the [Grungy Texture 007 preset] and decrease the Opacity to about 40%. The click on File>Save and Close
8. Create a Layer Mask on the Top Layer (Dog Image), and use the Paint Brush tool set to Black to paint over the edges of the dog where it meets the background. This will blend the two layers together, smoothing the edges. I start out at about 23% Opacity, with a fairly small brush, and move the opacity up to about 80 if I need to obliterate more of the original and cover it with background gradient.
9. Once the edges are blended, I normally Flatten the Image (Layer>Flatten Image), then call NIK Color Efex Pro and use the [Pro Contrast and Darken/Lighten Center] presets to create the correct contrast and darken the edges (but without using a vignette).
10. I use two more adjustment layers - a. On1 Adjustment Brush [Detail] to paint over the dog's eye and make it very sharp and bright, then b: Topaz Texture Effects to apply a texture at low capacity to give the image a painting effect. I would then have saved this image and labeled it "Swiss Mountain Dog Portrait".
1 - Original Photo
(Download)
2 - Topaz Remask 5
(Download)
3 - Masked Image with Transparent Background
(Download)
4 - Create New Layer for Gradient Background
(Download)
5 - Use Eyedoppper and Color Picker to Choose Background Colors
(Download)
6 - Diagonal Line to position Mirrored Gradient Background
(Download)
7 - Smart Photo Editor [Grungy Texture 007 preset]
![7 - Smart Photo Editor [Grungy Texture 007 preset]...](https://static.uglyhedgehog.com/upload/2017/4/9/t1-604883-orial7_smegrungetexture007.jpg)
(Download)
8 - Use Masking Tools to Blend Edges of Background and Subject
(Download)
9 - NIK Color Efex Pro [Pro Contrast and Darken /Lighten Center presets]

(Download)
10 - On1 Adjustment Brush [Detail] to Sharpen Eyes, Topaz Texture Effects for Texture - Final Image: Swiss Mountain Dog Portrait
![10 - On1 Adjustment Brush [Detail] to Sharpen Eyes...](https://static.uglyhedgehog.com/upload/2017/4/9/t1-608991-l_swissmountaindogportrait.jpg)
(Download)
Apr 9, 2017 19:10:53 #

Apr 9, 2017 19:20:23 #
MsLala wrote:
You're welcome Laura. There were a lot of folks asking about this so I took the time to write it all down.Very interesting, thanks for sharing. Laura
Apr 10, 2017 07:29:48 #
Good tutorial Bob.
When you compare the finished image with the original, it is well worth the effort.
Alan.
When you compare the finished image with the original, it is well worth the effort.
Alan.
Apr 10, 2017 07:57:02 #
Wonderful work Bob! Amazing, the difference between the original and your work of art. And thanks for sharing the tutorial. Maybe I can apply it to a picture of my LilyBean.
Apr 10, 2017 09:19:47 #
AlMac wrote:
Thank you Alan. I would definitely prefer to see the edited version as opposed to the original.Good tutorial Bob.
When you compare the finished image with the original, it is well worth the effort.
Alan.
When you compare the finished image with the original, it is well worth the effort.
Alan.
Apr 10, 2017 09:20:26 #
taj334 wrote:
Thank you Taj. It takes a while to get there, but the results are well worth the effort.Wonderful work Bob! Amazing, the difference between the original and your work of art. And thanks for sharing the tutorial. Maybe I can apply it to a picture of my LilyBean.
Apr 10, 2017 15:13:51 #
Bob, Thank you for sharing. You did a great tutorial, one that even a lot of Pro's can do.
I think it is time for you to do your own Blog site.
Don H
I think it is time for you to do your own Blog site.
Don H
Apr 10, 2017 15:33:14 #
donrosshill wrote:
Thanks for your confidence Don. I'm happy right where I am.Bob, Thank you for sharing. You did a great tutorial, one that even a lot of Pro's can do.
I think it is time for you to do your own Blog site.
Don H
I think it is time for you to do your own Blog site.
Don H
Apr 14, 2017 13:03:56 #
looks great , I'll give it a try , soon and if it works for me I'lll post the results...
Apr 14, 2017 13:14:22 #
bdk wrote:
Thanks bdk. I'd love to see the results.looks great , I'll give it a try , soon and if it works for me I'lll post the results...
Apr 19, 2017 15:53:32 #

Bob Yankle wrote:
I recently finished publishing a series of dog photos and portraits from a Dog Show in Raleigh a few weeks ago. Some folks asked how I created the textured backgrounds. This tutorial will give a brief outline of how these were done....
Snip for brevity
Dog Portrait".
Snip for brevity
Dog Portrait".
Great explanation. Thanks for writing. I wish more of us would show the "how to" more often.
Willie
Apr 19, 2017 18:16:45 #
fjrwillie wrote:
You're welcome fjrwillie. I'm with you ...... I learn many things here which I use quite often.Great explanation. Thanks for writing. I wish more of us would show the "how to" more often.
Willie
Willie
For future reference, go to "Search" and type in the phrase tutorial. There are a lot of older ones out there you may find that are still pertinent.
Mar 19, 2018 01:33:02 #
BBBruce77
Loc: Eureka, Montana
Thanks for your efforts in producing this tutorial. Love your sensitive cat and dog portraits and now I have an in depth view of how they are achieved. Thank you.
If you want to reply, then register here. Registration is free and your account is created instantly, so you can post right away.