You don't take a photograph; you make it! Ansel Adams
Sep 24, 2016 06:00:04 #

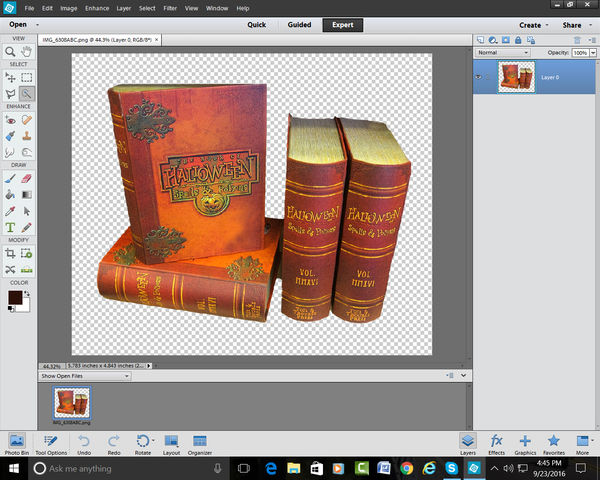
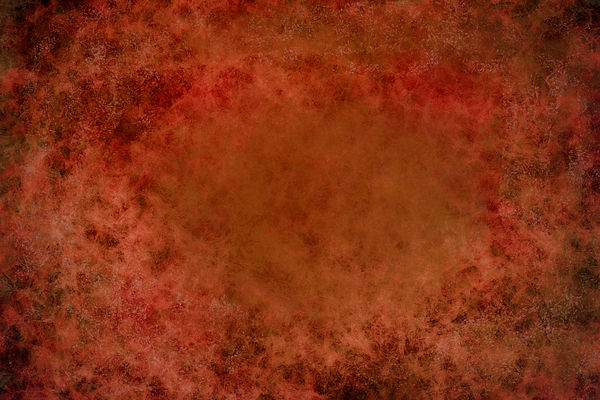
And here are the steps I took; I shot this image yesterday at a local store after getting the owner's permission. Next, I cutout the books and made it into a png. Pulled up a background by Joel Olives and, with the hue and saturation Adjustment layer, dialed it into a matching color for my books.
Than I dragged my books onto my background layer, used the transform tool to enlarge and move my books into place. Using the Levels adjustment layer, I added a layer mask and inverted it, cranked up the brightness and painted it over the books where I wanted it brightened and saved as a jpg.
Than I dragged my books onto my background layer, used the transform tool to enlarge and move my books into place. Using the Levels adjustment layer, I added a layer mask and inverted it, cranked up the brightness and painted it over the books where I wanted it brightened and saved as a jpg.
1 Original cropped 7x5x300
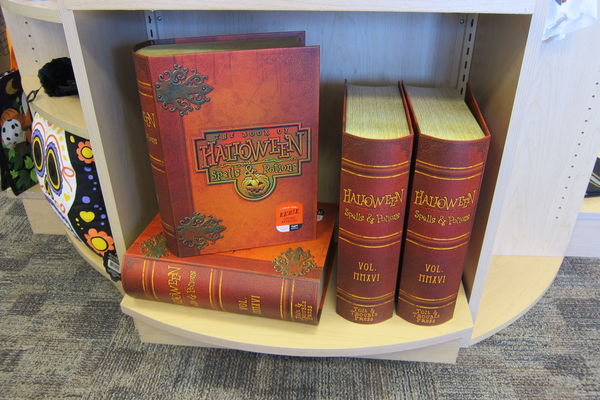
(Download)
2 Cutout books and saved as a png
(Download)
3 Used Hue and saturation ajustment to match background with books
(Download)
4 But Books and baskgorund together

(Download)
Sep 24, 2016 06:18:25 #
I'm sure some will object, but I like your effort here. You are a digital artist with proficiency in the tools of our trade, digital camera and Photoshop.
Sep 24, 2016 06:35:39 #
nikonboy wrote:
I'm sure some will object, but I like your effort here. You are a digital artist with proficiency in the tools of our trade, digital camera and Photoshop.
nikonboy, thank you for stopping by! Much appreciated! Always nice to see a new visitor!


Sep 24, 2016 06:38:13 #
Excellent art work. well explained steps you used to achieve the final image. what software did you use? Balbir
Sep 24, 2016 06:39:35 #

Sep 24, 2016 06:46:27 #

Sep 24, 2016 07:33:55 #

Very nice result.
Yesterday I watched a video where a studio photographer showed how to make an image using eight or nine exposures to capture the same bottle but using various approaches to light-painting to get different results and then he showed the final result, combining all of those images. He brushed aside the processing part with some comment about how much time he saved working at the computer by exploiting all of those different lighting techniques - which probably took as much time.
It was an interesting video and I can almost see the appeal to someone who really doesn't like computers - though I suspect combining those images took considerable time and effort on a computer. But different strokes for different folks - however you get there it is the final result that counts - and I do like your final result.
Sep 24, 2016 07:37:04 #
Balbir wrote:
Excellent art work. well explained steps you used to achieve the final image. what software did you use? Balbir
Balbir, thank you! I used PSE 12! It's always nice to see a new visitor!
Sep 24, 2016 07:37:36 #
Sep 24, 2016 07:39:28 #
rlaugh wrote:
Great work and excellent description of work done!!
Bob, thank you! This is a lot easier than it looks to some. Basic workflow steps.
Sep 24, 2016 07:46:26 #
pecohen wrote:
Very nice result. br br Yesterday I watched a vid... (show quote)
pecohen, thank you for a fine critique! You're new to my work so let me explain... I know nothing about my camera other point and shoot! I use the same Auto focus settings for every photo I take. I rely completely on software!
With no apologies!
Sep 24, 2016 07:48:51 #
Excellent work! That kind of artistry is what Photography is about in my opinion
Sep 24, 2016 08:05:09 #
sodapop wrote:
Excellent work! That kind of artistry is what Photography is about in my opinion
sodapop, you've made my day! Thank you so much! I'm convinced, Ansel's genius was more in the darkroom than with the camera. Today's darkroom is digital and, as such, it has no limits other than one's imagination!
Sep 24, 2016 08:10:25 #
And it is a lot of fun too!!!!
Snap Shot wrote:
sodapop, you've made my day! Thank you so much! I'm convinced, Ansel's genius was more in the darkroom than with the camera. Today's darkroom is digital and, as such, it has no limits other than one's imagination!
Sep 24, 2016 08:12:40 #
Good work SS, using every bit of technology available to us is no bad thing, and for me photo-art is what keeps so many millions of photographers keep coming back for more,
Geoff
Geoff
Snap Shot wrote:
And here are the steps I took; I shot this image y... (show quote)
If you want to reply, then register here. Registration is free and your account is created instantly, so you can post right away.